SDB:Installation on external hard drive
Recommended articles
Related articles
General
This article describes a way of installing openSUSE to an external hard drive. This means, we are installing it just the way you would on your internal hard drive, giving you a full operation system with a partition scheme and you own home directory etc. If you just need a USB booting system for emergency use, fully portable, for testing or whatever, you should use an live USB stick.
- For newer instructions with 13.1, see Installing openSUSE 13.1 onto an External Hard Drive.
Hardware
Before installing openSUSE to your external hard disk, you might want to check if your computer boots from USB. To make sure if your computer can load GRUB from a USB disk, you can download and install Super grub disk to a USB thumb drive. Super grub disk can be obtained from there website. Do not use the Super grub2 disk.
Non portability
Your installed system will be portable, in the sense of plugging it in any computer you want. However, one should take in account that there can be (major) differences between hardware of different computers. Your system will be configured to run on your installation computer and may fail on others. This usually can occur with difference in video cards (nVidia or Radeon) or architecture differences (x86 or x86_64).
Procedure
In general the progress is like any other installation. Just load your preferred installation method, with your USB disk plugged in. Walk trough the steps. If you are not sure how to do this check the installation portal to find and read about the possible methods.
When you get at the following steps, you have to start reading this article again:
- Partitioning
- Installation overview
Partitioning

At first YaST will propose to do some partitioning on your first hard disk (/dev/sda). Ignore this proposal by click Create partition setup. In the next screen you must select Custom partitioning.
Now you have entered the advanced partitioning program. In this example we are going to create a separate /boot partition, a swap space and an extended partition containing the root (/) and /home partition.
Partition scheme
In this example the following partitions are created:
| Partition | Size | Filesystem | Mount point | Remarks |
|---|---|---|---|---|
| /dev/sdb1 | 100 MB | ext2 | /boot | Will be mounted read-only |
| /dev/sdb2 | 2 GB | swap | swap | |
| /dev/sdb3 | Max. | N/A | N/A | Extended partition, which contains other partitions |
| /dev/sdb5 | 15 GB | ext3 | / (root) | Logical partitions start counting at 5 |
| /dev/sdb6 | Max. | XFS | /home | All remaining space can be used for /home |

Separate boot partition
It is recommended to use a separate boot partition. It is very likely that for some reason your disk gets un-plugged while your system is running. It can be as simple like pulling the wrong USB cable when you want to un-plug some other device. When this happens, there's a big change your root partition becomes corrupted. If /boot is on that partition, you risk your system becomes unbootable.
File system choices
For the /boot partition it is wise just to use ext2. Unless performing a kernel update or modifying GRUB options, nothing will ever be written to /boot. Ext2 is a very stable file system and does not perform journalling.
For our root partition we use ext3. Ext3 performs journalling to protect your data and is also a stable and mature file system. It is not wise to use ext4 on an external drive. Ext4 is made for performance. In order to achieve performance bigger portions of data are kept in the memory, before they are written to disk. If your drive gets unplugged this can result in a serious file system corruption. (Editor's personal experience)
XFS is use for the /home partition. XFS delivers high performance, with read/write speeds close to hardware limits. File system checks after a failure are very quick and XFS proofs to be very reliable. XFS is less forgiving on hardware faults (like bad sectors).
|
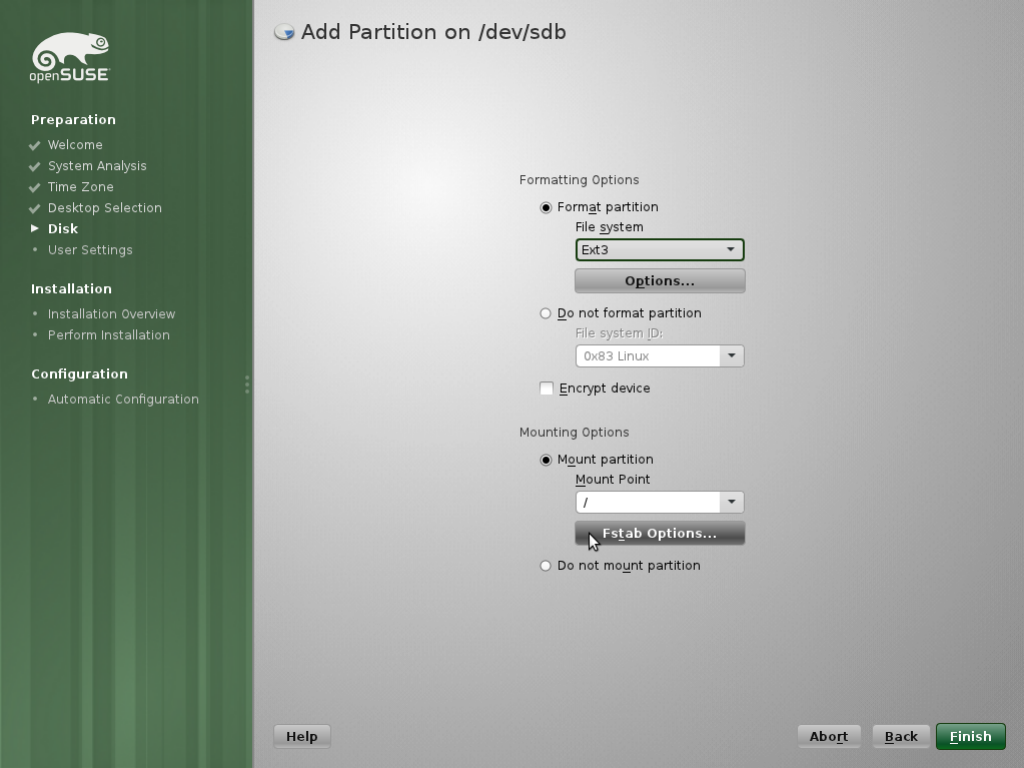
Creating partitionsIf necessary, first delete or resize partitions on your external hard disk, to create enough space of openSUSE. Then use the Create function in the partitioner. Enter the size of the new partition. In this screen you can set file system type and mount point, as explained above. Once set, click Fstab options. Fstab options are the Mount options upon system boot.
|
|
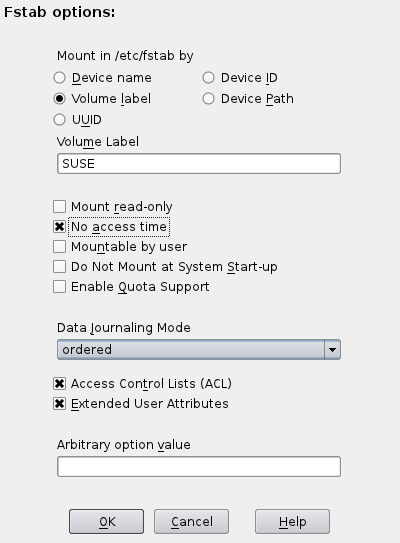
Set Mount in /etc/fstab by to Label and enter a unique label for each partition. Mounting by label is more redundant. If you inserted another USB disk on boot time and the Kernel recognizes that one quicker than your openSUSE disk, your openSUSE disk would be /dev/sdc and mounting of your file systems fails. Using No access time prevents the kernel to update the last access time on files when you open/run them. This gives a small performance boost, because it reduces the number of writes to your disk. Optional: You can choose to mount the /boot partition read-only. This gives you some extra safety, but before installing a new kernel during an updating process, you must not forget to re-mount this partition read-write with the following command (as root): $ mount -o remount,rw /boot
Once you set up all you partitions, continue the installation steps till you get to the "installation overview'"
|

Installation overview - GRUB settings
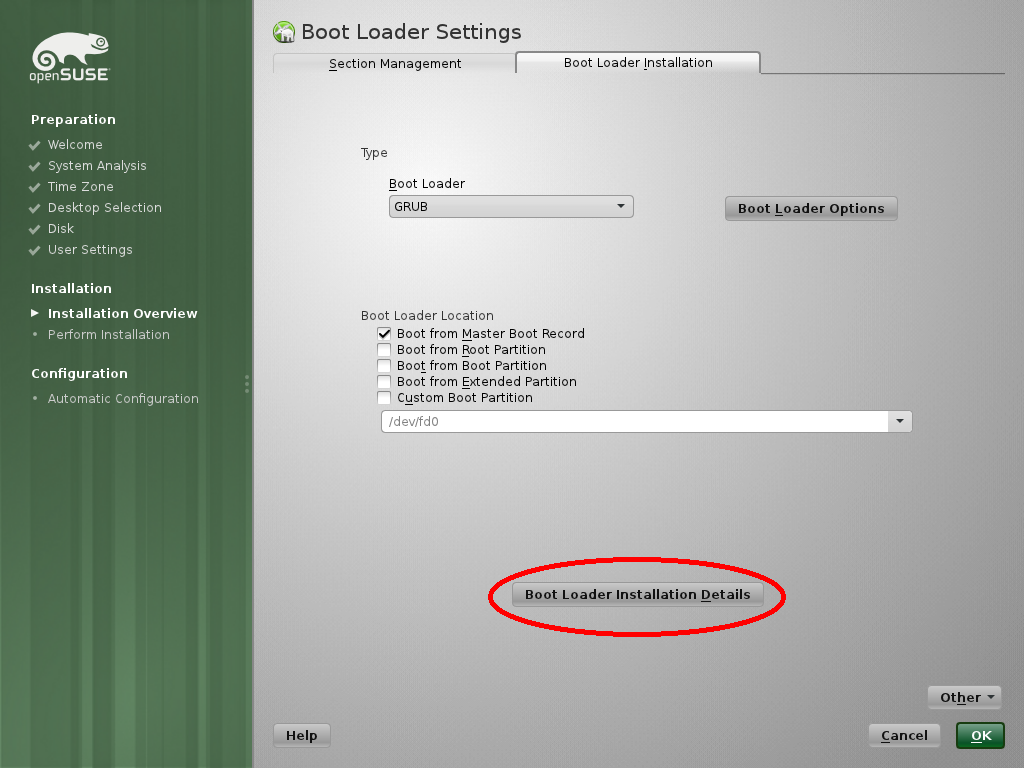
When you get to the installation overview, it is necessary to modify the Boot loader settings. By default, YaST wants to install GRUB on your primary hard disk's MBR. In this step we are going to make sure GRUB is installed on your external drive in a correct way.
Terminology
GRUB has it's own way of counting disks and partitions. GRUB starts counting at 0. The first disk it counts, is the disk where it is loading from. So if we install GRUB on our external disk, it still would be the first (so 0) disk. GRUB uses the following notation to indicate devices:
- (hdX) For hard disk devices.
- (hdX,X) For partitions on a disk device.
| GRUB notation | Meaning |
|---|---|
| (hd0) | Primary hard disk |
| (hd0,0) | Primary disk, first partition |
| (hd1,0) | Secondary disk, first partition |
| (hd0,1) | Primary disk, second partition |

GRUB settings
- In the installation overview, select booting
- In this screen select Other...
- Select Edit configuration files
We are now modifying the configuration files manually.
/boot/grub/device.map
This file tells GRUB what the disk order is when booting. The file should look something like this in it's default setting:
(hd0)  /dev/disk/by-id/ata-TOSHIBA_MK1652GSX_78CDC02UT
(hd1)  /dev/disk/by-id/usb-ST916082_1AS_5A188BFFFFFF-0:0
(fd0)  /dev/fd0
Now you can delete the ata and fd lines. These are the internal disk and floppy disk. Change the line with the usb disk to (hd0), so you get something like this:
(hd0) /dev/disk/by-id/usb-ST916082_1AS_5A188BFFFFFF-0:0
This file is the boot menu configuration. This file tells GRUB where to find the Kernel and Initrd file on your disk. Also the kernel command line is set in this file.
# Modified by YaST2. Last modification on Thu Mar 10 17:25:58 CET 2011
# THIS FILE WILL BE PARTIALLY OVERWRITTEN by perl-Bootloader
# Configure custom boot parameters for updated kernels in /etc/sysconfig/bootloader

default 0
timeout 8
gfxmenu (hd0,0)/message
##YaST - activate

###Don't change this comment - YaST2 identifier: Original name: linux###
title Desktop -- openSUSE 11.4 - 2.6.37.1-1.2
   root (hd0,0)
   kernel /vmlinuz-2.6.37.1-1.2-desktop root=/dev/disk/by-label/SUSE resume=/dev/disk/by-id/usb-ST916082_1AS_5A188BFFFFFF-0:0-part2 splash=silent quiet showopts vga=ask
   initrd /initrd-2.6.37.1-1.2-desktop

###Don't change this comment - YaST2 identifier: Original name: failsafe###
title Failsafe -- openSUSE 11.4 - 2.6.37.1-1.2
   root (hd0,0)
   kernel /vmlinuz-2.6.37.1-1.2-desktop root=/dev/disk/by-label/SUSE showopts apm=off noresume edd=off powersaved=off nohz=off highres=off processor.max_cstate=1 nomodeset x11failsafe vga=ask
   initrd /initrd-2.6.37.1-1.2-desktop
Note the (hdX,X) entries in this file. These should be set to (hd0,X). 0 being the first disk. As stated above, for GRUB the first disk is the one where it's loaded from. Change X to the partition number where /boot resides. If you followed above example for partitioning, X=0, 0 for the first partition. If /boot resides on the second partition (eg /dev/sdb2) X should be 1, for the third partition X should be 2 etc.
/etc/grub.conf
Do not touch this file. This are settings how GRUB is going to be written to your MBR. And, because your installation system may not be loaded from this disk, the disk count is different from the next time you boot your system. These settings are only applicable during installation. So leave them alone.
|
Saving settingsIn order to get YaST to read your settings correctly:
Now you should see a list with only your external drive in it. Just accept it by pressing Ok. If this step is omitted, YaST may try to revert or adjust the changes you made earlier. Return to the Installation overview by pressing Ok again.
|
Final check
In the installation overview you have a summary of all the settings. Make a last check at the Partitioning and Booting system. And you can continue installing your openSUSE system.