SDB:Network installation
Recommended articles
Related articles
Installing from the Internet
Using the network ISO image, you can create a bootable CD or USB memory stick. You can find these ISO images at http://download.opensuse.org/distribution/leap/ or https://get.opensuse.org . Below are direct links:

|
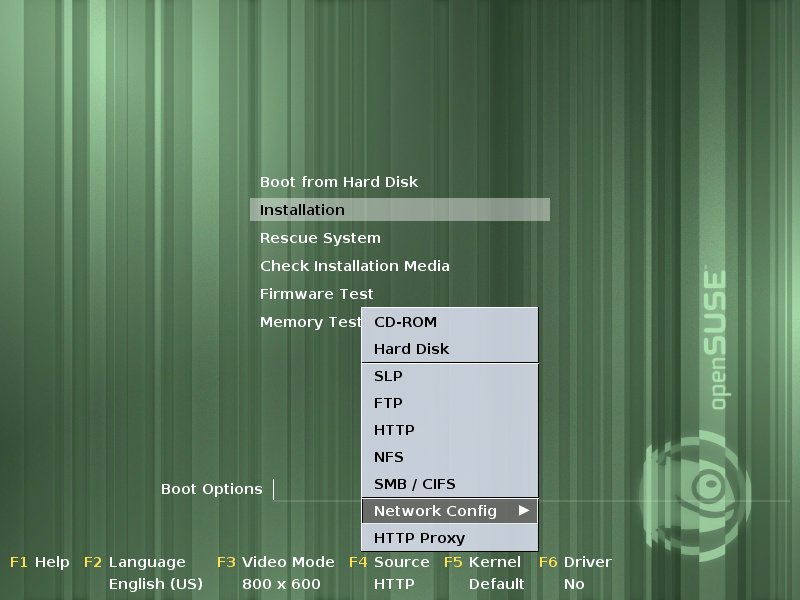
Boot screenWhen you boot from your network-install medium, you will be presented with the following list:
Network configuration |
|
AutomaticBy default, the network is configured automatically using DHCP. This is appropriate for most users. In some cases, you might need:
|
|
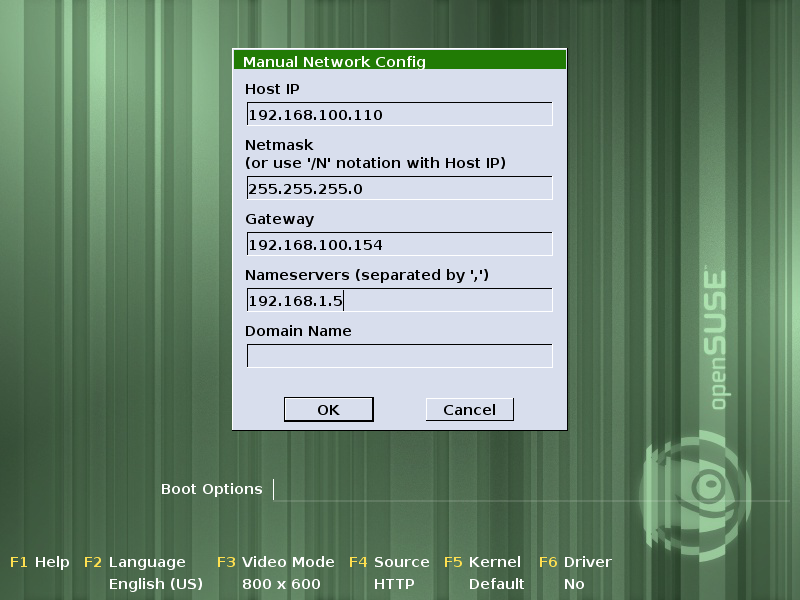
ManualOn this screen, you can set the following options:
|
|
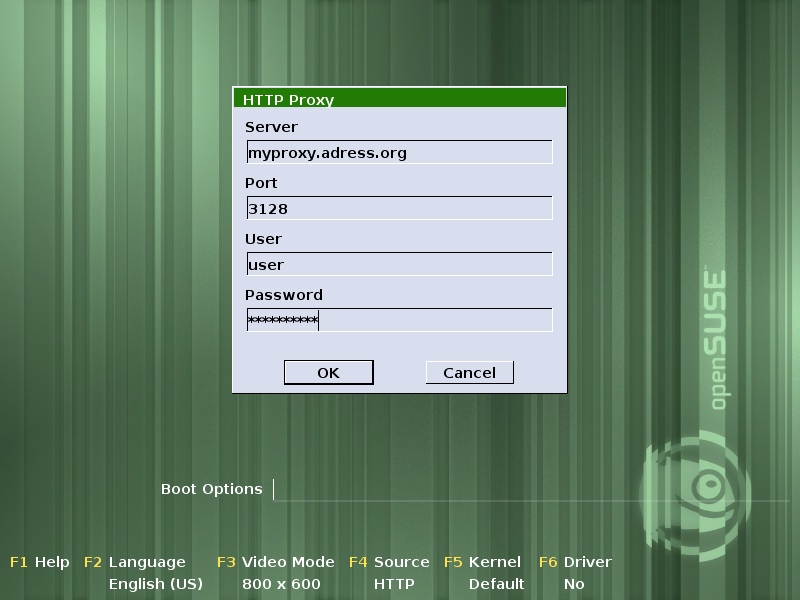
Proxy configurationFor some networks, you might need to configure a proxy server. If your network uses a proxy server, enter its address here. Contact your network administrator for details. A username and password are usually not required.
|
When everything is set up correctly, you can start the installation. The installation program looks for the fastest available mirror automatically and retrieves the installation files from there. It then proceeds as described in DVD installation, step 1, with the exception of the network configuration step. This is not needed, as the network is already configured and active at this point.
Installing from a local network source
- Boot the system and wait for the boot screen to appear.
- Press
[F2]to choose the language and your keyboard layout. - Press
[F3]to choose the screen resolution. - Press
[F4]and select the desired network protocol. FTP, HTTP, NFS, SMB/CIFS, and SLP (Service Location Protocol) are supported. - Provide the server's address and the path to the installation media:
- Select Installation from the main boot menu and press
[Enter]to continue. - The installation program automatically configures the network connection using DHCP. If automatic configuration fails, you will be prompted to enter the appropriate parameters.
- The installation retrieves the installation data from the source specified.
- The installation then proceeds as described in the step-by-step installation guide with the exception of the network configuration step needed prior to adding additional repositories. This step is not needed as the network is already configured and active at this point.
Media-free network installation
If you are unable to create installation media, or the machine onto which you are installing does not support removable media, then it is possible to boot the machine directly from the network without any local media.
This method has one important limitation. Only use it to add another, secondary Linux system to your computer. If a network installation is interrupted for any reason, you will need another locally-installed system to restart the installation.
The idea is to boot the system using kernel and initd images published on the Internet or in a repository on the local network. Below is an example using the Leap 15.2 repositories of openSUSE.
You must be the root user for this.
Get the kernel and initrd images
 mkdir /boot/install
 cd /boot/install
 wget http://download.opensuse.org/distribution/leap/15.4/repo/oss/boot/$(uname -i)/loader/linux
 wget http://download.opensuse.org/distribution/leap/15.4/repo/oss/boot/$(uname -i)/loader/initrd
There is usually no need to replace $(uname -i) — the command shell will replace it with your current architecture. If this is not the case, try $(uname -m) as alternative. Or (last ressort): if in doubt, choose x86_64.
This, however, requires some knowledge of GRUB configuration file /boot/grub/menu.lst format. If not sure, just add this at the end, so it will appear as the last item on the GRUB boot screen.
  title install
      root   (sdX,Y) # change this (sdX,Y)
      kernel /boot/install/vmlinuz install=http://download.opensuse.org/distribution/leap/15.4/repo/oss/
      initrd /boot/install/initrd
Change (sdX,Y) to whatever your setup requires, e.g. to the partition that was used in the previous entries to download the installation files.
Edit /boot/grub2/custom.cfg
This does require some knowledge of the GRUB2 configuration file /boot/grub2/custom.cfg format. If it doesn't already exist, create it using the following template. You will also need to substitute the actual location where you placed the linux and initrd files — below /install/ in the example. If you have your /boot/-directory on a dedicated partition, you can (as shown in the example) skip the /boot/ directory itself.
menuentry "openSUSE 15.4 install via HTTP" {
    search --no-floppy --label --set=root rootpartitionlabel
    linux /install/linux usessh=1 sshpassword="12345678" install=http://download.opensuse.org/distribution/leap/15.4/repo/oss/ hostip=192.139.88.209 netmask=255.255.255.0 gateway=192.139.88.254 nameserver=192.139.88.1
    initrd /install/initrd
}
- Change rootpartitionlabel to the label of your root partition. If you do not know, use the blkid command to find out.
- Change sshpassword to the password you like to use during installation. This will not be the final password and only used to authenticate in YaST.
- Change hostip to the IP address of your machine.
- Change netmask to the network mask of your machine.
- Change gateway to the default gateway for your machine - and finally:
- Change nameserver to the DNS server which can resolve at least download.opensuse.org for you (otherwise, you have to install by using IP addresses)
Once you configured everything correctly, you should be able to reboot the machine and choose the menu entry from the grub2 menu.
menuentry "Upgrade openSUSE 15.4 via HTTP" {
    search --no-floppy --label --set=root rootpartitionlabel
    linuxefi /install/linux showopts install=http://download.opensuse.org/distribution/leap/15.4/repo/oss upgrade=1
    initrdefi /install/initrd
}
- Change rootpartitionlabel to the label of your root partition. If you do not know, use the blkid command to find out. (Note: there is a whitespace between root and the rootpartitionlabel in the search line.)
- The Upgrade entry after menuentry is some descriptive text; this can be anything you like.
- The upgrade=1 entry on the linux line is only necessary if you wish to start an upgrade installation, which omits most of the questions asked during a normal installation. If you append rescue=1 to the linux line, then an rescue image will be booted. Allowing you to restore a broken installation.
- We also used an EFI-boot scheme here, as you may have noticed already from the linuxefi and initrdefi lines. If you do not have an EFI system, just use the usual linux and initrd entries.
Start the Installation
There are two ways to start the installation process:
- Reboot the computer and choose your custom option on the GRUB boot screen. This works only if you edited GRUB as explained above.
or
- Use the kernel's bootloader emulation kexec and skip the hardware reboot. Make sure that package named kexec-tools is installed. Then:
  kexec -l /boot/install/vmlinuz --initrd=/boot/install/initrd
  kexec -e
The first command will load the installation kernel and initrd into memory, and the second will start the new kernel.
Moments after issuing the kexec -e command, you will see the boot messages of the new installation kernel as it initializes.
See also
- Installation help
- Remote installation : how-to install openSUSE on a remote host
- Linuxrc runs before YaST starts and offers many options for further tweaking