Portal:FreeIPA/Installation
Introduction
Warning: FreeIPA 4.1.4 was available during the latter half of 2015 on Tumbleweed, but it is no longer available in the distribution due to lack of maintenance. This article only serves as a historical reference.
Objective
The installation guide will walk you through the setup of a fully functional and fault-tolerant FreeIPA cluster, plus a FreeIPA client. The entire setup consists of a certificate authority, FreeIPA server and replica, centrally managed automount (for home directory) and sudo rules, enrollment and registration of IPA client machine and user - everything being under the domain of "linuxdom.net".
Prerequisites - Software
As an integrated solution, FreeIPA server and replica run the complete distribution of FreeIPA server softwares, with additional dependencies on:
- 389 Directory Server
- Kerberos server
- Bind (DNS server)
- NTP (time synchronisation)
For authentication and access, a FreeIPA client needs Kerberos and FreeIPA clients, Yast authentication client module, and SSSD (System Security Services Daemon). Software installation procedures will be detailed in latter sections.
Prerequisites - Machines and Network
We will need a private network under the domain of "linuxdom.net", and three machines in the private network:
- IPA server - ipa-primary.linuxdom.net (192.168.122.33)
- IPA replica - ipa-standby.linuxdom.net (192.168.122.27)
- IPA client - pulautin.linuxdom.net (192.168.122.143)
IPA server and replica must use static IP addresses, and name resolution should be functional and able to resolve the host name to respective IP address in the private network.
If name resolution is not functional or IPA servers (primary and standby) cannot be resolved to their respective IP address, extra caution and steps must be taken during the installation. These steps are detailed in latter sections.
Certificate Authority
Public Key Infrastructure is an integral component in identity management, therefore before installing FreeIPA, we prepare a new Certificate Authority along with necessary certificates for directory, Kerberos, and web services.
openSUSE makes CA management trivial by offering a graphical and step-by-step interface in "Yast CA Management module", installable via:
Please note that the Dogtag PKI and Certmonger features bundled with the upstream FreeIPA release are not available in this openSUSE port.
Next for our setup, we will create a new Certificate Authority, and two certificates for IPA server and replica.
Create a new root Certificate Authority
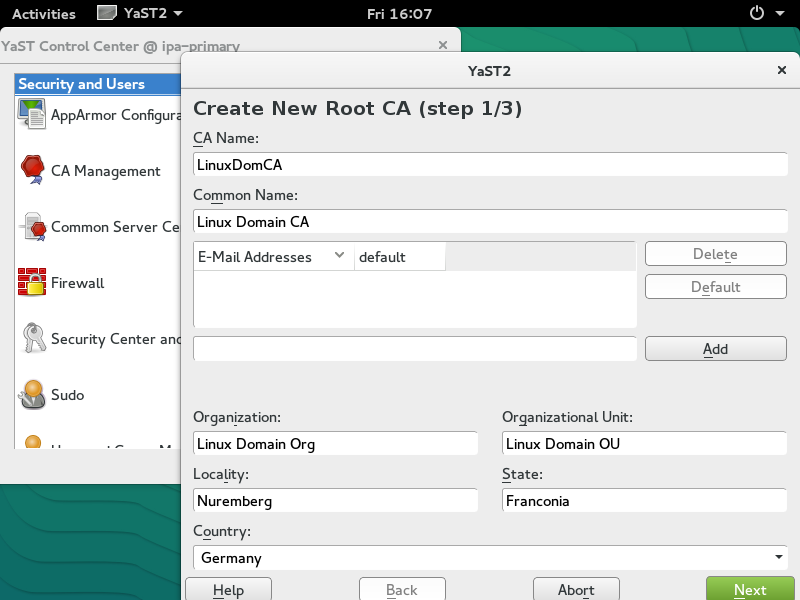
|
Enter CA detailsLaunch YaST CA Management, click "Create Root CA", then enter the names, organisational details, and locality details for the new certificate authority. Click "Next" when finished.
|
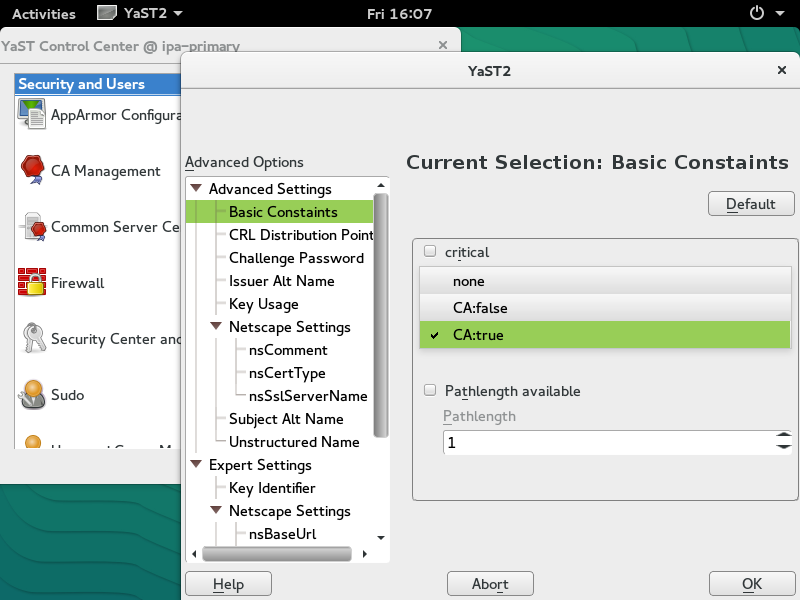
|
Adjust advanced optionsEnter a strong password to protect access to the CA management features. Adjust cryptography strength by altering Key Length. Enter desired CA valid period. Important! Due to a bug, now you have to enter "Advanced Options" and manually set "CA:true" in "Basic Constraints". Click "OK" when done.
|
|
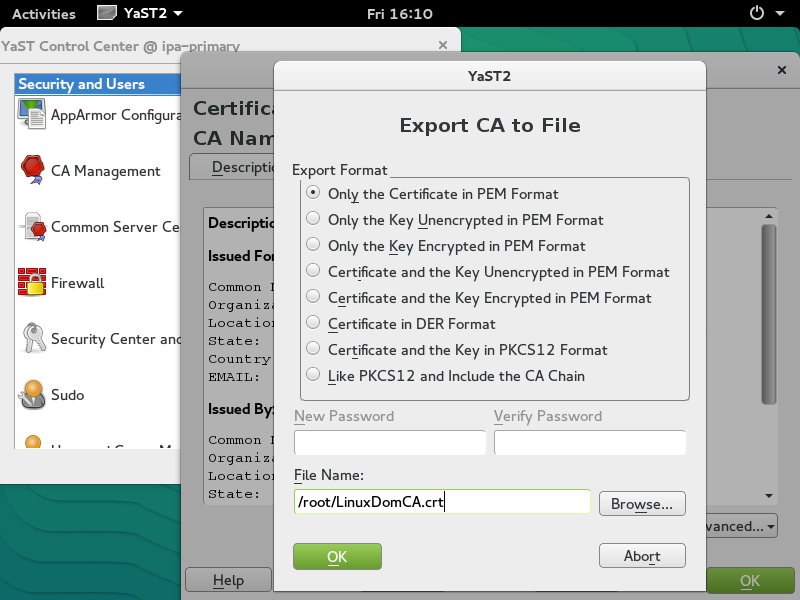
Export CA to a fileReview the new CA's details and click "Create", now the new CA is ready! Back to main screen, click "Enter CA" to enter the new CA, then click "Advanced..." and "Export to File" to save the CA certificate in PEM format to a local file.
|
Later, we will distribute the saved CA certificate to the IPA server, IPA replica, and all IPA client machines.
Prepare certificate for IPA Server
Each of the directory service, Kerberos service, and web service requires a server certificate to function. They may use separate certificates, however in our setup we will use only one certificate for all three services.

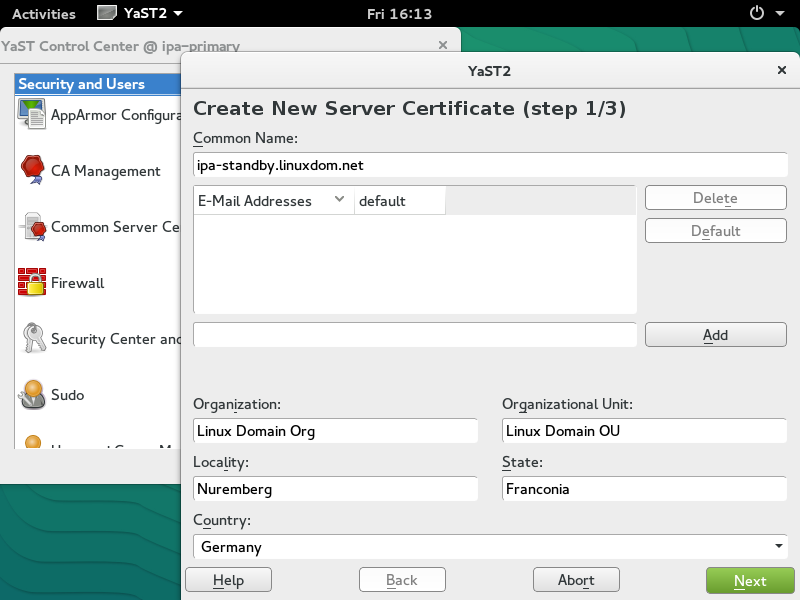
|
Enter certificate detailsIn YaST CA Management module, enter the CA we just created. Go to "Certificates" tab, and click "Add", then "Add Server Certificate". Fill in certificate organisational and locality details, then enter the server host name as Common Name. It is vital for Common Name to match server host name.
|

|
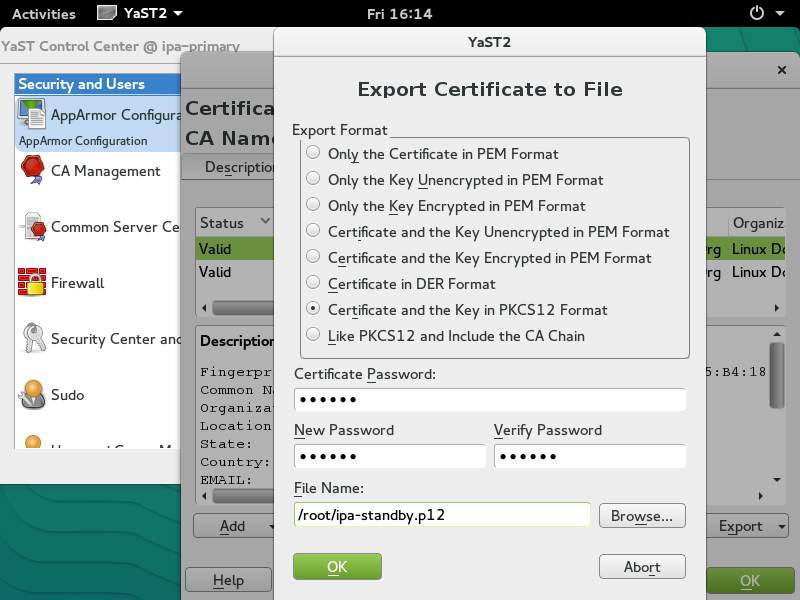
Export certificate to a fileSelect the server certificate we just created, and click "Export", then "Export to File". The exported file must use PKCS12 format and may not include CA chain. Enter a strong password (PIN) to protect the exported file.
|
Copy the exported PKCS12 file "ipa-primary.p12" to the IPA Server machine.
Prepare certificate for IPA Replica
The IPA replica also uses server certificates for directory, Kerberos, and web service. Just like how we created the certificate for IPA Server, remember to match Common Name to the host name.
|
Enter certificate detailsIn YaST CA Management module, enter the CA and use the familiar routine to create server certificate. Remember to match the Common Name to the host name of IPA replica.
|
|
Export certificate to a fileExport IPA replica certificate, also in PKCS12 format, and without CA chain.
|
Copy the exported PKCS12 file "ipa-standby.p12" to the IPA Server and IPA replica machine.
Common CA and LDAP configuration
Before proceeding with installation or configuration of IPA server, replica, or client, the involved machines must trust the CA we just created. This procedure must be carried out on all machines that are going to run IPA server, replica,or client.
Copy the exported CA certificate (LinuxDomCA.crt) to "/etc/pki/trust/anchors/" and run on each machine:
Edit global LDAP client configuration /etc/openldap/ldap.conf:
TLS_CACERT  /etc/pki/trust/anchors/LinuxDomCA.crt
URI         ldap://ipa-primary.linuxdom.net ldap://ipa-standby.linuxdom.net
BASE        dc=linuxdom,dc=net
LDAP parameter "URI" and "BASE" are configured for convenience, so that by default LDAP clients will run queries on the redundant cluster of IPA servers.
FreeIPA Server
FreeIPA installation turns a server into a specialised IPA server. For security reasons please avoid using the server for other roles such as web hosting or running business applications. For a rather small organisation (less than 100 users), the server will need approximately 400MB of memory.
Install all FreeIPA packages and dependencies will be installed automatically:
Install
In our setup, the server's host name is expected to be "ipa-primary" and the fully-qualified-domain-name (FQDN) should be in "linuxdom.net" domain, run hostname command to verify:
# hostname
ipa-primary

# hostname -f
ipa-primary.linuxdom.net
If host name or FQDN is incorrect, installation may still proceed, however the names must be manually corrected and entered into hosts file:
# hostnamectl set-hostname ipa-primary.linuxdom.net

# ip addr show
1: lo: <LOOPBACK,UP,LOWER_UP> mtu 65536 qdisc noqueue state UNKNOWN group default
    link/loopback 00:00:00:00:00:00 brd 00:00:00:00:00:00
    inet 127.0.0.1/8 scope host lo
       valid_lft forever preferred_lft forever
2: ens3: <BROADCAST,MULTICAST,UP,LOWER_UP> mtu 1500 qdisc pfifo_fast state UP group default qlen 1000
    link/ether 52:54:00:73:de:4e brd ff:ff:ff:ff:ff:ff
    inet 192.168.122.33/24 brd 192.168.122.255 scope global ens3
       valid_lft forever preferred_lft forever

# echo '192.168.122.33 ipa-primary.linuxdom.net ipa-primary' >> /etc/hosts
The entry in hosts file must have FQDN listed before the host name.
Installation may now begin. Invoke the ipa-serverinstall command, then the installation wizard (CLI) will start:
# ipa-server-install \
  --ca-cert-file=LinuxDomCA.crt \
  --dirsrv-cert-file=ipa-primary.p12 --dirsrv-pin=p12_password \
  --http-cert-file=ipa-primary.p12 --http-pin=p12_password \
  --pkinit-cert-file=ipa-primary.p12 --pkinit-pin=p12_password
The installation wizard will ask several questions regarding the network environment, IPA name resolution service, and IPA administrative passwords. Carefully answer the questions, and eventually the installation will take several minutes to complete.
The full conversation and output from our linuxdom.net installation is available here: ipa-server-install Example Output
Verify
After server installation is successfully completed, we can verify that FreeIPA is operating properly by running the following commands on the IPA server:
# kinit admin
Password for admin@LINUXDOM.NET: <enter IPA Admin password>

# klist
... Default principal: admin@LINUXDOM.NET ...

# klist -k
Keytab name: FILE:/etc/krb5.keytab
KVNO Principal
---- --------------------------------------------------------------------------
   2 host/ipa-primary.linuxdom.net@LINUXDOM.NET
...

# ipa user-show admin
  User login: admin
  Last name: Administrator
  Home directory: /home/admin
  Login shell: /bin/bash
  UID: 1435400000
  GID: 1435400000
  Account disabled: False
  Password: True
  Member of groups: admins, trust admins
  Kerberos keys available: True

# ipa host-show ipa-primary
  Host name: ipa-primary.linuxdom.net
  Principal name: host/ipa-primary.linuxdom.net@LINUXDOM.NET
  Password: False
  Keytab: True
  Managed by: ipa-primary.linuxdom.net
Congratulations, your IPA server is now running and operational!
Prepare for replica
One IPA server is a single point of failure; to mitigate potential downtime caused by the single IPA server, we will soon install an IPA Replica. Before proceeding with the installation of IPA Replica, the server has to be prepared and hand over a "replica information" file to the replica machine, by running the following command:
# ipa-replica-prepare ipa-standby.linuxdom.net \
  --http-cert-file ipa-standby.p12 \
  --dirsrv-cert-file ipa-standby.p12 \
  --ip-address 192.168.122.27
ipa-replica-prepare wizard (CLI) will ask for IPA directory manager password and passwords for unlocking the file ipa-standby.p12. Eventually, a file called "replica-info-ipa-standby.linuxdom.net.gpg" will be generated.
Copy the file to IPA replica machine, and preparation is complete. The full conversation and output from our linuxdom.net replica preparation is available here: ipa-replica-prepare Example Output
FreeIPA Replica
Once set up, an IPA replica becomes a complete copy of server, sharing the same internal information about users, machines, policies, etc. All IPA replicas are "master"s, and IPA clients may contact any available IPA server or replica. The single point of failure of IPA server is eliminated by the introduction of IPA replica.
The software, network and hardware requirements of an IPA replica is identical to that of an ordinary IPA server. For security reasons please avoid using the replica for other roles such as web hosting or running business applications.
In the previous section we prepared the IPA server for the replica setup, soon we will install the IPA replica. Beginning with package installation, IPA replica uses all FreeIPA packages and dependencies:
Install
First please make sure that CA and LDAP configuration has been carried out on the replica machine, as described in Common CA and LDAP configuration, otherwise replica installation will definitely fail.
Just like an IPA server, the replica also requires the host name and FQDN to be properly configured. The techniques used for verifying host names on IPA server apply here.
After host names are verified, the installation of replica may begin. Invoke the ipa-replica-install command, then the installation wizard (CLI) will start:
# ipa-replica-install \
  --setup-dns --forwarder 8.8.8.8 \
  --skip-conncheck \
  replica-info-ipa-standby.linuxdom.net.gpg
In our setup, the DNS service is enabled in order to provide IPA clients with redundant name resolution servers. he full conversation and output from our linuxdom.net replica installation is available here: ipa-replica-install Example Output
Note that "--skip-conncheck" disables connection check which tests Kerberos, LDAP, and SSH connectivity between a replica and the replicated server. SSH connectivity test will fail unless the replicated server is configured to be its own client; since we are not going to do it, the connection check has to be skipped.
Verify
After replica installation is successfully completed, we can verify that FreeIPA is operating properly by running the following commands on the IPA replica:
# kinit admin
Password for admin@LINUXDOM.NET: <enter IPA admin password>

# klist
... Default principal: admin@LINUXDOM.NET ...

# klist -k
Keytab name: FILE:/etc/krb5.keytab
KVNO Principal
---- --------------------------------------------------------------------------
   2 host/ipa-standby.linuxdom.net@LINUXDOM.NET
...

# ipa host-show ipa-standby
  Host name: ipa-standby.linuxdom.net
  Principal name: host/ipa-standby.linuxdom.net@LINUXDOM.NET
  Password: False
  Keytab: True
  Managed by: ipa-standby.linuxdom.net

# ipa user-show admin
  User login: admin
  Last name: Administrator
  Home directory: /home/admin
  Login shell: /bin/bash
  UID: 1435400000
  GID: 1435400000
  Account disabled: False
  Password: True
  Member of groups: admins, trust admins
  Kerberos keys available: True
Administration
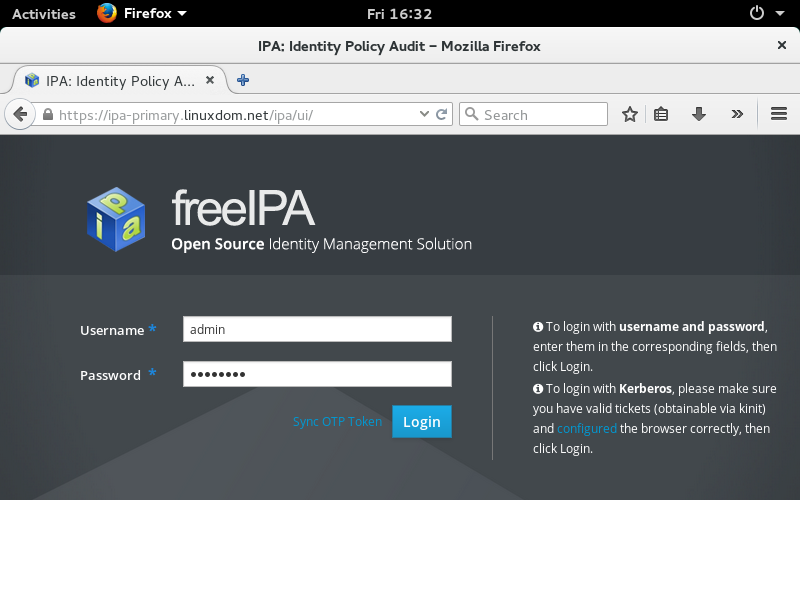
FreeIPA offers a web UI application for administration of all entities and policies. The web UI application runs on every server/replica; administrators can log into the web application remotely via username/password combination. A command line tool "ipa" is available locally on each server/replica, unfortunately it cannot be used for administration of a remote server in this openSUSE port.
|
Launch your favourite browser and navigate to any IPA server/replica on HTTPS, enter IPA admin credentials, and explore!
|
Manage user and hosts
|
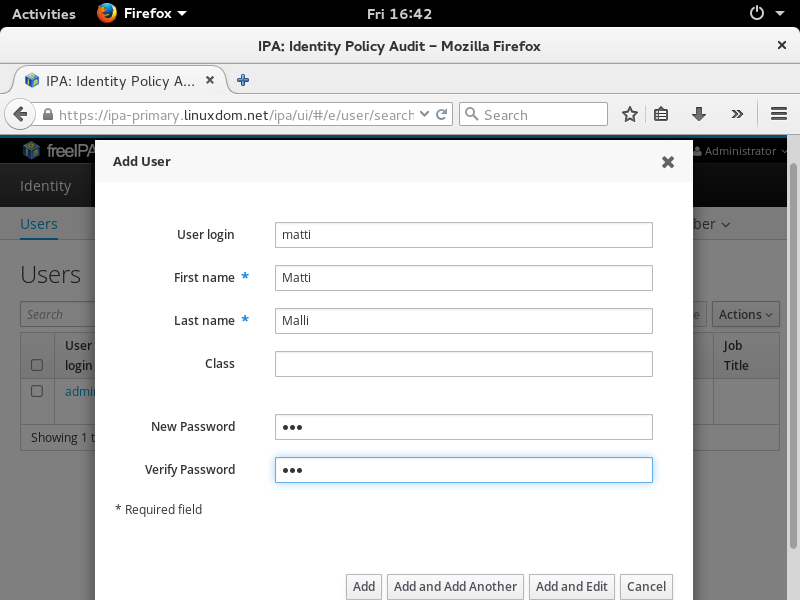
Create demo user "matti"Navigate to "Identity", "Users", then click "Add". Fill in user details and enter an initial password. As IPA admin, you may edit user details and reset password at any time.
|
|
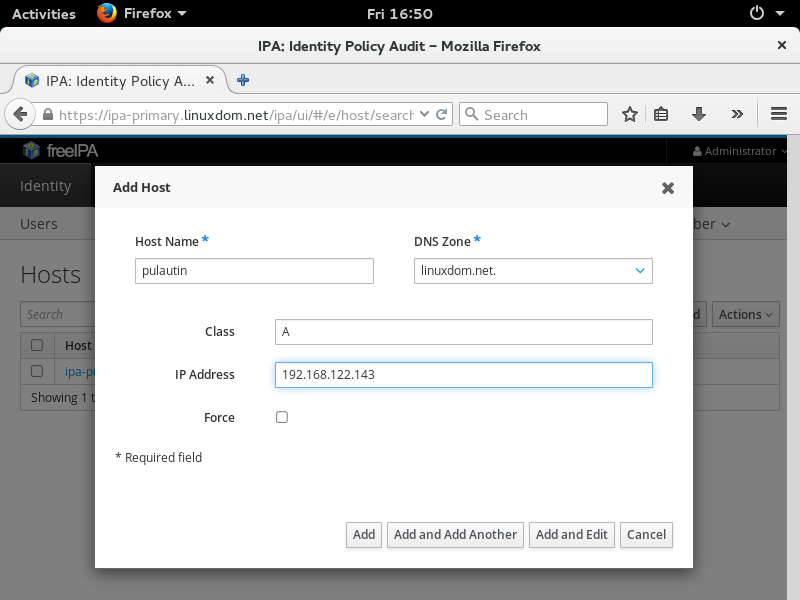
Create demo host "pulautin"Navigate to "Identity", "Hosts", then click "Add". Fill in new machine's host name and IP address. The host name becomes immediately resolvable via IPA DNS service.
|
Manage automount
Our setup will automatically mount /home directory of IPA clients to an NFS share on a storage server (in this case ipa-primary).

|
Set up Automount for /homeNavigate to "Network Services", "Automount". Create a new location ("officehome"), and enter NFS location in a new Automount Key. If your NFS server is Kerberos-enabled, remember to prefix Mount Information with: -fstype=nfs4 -sec=krb5
|
Manage sudo
We will give user matti super-power by authorising him to run any command, as anybody, on any host.
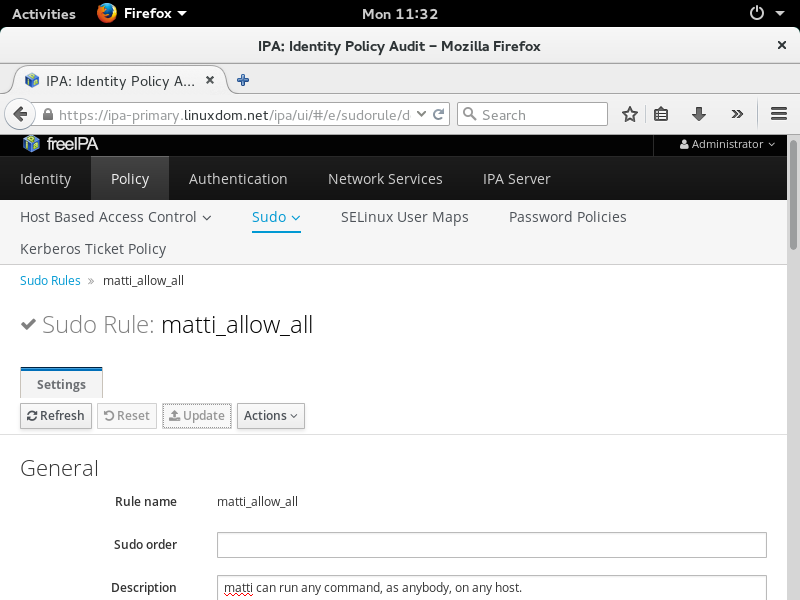
|
Enter sudo rule detailsNavigate to "Policy", "Sudo", then click "Add". Fill in the sudo rules form.
|
Command line tools
Nearly all administrative tasks can be carried out using command line tool "ipa", which is available locally on each server/replica.
Before running the tool, you must obtain a Kerberos ticket using a user with IPA administrative privilege:
# kinit admin
Password for admin@LINUXDOM.NET: <enter IPA admin password>

# klist
... Default principal: admin@LINUXDOM.NET ...

# ipa host-show ipa-primary
  Host name: ipa-primary.linuxdom.net
  Principal name: host/ipa-primary.linuxdom.net@LINUXDOM.NET
  Password: False
  Keytab: True
  Managed by: ipa-primary.linuxdom.net
For more information and examples, please consult the manual page:
"ipa" cannot be used to administrate a remote IPA server/replica in this openSUSE port.
FreeIPA Client
To make a machine IPA-ready, the system administrator has to take care of enrolment of the machine and setting up authentication client - the process involves using IPA command line tools and YaST Authentication Client module. Install the tools and all necessary dependencies by:
Please note that "ipa-client-install", a utility for IPA client configuration in the upstream FreeIPA project, is not available in this openSUSE port.
Remember that all IPA clients (and servers, replicas) must use appropriate CA and LDAP configuration. If this is not yet done on the client machine, please revisit the Common CA and LDAP configuration.
Enrol a new machine
The DHCP server in the private network should be properly configured to match the IPA domain name (linuxdom.net) and announce IPA server (and replicas) as DNS servers. If manual configuration is required on the client machine, enter the domain name and name server addresses in /etc/resolv.conf:
search linuxdom.net
nameserver 192.168.122.33 # ipa-primary.linuxdom.net
nameserver 192.168.122.27 # ipa-standby.linuxdom.net
Configure Kerberos client to work in the IPA realm by editing /etc/krb5.conf:
[libdefaults]
default_realm = LINUXDOM.NET
forwardable = true

[realms]
LINUXDOM.NET = {
  kdc = ipa-primary.linuxdom.net
  kdc = ipa-standby.linuxdom.net
  admin_server = ipa-primary.linuxdom.net
}

[domain_realm]
linuxdom.net = LINUXDOM.NET
.linuxdom.net = LINUXDOM.NET
Parameter "forwardable" makes the creation of initial Kerberos tickets forwardable by default. IPA client self-service single-signon will not work unless the parameter is explicitly set to true.
To complete host enrolment procedure, retrieve the IPA client machine's keytab using the privilege of IPA admin, or any user specifically allowed to retrieve keytab according to policies defined in IPA:
# kinit admin
Password for admin@LINUXDOM.NET: <enter password>

# ipa-getkeytab -s ipa-primary.linuxdom.net -p host/pulautin.linuxdom.net -k /etc/krb5.keytab
Keytab successfully retrieved and stored in: /etc/krb5.keytab
If you decide to use IPA Automount feature that involves an NFSv4, Kerberos-enabled NFS server, remember to retrieve a Kerberos keytab for the enrolled host as well, for example:
# ipa-getkeytab -s ipa-primary.linuxdom.net -p nfs/pulautin.linuxdom.net -k /etc/krb5.keytab
Keytab successfully retrieved and stored in: /etc/krb5.keytab
Verify that keytab is correct by running klist:
# klist -k
Keytab name: FILE:/etc/krb5.keytab
KVNO Principal
---- --------------------------------------------------------------------------
   1 host/pulautin.linuxdom.net@LINUXDOM.NET
...
Configure authentication using Yast
The remainder of IPA client configuration is carried out using YaST Authentication Client module.

|
Enable the client and join domainLaunch Authentication Client module. Tick both "Create Home Directory on Login" and "Enable SSSD Daemon". Click "New Service/Domain", choose "Service", and enable all of these services: autofs, sudo, nss, pam. Click "New Service/Domain", choose "Domain", and enter IPA domain name. Choose "ipa" as Identification Provider. Click "OK" to proceed to the next dialog.
|
|
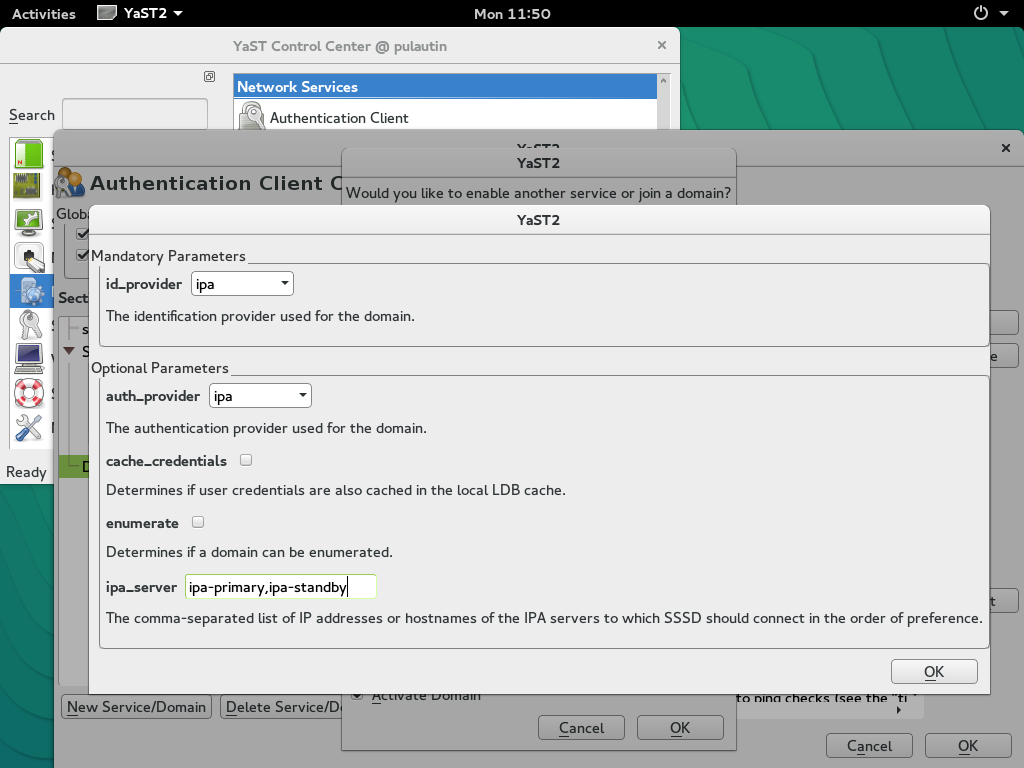
Enter IPA server addressesEnter IPA server (and replica) host name or IP address.
|
|
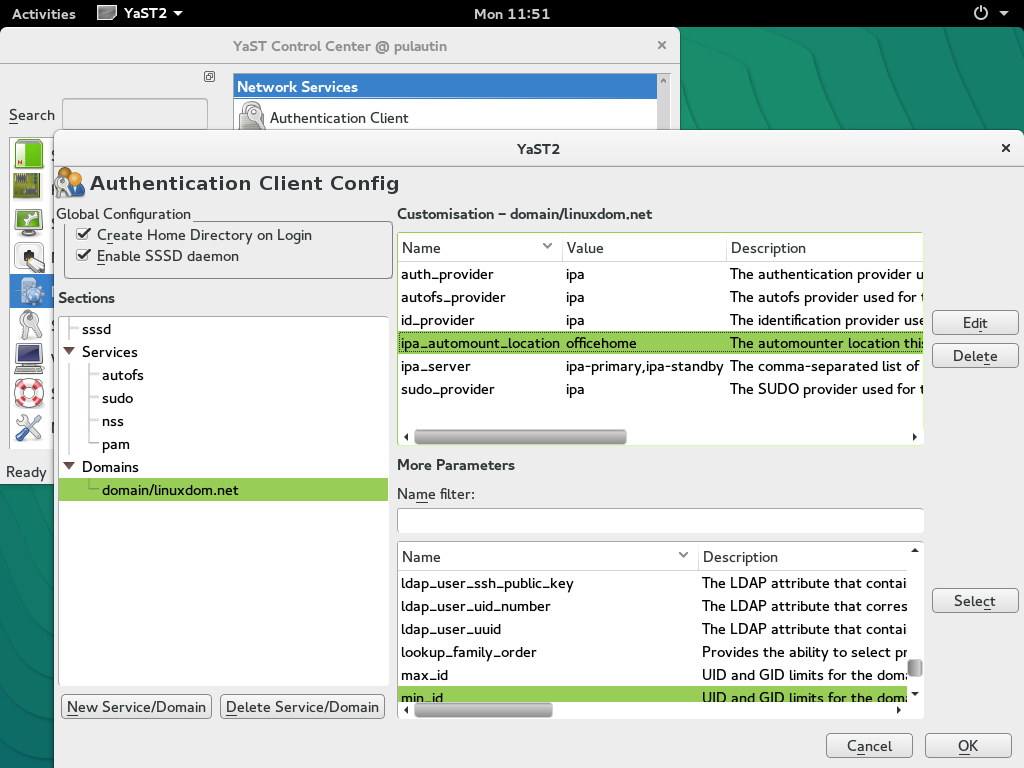
Configure for automount and sudoPreviously on IPA administrative web application, we created an Automount service called "officelocation" which automatically mounts /home to an NFS share; specify IPA as "autofs_provider", and enter "officehome" as "ipa_automount_location". Specify IPA as "sudo_provider" to make our IPA sudo rules effective. When done, click "OK".
|
Sudo and Name Service Switch
After going through YaST Authentication Client configuration, the IPA client now accepts both IPA sudo rules and local /etc/sudoers configuration - and the local configuration takes precedence. This is done for safety reasons, to make sure that you are not locked out of sudo access in case of a mistake in IPA policy.
Please thoroughly test IPA Sudo policy, and then edit /etc/nsswitch.conf, find the line:
And replace it with:
Local sudo configuration will no longer be effective. Only IPA sudo rules will apply from now on.
Experience the desktop and IPA self-service
Reboot the client machine and login to your favourite desktop using an IPA user's credentials.

|
Desktop login as an IPA userEnter IPA user name and initial password. You will be prompted to change your initial password immediately after login.
|
|
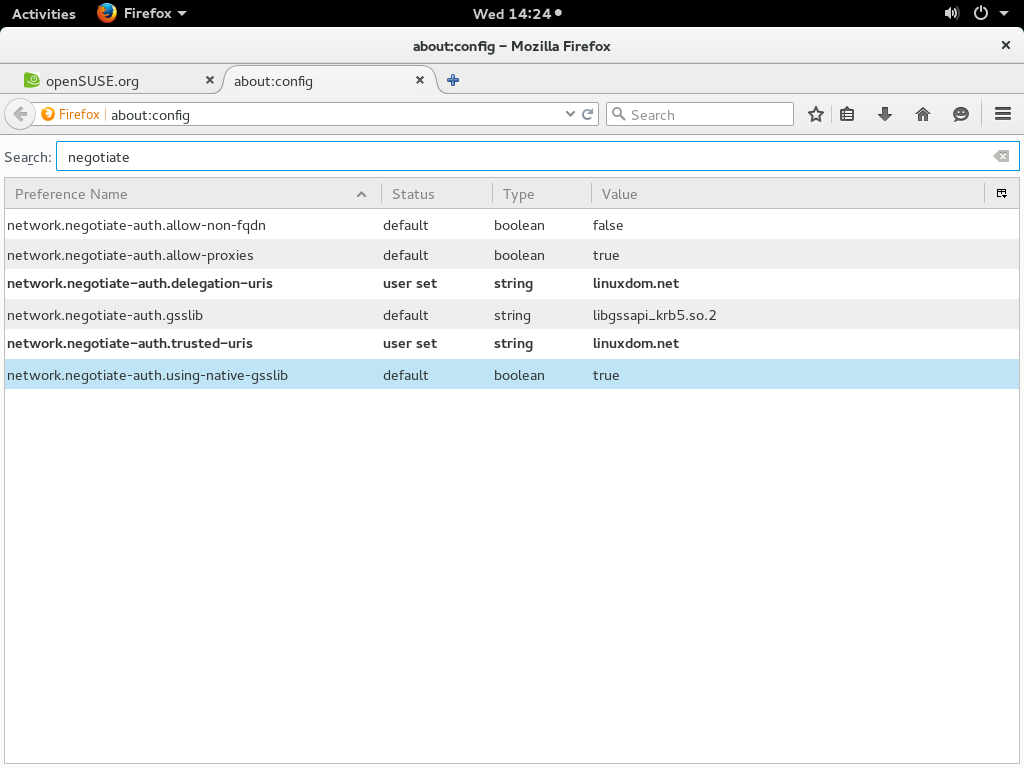
(Optional) Configure Firefox for Single-SignOnIf you wish to enable Single-SignOn to IPA user self-service, open Firefox and naviagate to "about:config". Search for parameters named "negotiate" and enter IPA domain name into parameter "delegation-uris" and "trusted-uris".
|
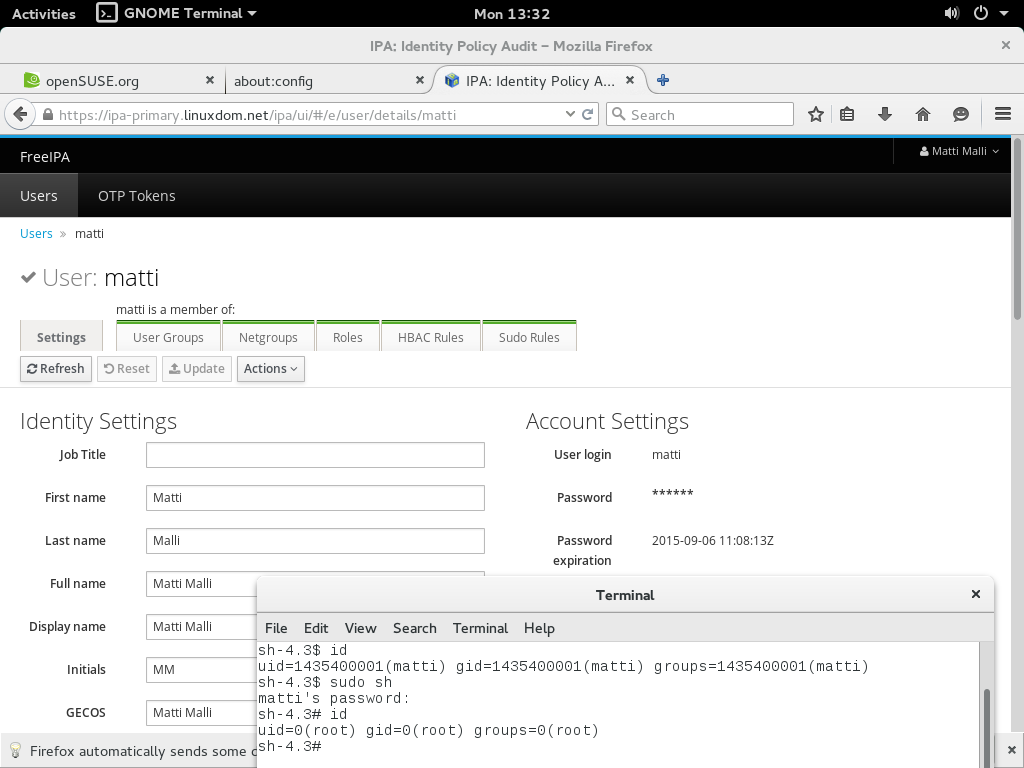
|
User self-serviceLaunch browser and navigate to any IPA server/replica on HTTPS. You are automatically signed on and are able to change personal details such as telephone number and display name. Remember to try your IPA sudo policy too.
|