SDB:Setup Mediatomb in openSUSE
About Mediatomb
Mediatomb is open source media server software for Linux. Mediatomb allows you to stream your music and video files to other media devices, such as (but not limited to) game consoles, etc.
Prerequisites
Computer
- A supported media device (supported by mediatomb)
- Network Interface (for example, Ethernet network card,router)
Software
The following software packages (files ending in .rpm) must be installed, before one can start setting up mediatomb.
mediatomb
mediatomb-mysql
mediatomb-sqlite
The main mediatomb software package is required regardless, as this package contains mediatomb itself. The other packages are for the mediatomb database of your media files. It depends on your Linux distribution as to which type of database mediatomb uses.
Installation guide
The required software packages are at PackMan online software repository
mediatomb software onto your system, provided that all prerequisites have been met.
Using YaST
1) Add the PackMan online software repository to your repo list. (see Additional package repositories page for more information).
2) Open YaST > Software > Software Management
3) Type mediatomb into the search box and press enter (making sure you tick the box next to mediatomb).
4) Accept the proposal from YaST to install mediatomb.
Using your Web browser
1) Open your Web browser.
2) Goto PackMan online software repository
3) Click on your openSUSE version.
4) Click on the One Click Install feature.
5) Accept the proposal from YaST to install mediatomb.
Configuration guide
Firewalls guide
root (see SDB:Login_as_root for more information). The following guide also assumes you have already installed mediatomb on your computer.Tip:You can configure mediatomb to operate on a particular TCP port if you wish, see sections below.
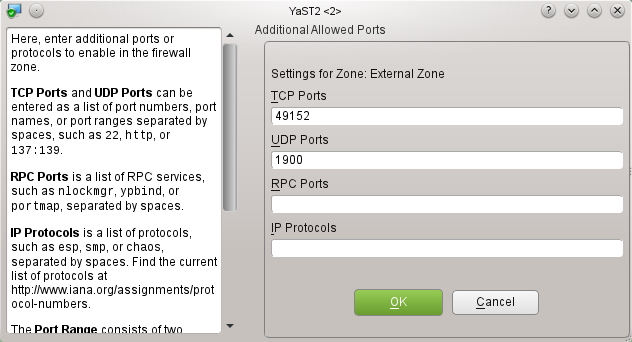
Open YaST > Security and Users > Firewall > Allowed Services > Advanced
Add the necessary TCP & UDP ports to the TCP Ports & UDP Ports fields (see above sceenshot, for an example). Your computer's firewall should now allow mediatomb to "see" your media device, and vice versa.
Configuring mediatomb under a local user account
By default mediatomb uses a file called config.xml in the /home/USERNAME/.mediatomb folder (where USERNAME is your user name). You can edit this file to change settings for mediatomb or you can change at least some settings, via the mediatomb web interface.
config.xml can be created.mediatomb first use/creating config.xml steps
Step 1
Open a terminal window (Konsole in KDE).
Step 2
Type mediatomb and then press enter.
This should now create config.xml.
Configuring mediatomb as a service
To run mediatomb as a system service, you need to edit some of the configuration files installed by mediatomb's software package (RPM package).
First Steps
The first step is to edit /etc/mediatomb.conf
Below is a copy of /etc/mediatomb.conf (mediatomb's system-wide configuration file)
## This is a sambel configuration file for the MediaTomb daemon script
## used on Fedora Core

## By default the configuration will be created in /etc/mediatomb

## Network interface on which the server will run, you need to edit this!
MT_INTERFACE="eno1"

## User defined command line options that may be passed to the server
MT_OPTIONS=""

## MediaTomb will be started on port 50500
MT_PORT="49152"

## MediaTomb will run as mediatomb
MT_USER="mediatomb"
MT_GROUP="mediatomb"

## Location of the PID file
MT_PIDFILE="/var/run/mediatomb.pid"

## Location of the log file
MT_LOGFILE="/var/log/mediatomb"

## Location of the config file/database
MT_HOME="/etc"
MT_CFGDIR="mediatomb"
As the following states, you will need to edit this section of mediatomb.conf
## Network interface on which the server will run, you need to edit this!
MT_INTERFACE="eno1"
If your network interface's system name is eth1, that's what you need to replace eno1 with.
You can choose which TCP port mediatomb binds to, in the section below;
## MediaTomb will be started on port 50500
MT_PORT="49152"
Mediatomb will bind to TCP port 49152 in this example, 50500 was changed to 49152 for the purpose of this guide.
Starting and Stopping the mediatomb service
You can start the service though YaST (the easy way) or though the shell.
Using YaST
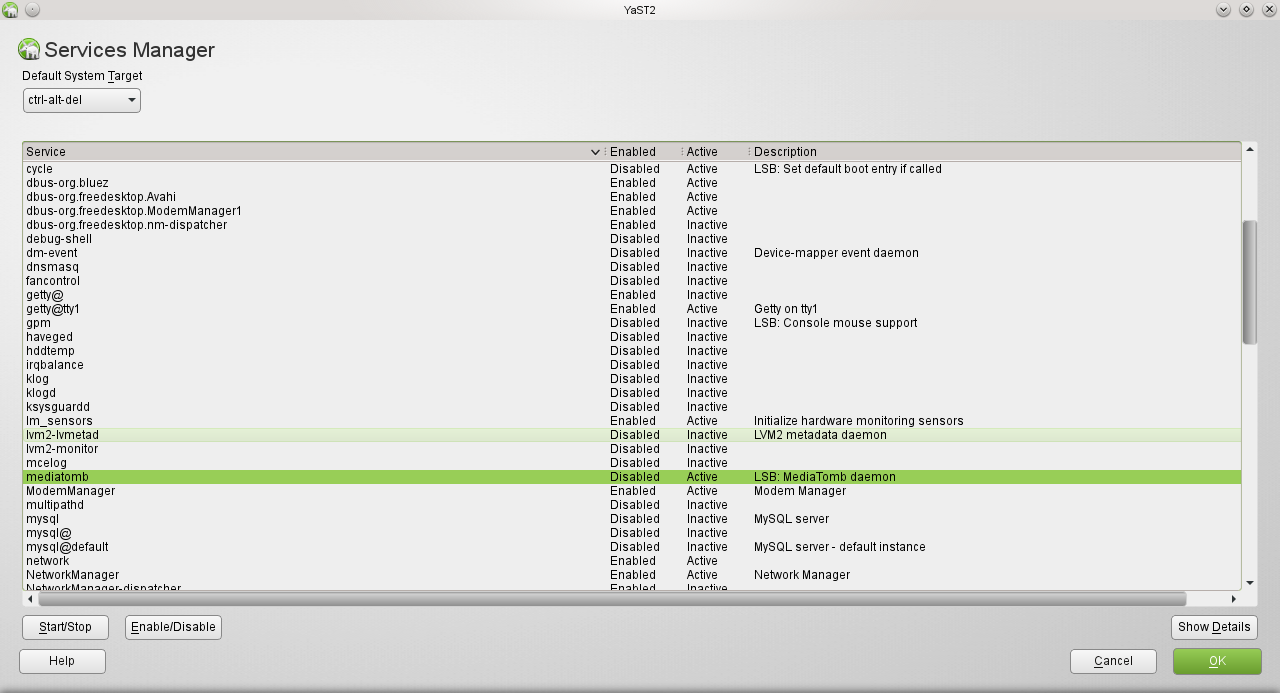
Open YaST > System > Services Manager
Select the mediatomb system service and click on the Start/Stop button.
Using the shell
You can use the following commands (as root) to start/stop and check status of the mediatomb system service;
rcmediatomb start
rcmediatomb stop
rcmediatomb status
If the mediatomb service fails to start, you may need to do some more configuration. You can run the following commands to check the service;
systemctl -l status mediatomb.service
journalctl -xn
If you see the following from the systemctl -l status mediatomb.service command;
mediatomb.service - LSB: MediaTomb daemon
   Loaded: loaded (/etc/init.d/mediatomb)
   Active: failed (Result: resources) since Fri 2016-04-29 21:12:30 ACST; 11s ago
  Process: 16771 ExecStart=/etc/init.d/mediatomb start (code=exited, status=5)

Apr 29 21:12:30 your_pc's_name_here mediatomb[16771]: /usr/bin/mediatomb not installed
Apr 29 21:12:30 your_pc's_name_here systemd[1]: PID file /var/run/mediatomb.pid not readable (yet?) after start.
Apr 29 21:12:30 your_pc's_name_here systemd[1]: Failed to start LSB: MediaTomb daemon.
Apr 29 21:12:30 your_pc's_name_here systemd[1]: Unit mediatomb.service entered failed state.
You will need to edit /etc/init.d/mediatomb as well; because mediatomb's system service is looking for a executable, that does not exist. As the following error message indicates.
Apr 29 21:12:30 your_pc's_name_here mediatomb[16771]: /usr/bin/mediatomb not installed
Therefore you need to change some lines the above mentioned script, that starts the mediatomb system service. If your system has the mediatomb-mysql software package installed, see the below example of a modified script for the mediatomb system service. If your system has the mediatomb-sqlite package installed replace mediatomb-mysql with mediatomb-sqlite instead.
Below is a example of a /etc/init.d/mediatomb script, that uses mysql for mediatomb's database format.
#!/bin/sh
#
# mediatomb This script starts and stops the mediatomb daemon
#
# processname: mediatomb
# description: mediatomb is a daemon process which provides a UPnP service
# config: /etc/mediatomb
# config: /etc/mediatomb/config.xml
# pidfile: /var/run/mediatomb.pid

### BEGIN INIT INFO
# Provides:     mediatomb
# Required-Start:   $local_fs $remote_fs $network
# Required-Stop:    $local_fs $remote_fs $network
# Default-Start:    3 5
# Default-Stop:     0 1 2 6
# Short-Description:    MediaTomb daemon
# Description:      This script starts and stops the mediatomb daemon
### END INIT INFO

# Source function library.
. /etc/rc.status
rc_reset

# Source networking configuration.
#. /etc/sysconfig/network

# Set default mediatomb configuration.

# either make an installation in /etc/mediatomb and leave this blank,
# or specify an alternative config file location using the -c option
# Note: be aware, that -i parameter is used to set the ip of the
# interface specified above

. /etc/mediatomb.conf

###############################
# make sure to run it as $MT_USER
MEDIATOMB="-d -u $MT_USER -g $MT_GROUP -P $MT_PIDFILE -l $MT_LOGFILE -m $MT_HOME -f $MT_CFGDIR -p $MT_PORT"

test -x "/usr/bin/mediatomb-mysql" || { echo "/usr/bin/mediatomb not installed";
	if [ "$1" = "stop" ]; then exit 0;
	else exit 5; fi; }

[ ${MT_INTERFACE} = "NOT_SET" ] && echo "Please edit /etc/mediatomb.conf and change \
the MT_INTERFACE variable to your network device (eth0, eth1, etc.)" && exit 0

PATH="$PATH:/usr/bin:/usr/local/bin"

IFACE_IP=`ifconfig | grep -i "$MT_INTERFACE" -A 1|grep "inet addr"|cut -d " " -f 12|cut -d ":" -f 2`
[ -d /var/lock/subsys/ ] || mkdir -p /var/lock/subsys/

# By default it's all good
RETVAL=0

# See how we were called.
case "$1" in
	start)
		# Start daemon.
		echo -n "Applying multicast settings to $MT_INTERFACE... "
		# those settings are necessary for us to react to M-SEARCH requests
		route add -net 239.0.0.0 netmask 255.0.0.0 $MT_INTERFACE >/dev/null 2>&1
		ifconfig $MT_INTERFACE allmulti
		touch $MT_PIDFILE
		chown $MT_USER $MT_PIDFILE

		mkdir -p "/$MT_HOME/$MT_CFGDIR"
		chown $MT_USER "/$MT_HOME/$MT_CFGDIR"

		echo -n "Starting mediatomb: "
		mediatomb-mysql $MEDIATOMB $IFACE_IP $MT_OPTIONS
		RETVAL=$?
		rc_status -v
		[ $RETVAL = 0 ] && touch /var/lock/subsys/mediatomb
		;;
	stop)
		# Stop daemons.
		echo -n "Shutting down mediatomb: "
		killproc mediatomb
		RETVAL=$?
		rc_status -v

		[ $RETVAL = 0 ] && rm -f /var/lock/subsys/mediatomb
		;;
	restart)
		$0 stop
		$0 start
		;;
	reload)
		$0 stop
		$0 start
		;;
	condrestart)
		[ -e /var/lock/subsys/mediatomb ] && $0 restart
		;;
	status)
		if test -e $MT_PIDFILE ; then
			echo " seems running"
		else
			echo " not running"
		fi
		RETVAL=$?
		;;
	*)
		echo "Usage: $0 {start|stop|restart|status|condrestart}"
		RETVAL=1
		;;
esac

rc_exit
As you can see, now there is a real executable file (that does actually exist) there.
Automatically start service when system starts
You can have the mediatomb service start when the system does. The easy way to do this is by using YaST Services Manager.
Using the YaST Services Manager
To enable/disable the automatic starting of the mediatomb system service, follow the steps below;
Open YaST > System > Services Manager
Then select the mediatomb service and click on the Enable/Disable button pictured below;
And that's it, the mediatomb service should start every time your system does!
Adding media files to the database
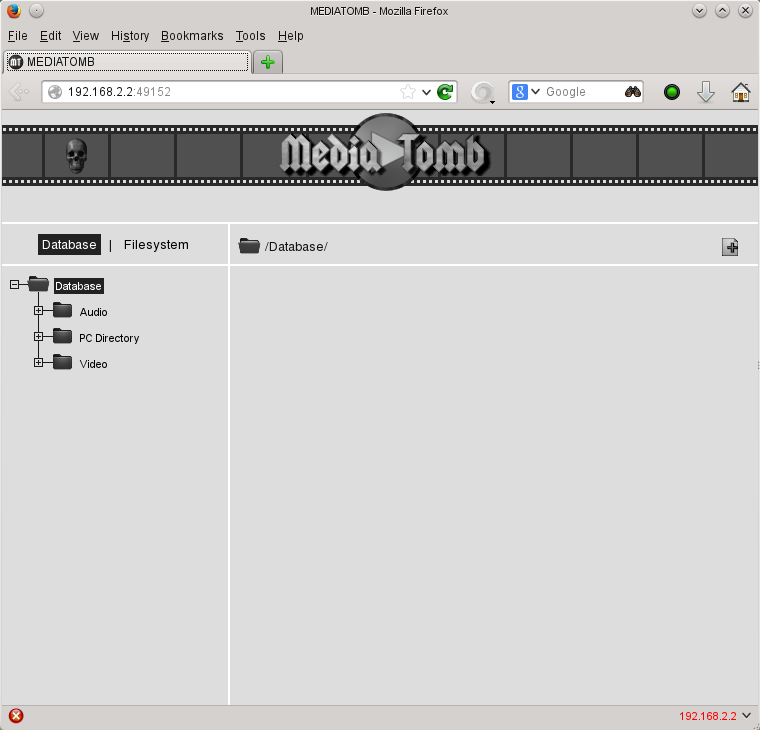
Below is a sceenshot of the mediatomb web interface.
Accessing the mediatomb web interface
Step 1
Open your web browser.
Step 2
There are two ways you can access the mediatomb web interface, in your web browser's address bar type localhost:TCP_port_here or YOUR_PC'S_IP_ADDRESS_HERE:TCP_port_here.
Example:
192.168.2.3:49152
The above example uses TCP port 49152 and 192.168.2.3 as my computer's local IP address.
localhost:49152
The above example uses the TCP port 49152 once again.
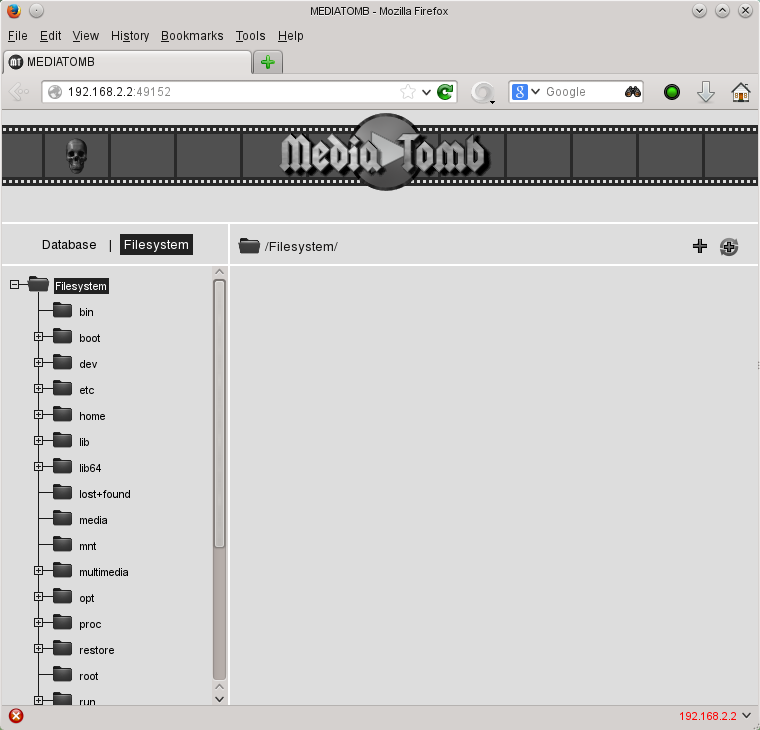
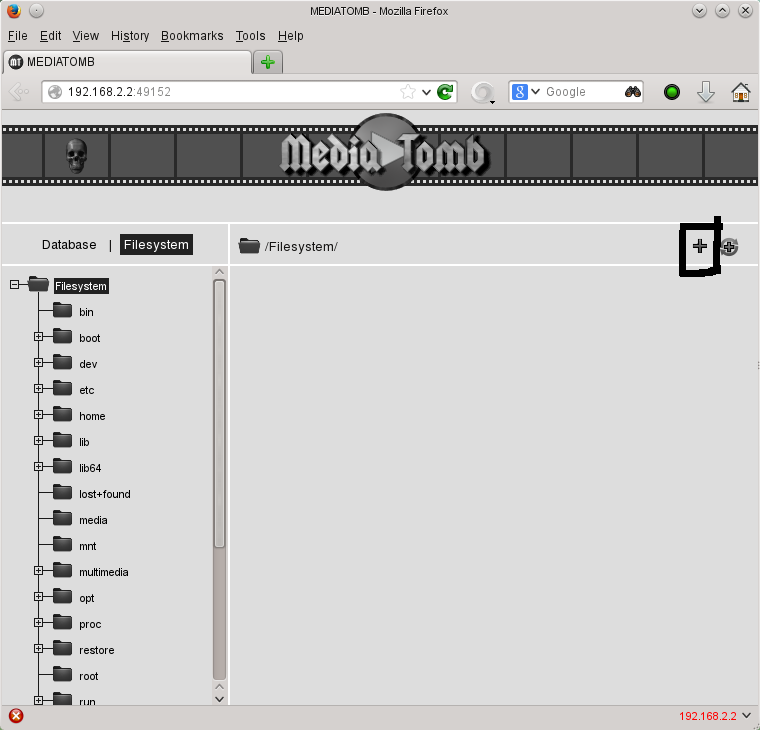
Click on the icon inside the black squire below to add your media files. This option will just add the file(s) you have selected, to the mediatomb database of your media file(s).
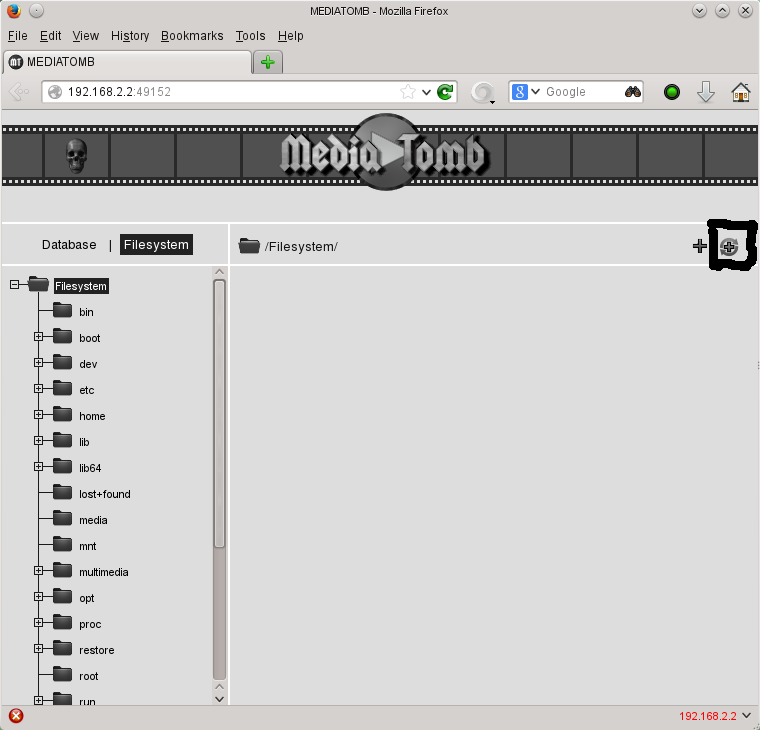
Click on the icon inside the black squire below to add your media files. This option will add the folder as an "autoscan" directory. Therefore if you add more media files to the selected folder, mediatomb will automactaclly "see" them (you therefore will not have to do anything, after this step to add files to the mediatomb database for the selected folder.)
Editing mediatomb's configuration file
Below is an example of config.xml
<?xml version="1.0" encoding="UTF-8"?>
<config version="2" xmlns="http://mediatomb.cc/config/2" xmlns:xsi="http://www.w3.org/2001/XMLSchema-instance" xsi:schemaLocation="http://mediatomb.cc/config/2 http://mediatomb.cc/config/2.xsd">
  <server>
    <ui enabled="yes" show-tooltips="yes">
      <accounts enabled="no" session-timeout="30">
        <account user="mediatomb" password="mediatomb"/>
      </accounts>
    </ui>
    <name>MediaTomb Media Server</name>
    <port>49152</port>
    <udn>uuid:fb48dd98-ad1e-4cf0-9cc7-9c9fc7a56009</udn>
    <home>/home/james/.mediatomb</home>
    <webroot>/usr/share/mediatomb/web</webroot>
    <storage>
      <sqlite3 enabled="yes">
        <database-file>mediatomb.db</database-file>
      </sqlite3>
    </storage>
    <protocolInfo extend="yes"/><!-- For PS3 support change to "yes" -->
    <!--
       Uncomment the lines below to get rid of jerky avi playback on the
       DSM320 or to enable subtitles support on the DSM units
    -->
    <!--
    <custom-http-headers>
      <add header="X-User-Agent: redsonic"/>
    </custom-http-headers>

    <manufacturerURL>redsonic.com</manufacturerURL>
    <modelNumber>105</modelNumber>
    -->
    <!-- Uncomment the line below if you have a Telegent TG100 -->
    <!--
       <upnp-string-limit>101</upnp-string-limit>
    -->
    <extended-runtime-options>
      <ffmpegthumbnailer enabled="yes">
        <thumbnail-size>128</thumbnail-size>
        <seek-percentage>5</seek-percentage>
        <filmstrip-overlay>yes</filmstrip-overlay>
        <workaround-bugs>no</workaround-bugs>
        <image-quality>8</image-quality>
      </ffmpegthumbnailer>
      <mark-played-items enabled="no" suppress-cds-updates="yes">
        <string mode="prepend">*</string>
        <mark>
          <content>video</content>
        </mark>
      </mark-played-items>
    </extended-runtime-options>
  </server>
  <import hidden-files="no">
    <scripting script-charset="UTF-8">
      <common-script>/usr/share/mediatomb/js/common.js</common-script>
      <playlist-script>/usr/share/mediatomb/js/playlists.js</playlist-script>
      <virtual-layout type="builtin">
        <import-script>/usr/share/mediatomb/js/import.js</import-script>
      </virtual-layout>
    </scripting>
    <mappings>
      <extension-mimetype ignore-unknown="no">
        <map from="mp3" to="audio/mpeg"/>
        <map from="ogx" to="application/ogg"/>
        <map from="ogv" to="video/ogg"/>
        <map from="oga" to="audio/ogg"/>
        <map from="ogg" to="audio/ogg"/>
        <map from="ogm" to="video/ogg"/>
        <map from="asf" to="video/x-ms-asf"/>
        <map from="asx" to="video/x-ms-asf"/>
        <map from="wma" to="audio/x-ms-wma"/>
        <map from="wax" to="audio/x-ms-wax"/>
        <map from="wmv" to="video/x-ms-wmv"/>
        <map from="wvx" to="video/x-ms-wvx"/>
        <map from="wm" to="video/x-ms-wm"/>
        <map from="wmx" to="video/x-ms-wmx"/>
        <map from="m3u" to="audio/x-mpegurl"/>
        <map from="pls" to="audio/x-scpls"/>
        <map from="flv" to="video/x-flv"/>
        <map from="mkv" to="video/x-matroska"/>
        <map from="mka" to="audio/x-matroska"/>
        <!-- Uncomment the line below for PS3 divx support -->
        <!-- <map from="avi" to="video/divx"/> -->
        <!-- Uncomment the line below for D-Link DSM / ZyXEL DMA-1000 -->
        <!-- <map from="avi" to="video/avi"/> -->
      </extension-mimetype>
      <mimetype-upnpclass>
        <map from="audio/*" to="object.item.audioItem.musicTrack"/>
        <map from="video/*" to="object.item.videoItem"/>
        <map from="image/*" to="object.item.imageItem"/>
      </mimetype-upnpclass>
      <mimetype-contenttype>
        <treat mimetype="audio/mpeg" as="mp3"/>
        <treat mimetype="application/ogg" as="ogg"/>
        <treat mimetype="audio/x-flac" as="flac"/>
        <treat mimetype="image/jpeg" as="jpg"/>
        <treat mimetype="audio/x-mpegurl" as="playlist"/>
        <treat mimetype="audio/x-scpls" as="playlist"/>
        <treat mimetype="audio/x-wav" as="pcm"/>
        <treat mimetype="audio/L16" as="pcm"/>
        <treat mimetype="video/x-msvideo" as="avi"/>
        <treat mimetype="video/mp4" as="mp4"/>
        <treat mimetype="audio/mp4" as="mp4"/>
        <treat mimetype="application/x-iso9660" as="dvd"/>
        <treat mimetype="application/x-iso9660-image" as="dvd"/>
      </mimetype-contenttype>
    </mappings>
    <online-content>
      <YouTube enabled="no" refresh="28800" update-at-start="no" purge-after="604800" racy-content="exclude" format="mp4" hd="no">
        <favorites user="mediatomb"/>
        <standardfeed feed="most_viewed" time-range="today"/>
        <playlists user="mediatomb"/>
        <uploads user="mediatomb"/>
        <standardfeed feed="recently_featured" time-range="today"/>
      </YouTube>
    </online-content>
  </import>
  <transcoding enabled="no">
    <mimetype-profile-mappings>
      <transcode mimetype="video/x-flv" using="vlcmpeg"/>
      <transcode mimetype="application/ogg" using="vlcmpeg"/>
      <transcode mimetype="application/ogg" using="oggflac2raw"/>
      <transcode mimetype="audio/x-flac" using="oggflac2raw"/>
    </mimetype-profile-mappings>
    <profiles>
      <profile name="oggflac2raw" enabled="no" type="external">
        <mimetype>audio/L16</mimetype>
        <accept-url>no</accept-url>
        <first-resource>yes</first-resource>
        <accept-ogg-theora>no</accept-ogg-theora>
        <agent command="ogg123" arguments="-d raw -o byteorder:big -f %out %in"/>
        <buffer size="1048576" chunk-size="131072" fill-size="262144"/>
      </profile>
      <profile name="vlcmpeg" enabled="no" type="external">
        <mimetype>video/mpeg</mimetype>
        <accept-url>yes</accept-url>
        <first-resource>yes</first-resource>
        <accept-ogg-theora>yes</accept-ogg-theora>
        <agent command="vlc" arguments="-I dummy %in --sout #transcode{venc=ffmpeg,vcodec=mp2v,vb=4096,fps=25,aenc=ffmpeg,acodec=mpga,ab=192,samplerate=44100,channels=2}:standard{access=file,mux=ps,dst=%out} vlc:quit"/>
        <buffer size="14400000" chunk-size="512000" fill-size="120000"/>
      </profile>
    </profiles>
  </transcoding>
</config>
The option below, tells mediatomb which TCP port to always use.
<port>number</port>
Where number is the number of the TCP port you whould like mediatomb to always use.
Troubleshooting guide
Q) Why is mediatomb not displaying any of my media files on my media device?
A) You need to create a database of your media files using the mediatomb web interface at http://localhost:49152/ (this will only work if you are using TCP port 49152.)
You also need to make sure mediatomb is actually running, you can have mediatomb start automatically with openSUSE if you wish.
Q) The mediatomb system service will not start and systemctl -l status mediatomb.service command gives me the following error messages;
mediatomb.service - LSB: MediaTomb daemon
   Loaded: loaded (/etc/init.d/mediatomb)
   Active: failed (Result: resources) since Fri 2016-04-29 20:13:06 ACST; 7min ago
  Process: 14103 ExecStart=/etc/init.d/mediatomb start (code=exited, status=0/SUCCESS)

Apr 29 20:12:57 your_pc_name_here mediatomb[14103]: Applying multicast settings to eno1... Starting mediatomb: ..done
Apr 29 20:12:57 your_pc_name_here systemd[1]: PID 14124 read from file /var/run/mediatomb.pid does not exist or is a zombie.
Apr 29 20:13:06 your_pc_name_here systemd[1]: mediatomb.service never wrote its PID file. Failing.
Apr 29 20:13:06 your_pc_name_here systemd[1]: Failed to start LSB: MediaTomb daemon.
Apr 29 20:13:06 your_pc_name_here systemd[1]: Unit mediatomb.service entered failed state.
A) You need to make sure your network interface is running, as the mediatomb service will not run unless your network is. Connect your PC to your router and make both are turned on (and connected).
