SDB:Install oneAPI
Intel products will deliver the tools needed to deploy applications and solutions across these architectures. Its set of complementary toolkits—a base kit and specialty add-ons—simplify programming and help developers improve efficiency and innovation. The core Intel oneAPI DPC++ Compiler and libraries implement the oneAPI industry specifications available at https://www.oneapi.com/open-source/.
Highlights
- The DPC++ Compatibility Tool is a migration engine that transforms CUDA* code into a standards-based DPC++ code.
- Data Parallel C++ (DPC++) is an open, standards-based evolution of ISO C++ that incorporates Khronos SYCL* and community extensions to simplify data parallel programming.
- Designed for end-to-end machine learning and data science.
- Powerful libraries—including deep learning, math, and video and media processing.
Requirements
CPU Processor Requirements
Systems based on Intel® 64 architectures below are supported both as host and target platforms.
- Intel® Core™ processor family or higher
- Intel® Xeon® processor family
- Intel® Xeon® Scalable processor family
Requirements for Accelerators
- Integrated GEN9 (and higher) GPUs. See source in Intel® Graphics Compiler for OpenCL™
- FPGA Card: see Intel(R) DPC++ Compiler System Requirements.
Disk Space Requirements
- 3.3 GB of disk space (minimum) on a standard installation.
- NOTE: During the installation process, the installer may need up to 6 GB of additional temporary disk storage to manage the download and intermediate installation files.
Memory Requirements
- 8 GB RAM recommended
Package Requirements
Install CMake*, pkg-config, and GNU* Dev Tools to Build Samples. Although the CMake and pkg-config build tools are not required by the oneAPI tools and toolkits, many oneAPI samples are provided as CMake projects and require CMake to build them. In some cases pkg-config is necessary to locate libraries needed to complete a build of the application.
The Intel compilers utilize the existing GNU build toolchains to provide a complete C/C++ development environment. If your distribution of Linux does not include the complete suite of GNU development tools, you need to install these tools. To install CMake, pkg-config, and the GNU development tools on your Linux system, open a terminal session and enter the following commands:
$ sudo zypper ref
$ sudo zypper --non-interactive install cmake pkg-config
$ sudo zypper --non-interactive install pattern devel_C_C++
Verify the installation by displaying the installation location with this command:
$ which cmake pkg-config make gcc g++
One or more of these locations will display:
/usr/bin/cmake
/usr/bin/pkg-config
/usr/bin/make
/usr/bin/gcc
/usr/bin/g++
Installing : Zypper repository instructions
Intel provides access to all of its oneAPI toolkits and packages through a public Zypper repository. Zypper is a command line package manager which provides functions like repository access, dependency solving, package installation, etc. for openSUSE* and SUSE* Linux* Enterprise. See below for instructions on how to pull the latest versions of the Intel tools.
If you have an existing oneAPI installation from older, use 'zypper rm <packages>' to remove your old installation. For example:
sudo -E zypper rm intel-hpckit intel-basekit intel-oneapi*
Add the Intel oneAPI repository public key with the following command:
sudo zypper addrepo https://yum.repos.intel.com/oneapi oneAPI
By adding this new repository, Zypper had to automatically import the public repo key. For some cases rpm might require explicit key import by:
rpm --import https://yum.repos.intel.com/intel-gpg-keys/GPG-PUB-KEY-INTEL-SW-PRODUCTS.PUB
Install the desired package. Determine which Intel® oneAPI Toolkit package or packages you require. A Table of Packages is at the top of this page. If you are on a company intranet or behind a firewall make sure to set environment variables http_proxy and https_proxy appropriate to allow yum access the repository servers using https protocol. To install a Toolkit, for example the Intel® oneAPI Base Toolkit, the meta package name is "intel-basekit" and it can be installed with the following:
sudo zypper install intel-basekit
Disable Hangcheck
This section applies only to applications with long-running GPU compute workloads in native environments. Not recommended for virtualizations or other standard usages of GPU, such as gaming.
A workload that takes more than four seconds for GPU hardware to execute is a long running workload. By default, individual threads that qualify as long-running workloads are considered hung and are terminated. Disabling the hangcheck timeout period avoids this problem.
NOTE: If the system is rebooted, hangcheck is automatically enabled. You must disable hangcheck again after every reboot or follow the directions below to disable hangcheck persistently (across multiple reboots).
To disable hangcheck until the next reboot:
sudo sh -c "echo N> /sys/module/i915/parameters/enable_hangcheck"
To disable hangcheck across multiple reboots:
Open a terminal and run this command:
 Append i915.enable_hangcheck=0 to GRUB_CMDLINE_LINUX_DEFAULT in /etc/default/grub
 Run sudo update-grub
Reboot the system. Hangcheck will remain disabled.
Build and Run a Sample Project Using the Command Line
Set Environment Variables for CLI Development
For working at a Command Line Interface (CLI), the tools in the oneAPI toolkits are configured via environment variables. Set up your CLI environment by sourcing the setvars script:
Option 1: Source setvars.sh once per session
Source setvars.sh every time you open a new terminal: You can find the setvars.sh script in the root folder of your oneAPI installation, which is typically /opt/intel/oneapi/ when installed as root or sudo, and ~/intel/oneapi/ when not installed as a super user. If you customized the installation folder, the setvars.sh is in your custom folder.
source /opt/intel/oneapi/setvars.sh
:: initializing oneAPI environment ...
:: intelpython -- latest
:: vtune -- latest
:: daal -- latest
:: dev-utilities -- latest
:: tbb -- latest
:: dnnl -- latest
:: compiler -- latest
:: advisor -- latest
:: debugger -- latest
:: ccl -- latest
:: ippcp -- latest
:: dpcpp-ct -- latest
:: vpl -- latest
:: mpi -- latest
:: mkl -- latest
:: ipp -- latest
:: oneAPI environment initialized ::
Option 2: One time setup for setvars.sh
To have the environment automatically set up for your projects, include the command source install_dir>/setvars.sh in a startup script where it will be invoked automatically (replace <install_dir> with the path to your oneAPI install location).
For example, you can add the source <install_dir>/setvars.sh command to your ~/.bashrc or ~/.bashrc_profile or ~/.profile file. To make the settings permanent for all accounts on your system, create a one-line .sh script in your system's /etc/profile.d folder that sources setvars.sh (for more details, see /etc/profile.d/). The setvars.sh script can also be managed using a configuration file.
In the same terminal, run the application (it should be in your PATH):
$ oneapi-cli
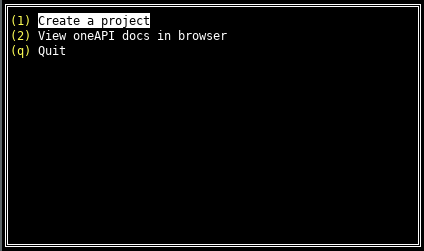
The oneAPI CLI menu appears:
- Use the up and down arrow keys to select Create a project, then press Enter
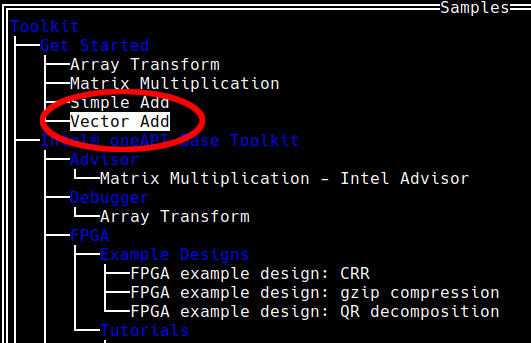
- Select the language for your sample. For your first project, select cpp , then press Enter. The toolkit samples list appears.
- Select the Vector Add sample. Vector Add is a simple test application that will help verify that the tools are setup correctly and can access your system's GPU:
- After you select a sample, press Enter.
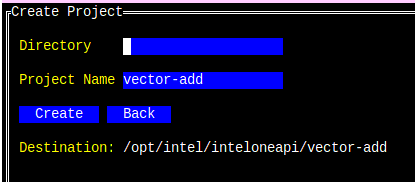
- Enter an absolute or a relative directory path to create your project. Provide a directory and project name. The Project Name is the name of the sample you chose in the previous step.
- Press Tab to select Create, then press Enter:
The directory path is printed below the Create button.
Now, navigate to where the makefile is located. If there is no makefile in the project, refer to the section below on how to use CMake to create a project with a makefile that you can use to run the design. Build the program using Make.
cd vector-add
make all
dpcpp -O2 -g -std=c++17 -o vector-add-buffers src/vector-add-buffers.cpp
Finally run the program.
make run
./vector-add-buffers
Running on device: Intel(R) Gen9 HD Graphics NEO
Vector size: 10000
[0]: 0 + 0 = 0
[1]: 1 + 1 = 2
[2]: 2 + 2 = 4
...
[9999]: 9999 + 9999 = 19998
Vector add successfully completed on device.
To understand the command used in the Makefile, refer to the Intel® oneAPI Programming Guide.
This text was built by Official oneAPI Innovator Intel and openSUSE member Alessandro de Oliveira Faria based on Intel tutorials. More information see the official page HERE


