SDB:Howto-pihole
Tested on openSUSE
Recommended articles
Related articles
Pihole is a network-wide blocker for advertising and trackers. The pihole-projects provides installation scripts, but unfortunately not for openSUSE. A systemd-service for pihole is missing as well.
Our community member Herbster0815 did a pretty good job in packaging pihole for openSUSE. This how-to describes how you get it running.
Preface
Pihole provides a DNS Server for the local network, which uses block- and filter lists to block calls to known advertising servers. Once pihole is set-up, one needs to instruct the DHCP-Server to use pihole as DNS server. This is usually set in your router. The pi-hole server should receive a fix IP address (can be set in Router as well)
Pihole does not need much resources and can be run on a NAS, a virtual machine or on an old Raspberry Pi. Below installation runs on a Raspi 3 with 1GB RAM and MicroOS for pihole - see notes)
Pihole comes with various packages:
- pi-hole - the command-line program to manage settings
- pi-hole-ftl - the Faster Than Light (FTL) pihole-DNS-Server.
- pi-hole-admin-lte-config-lighttpd - Pi-hole AdminLTE configuration files for lighttpd
You need at least the first two packages, if you want a webfrontend to manage settings and see the statistics, the third package must be installed as well.
Installation
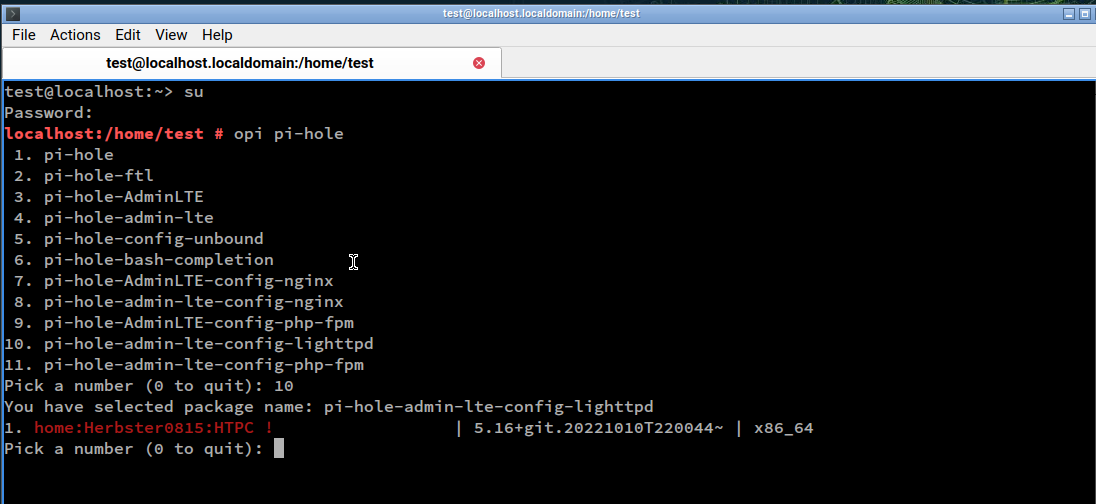
The easiest way to install pihole is the openSUSE Package Installer opi:
Select pi-hole-admin-lte-config-lighttpd for installation - required packages are installed automatically.
Select home:Herbster0815:pihole repository (and keep it after installation)
Configuration
The package installation provides some basic setup of the configuration files, however, some small manual work is required
- edit /etc/pihole/setupVars.conf
Add your preferred DNS servers or use the preset. In any case you need to edit your local IP address! Note that your pihole should receive a fix IP address from your router, which needs to be configured in the DHCP server as well. Find details in the pihole documentation
- edit /etc/dnsmasq.d/01-pihole.conf
Change the DNS servers as well
- start the services:
systemctl enable --now pi-hole-lighttpd
systemctl enable --now pi-hole-ftlNow is a good time to update the blocklists:
and to set a password for the pihole webfrontend:
The pihole dashboard is now accessible at htp://<your-IP-address>
Installation on MicroOS - RPM
As self-maintained, transactional and basically immutable system is MicroOS the weapon of choice for a fire-and-forget solution like pihole. Here are the steps to set it up (on a Raspi3 with 1GB RAM).
Installation of MicroOS
I used a USB stick with a recent copy of MicroOS, booted the Raspi from the same and installed the system on a 32GB SD card. For the installation, a monitor, keyboard and mouse were attached to the Raspi, and removed after the installation was completed. Additionally, systemd-status-mail was installed to monitor the health status of MicroOS.
As pihole is installed to /var, we need to make sure that this folder is available during installation.
Open a transactional shell:
Mount /var manually:
mount /var
and continue directly with the installation (see below) in the same transactional shell.
Installation
For the installation of opi and pihole, open a transactional shell:
From here you can use zypper to install opi, and with opi in place, proceed as described above. Leave the shell with exit Reboot the system for the changes to take place. After reboot, continue with the configuration as described above.
EMail notification for updates
In case you want to be informed if an update on the (mostly unattended) MicroOS system fails, consider systemd-status-mail.
SELinux
Pihole does currently not work well with SELinux, so it should be switched off until a pihole module for SELinux is in place (see Bugzilla)
In /etc/default/grub, add the following line to the GRUB_CMDLINE_LINUX_DEFAULT= line:
GRUB_CMDLINE_LINUX_DEFAULT="security=selinux selinux=0 enforcing=0"
Afterwards run
and reboot.
Raspberry Pi
The Raspi does not come with a Real-Time-Clock (RTC). Although a NTP daemon is started by default, it needs some seconds until the correct time is available. This confuses the logging of pihole, and results in a broken dashboard.
If you are using chronyd to synchronize time (default on MicroOS) you can easily overcome this situation with
systemctl enable chrony-wait
Another option could be to install fake-hwclock using opi. Afterwards, enable the service with
systemctl enable --now fake-hwclock
Installation on MicroOS - Container
The preferred way to run software on MicroOS is continerized. To do so, either select the MicroOS version with podman during installation, or install podman afterwards (transactional-update pkg install podman)
Log in as root (su -) and create the directories /root/etc-pihole and /root/etc-dnsmasq. They are needed for mapping /etc/pihole and /etc/dnsmasq.d.
Now run the container installation:
podman run -d --name pihole --label "io.containers.autoupdate=registry" -e TZ=Europe/Berlin -e VIRTUAL_HOST=pi.hole -e
PROXY_LOCATION=pi_hole -e ServerIP=127.0.0.1 -e WEBPASSWORD=test --cap-add=NET_ADMIN -p 8080:80 -p 53:53/udp -p 53:53/tcp -p
443:443 -v /root/etc-pihole:/etc/pihole:z -v /root/etc-dnsmasq:/etc/dnsmasq.d:z docker.io/pihole/pihole:latest
(Select docker.io when asked to install the pihole container)
Note the autoupdate-name must match the container name!
ServerIP should contain the fix IP address assigned to the host (like 192.168.1.254)
WEBPASSWORD may be something more senseful
Configuration files can be edited as above.
Now generate a systemd service to start the container automatically, copy it to the respective folder and restart the systemd-daemon:
cp container-pihole.service /etc/systemd/system/.
systemctl daemon-reload && systemctl enable --now container-pihole.serviceAs pihole is now running, the dashboard can be accessed on port 8080 (-p 8080:80 - chose port as you like)
To set a password (pihole -a -p), open a podman shell:
Now pihole is ready to use, and will be updated automatically as well
The webfrontend can be accessed under http://<ServerIP>:8080
Communication
Feedback is welcome. You can email the support mailing list to provide feedback or visit the openSUSE Bar and someone might be able to discuss it with you.
