SDB:Encrypted root file system
/home.
Introduction and Motivation
Most laptop users do not begin to think about the problems associated with laptop theft until after the first theft occurs. If the laptop happened to contain the source code for a new product, or company confidential documents, or the notes for an newspaper article on political corruption, or maybe just a private love letter, then there is a potential for catastrophe if the data falls into the wrong hands.
To counter the potentially damaging effects of laptop theft, one can either choose to use hardware encryption devices, or use software encryption to protect the data. The latter approach is particularly attractive because a software solution is more flexible than a hardware approach and with a modern CPU, most users will not notice the performance penalty associated with on-the-fly software encryption/decryption.
Why encrypt the root file system?
At first glance, one is inclined to encrypt only the most sensitive files,
or perhaps the entire user file system (/home) containing the sensitive
information. If one is not encrypting the root file system, then this is
a simple enough exercise which is supported by the SUSE installation
procedure, as well as other software, some of which even runs in
user space. However, the problem with
such an approach is that the contents of an encrypted file tend to
leak out of the encrypted area into other areas, e.g. swap, /tmp,
and /var. Furthermore, editors or other programs used for working with the
data may create swap files in other locations as well. Finally, metadata
related to the file, such as its size, permissions, access time etc.
of modern journaling filesystems possibly being stored on separate partitions only compound such
problems. In general, then, it is not
easy to fully prevent the leakage of information from the user's
file system into the root file system.
To understand how big the problem can be, suppose a company has installed
a web server on its intranet for the purpose of distributing company
confidential information. If an employee is viewing a doc file from this
web
server with Firefox using the OpenOffice.org plugin, then the complete file is
stored in /tmp and remains there until it is erased. Hence, while there
maybe only bits and pieces of a sensitive document in swap, the entire
document could be available in /tmp.
For this reason, the only appropriate course of action is to encrypt the entire root file system, along with the file system containing the sensitive data.
Encrypted root filesystem on a new installation
Encrypting the root file system, as well as /home, /tmp and other partitions is now fully supported in the openSUSE graphical installer.
LVM is not needed (but can be activated) for an encrypted root filesystem.
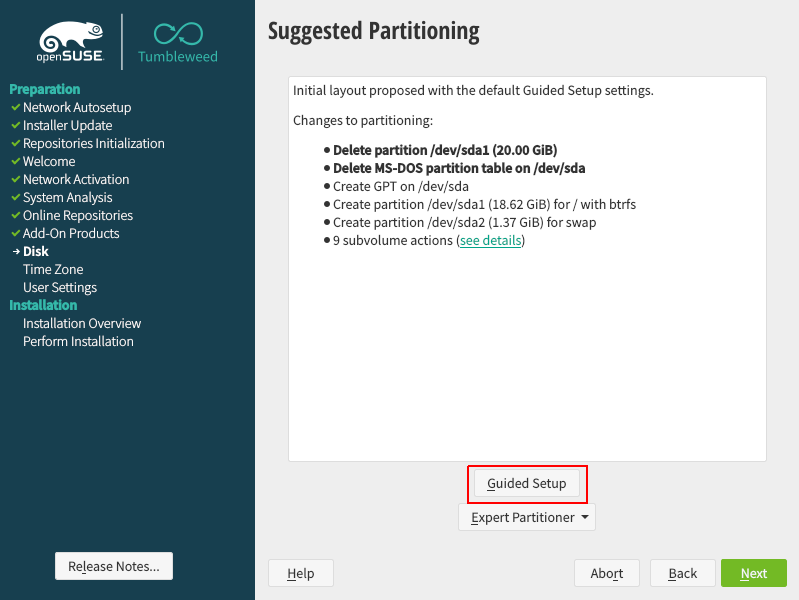
Select 'Guided Setup' during installation

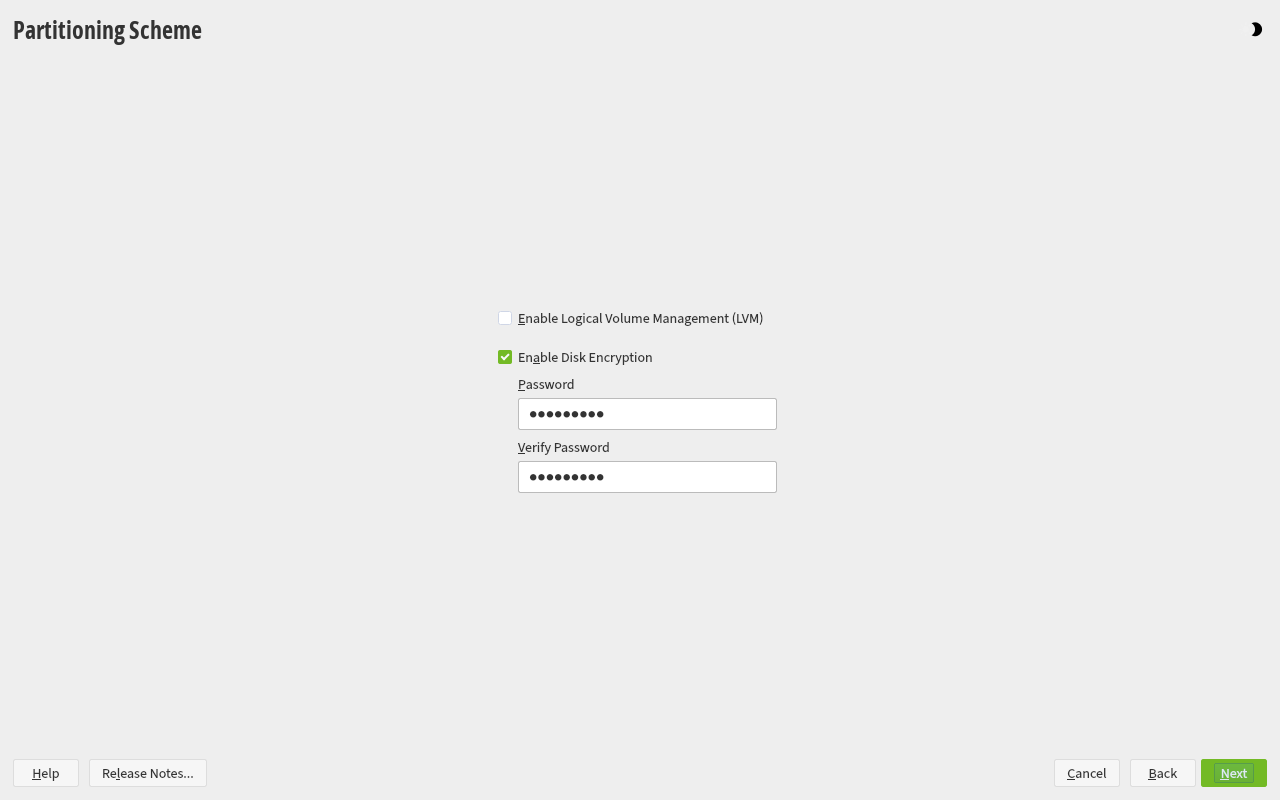
Check 'Enable Disk Encryption'

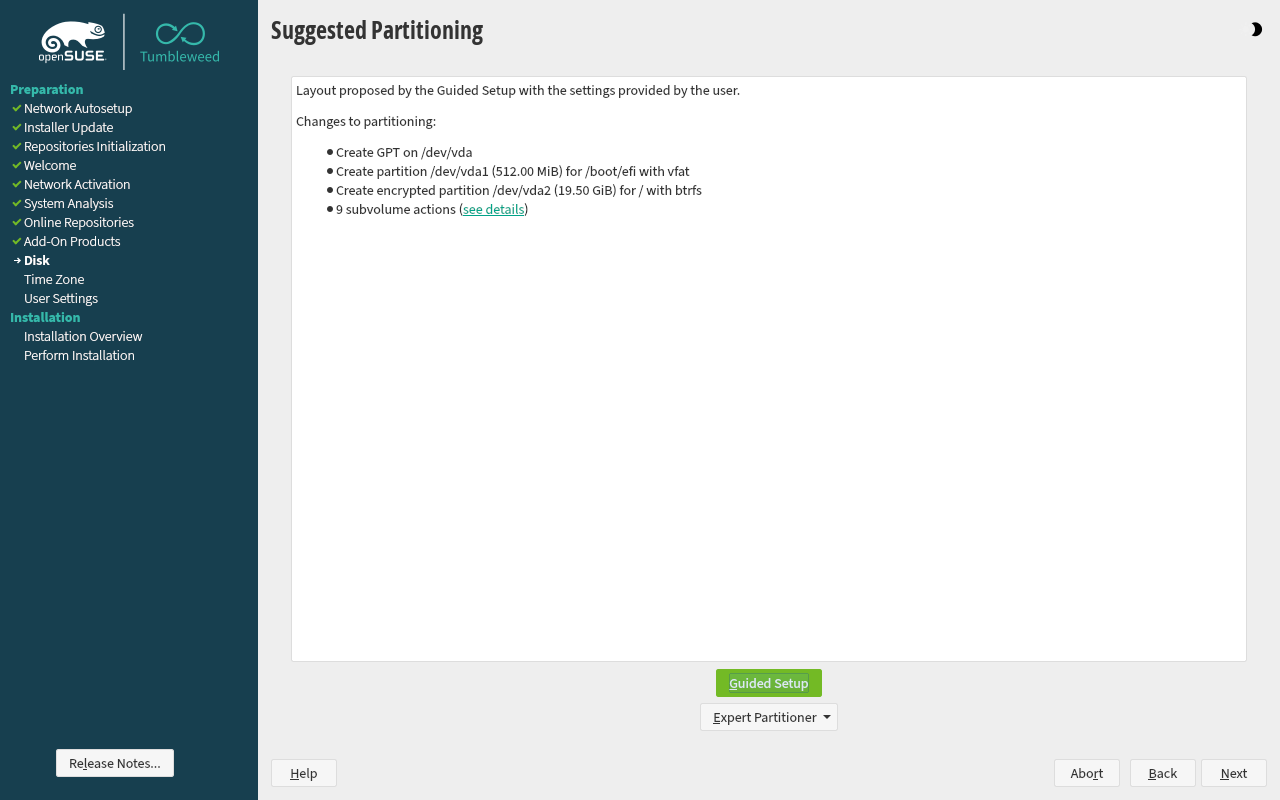
Start encrypted Installation


Make sure to use a passphrase that doesn't need special characters if you don't use the US layout, as they could be in a different position than your usual layout.
Encrypted partitions on existing installations
It is also possible to create encrypted partitions on a running system through the 'Partitioner' program in YAST. However, encrypting an existing partition destroys all data on it, and requires re-sizing and restructuring of existing partitions.
Instructions can be found in the 'Encrypting Partitions and Files' chapter of the openSUSE Security Guide, which is part of the official openSUSE manuals.
Avoiding to type the passphrase twice
With multiple partitions, every partition that has to be decrypted will require you to enter the password.
This can happen usually if you have installed openSUSE with an encrypted root filesystem and an encrypted swap partition WITHOUT LVM.
As LUKS supports only crypting a single partition, two LUKS partitions will be created and two passwords will be required.
Automatically decrypt the root partition
A disadvantage of encrypting the root partition is that you'll have to provide the decryption passphrase twice - once in the bootloader (Grub), and then again when your system actually boots.
You can avoid this by adding a key file to your initrd so that you only type the decryption passphrase in the bootloader.
In Leap and Tumbleweed
The steps below describe how to set up a key file. Please execute the commands and edit the files listed below as root.
- Create an empty key file. user $Only root should be able to read this file.
sudo touch /.root.keyuser $sudo chmod 600 /.root.key - Generate the key. user $
sudo dd if=/dev/urandom of=/.root.key bs=1024 count=1 - Add the key file as a valid way to decrypt your root partition. user $
sudo cryptsetup luksAddKey /dev/sda1 /.root.keyTo find the name of the device on your system, useuser $Find in the tree an entry listed as typesudo lsblkcrypt. Right above it you should see an entry of typepart. That is your partition name. It might have a name likesda2ornvme0n1p2. - Edit /etc/crypttab, find the row that pertains to the root partition by UUID and add the key file in the third column where it might already say
none.cr_sda1 UUID=... /.root.key x-initrd.attach
(Again, the partition name is just an example.) - Configure dracut to add the key file to the initrd:
echo -e 'install_items+=" /.root.key "' | sudo tee --append /etc/dracut.conf.d/99-root-key.conf > /dev/null
(Note the spaces before and after the doublequote characters.) - Rebuild the initrd. user $
sudo dracut -f
If you have other encrypted partitions (e.g. /home, swap, etc), you can create additional keys to mount them (after logging in) without entering a passphrase. This works exactly as described above in steps 1-4, except that you don't need to write x-initrd.attach on the partition's /etc/crypttab line, nor add the key for those partitions to the initrd (step 5), unless you also want these partitions decrypted at boot time. In any case, step 6 is still required for the changes to be applied.
In MicroOS
This is what you need to do to avoid typing password twice in openSUSE MicroOS:
- Open the transactional-update shell.
sudo transactional-update shell
- Follow the steps described in the "In Leap and Tumbleweed" section in the same way.
- After following the steps of the previous section, close the transactional-update shell as usual.
exit
Now the system should ask the password once in the next system boot.
Additional steps when using hibernation with encrypted swap partition
If you want to hibernate your system and the swap partition is also encrypted, in such case, edit /etc/crypttab (same as step 4 above) using the key for the swap partition, also appending the force option to the 4th column (it will look like x-initrd.attach,force). This option will tell dracut to force the inclusion of the encrypted swap partition so it gets decrypted upon reboot.
Additionally, configure dracut to ensure that the resume module is included in the initrd:
# echo -e 'add_dracutmodules+=" resume "' | sudo tee --append /etc/dracut.conf.d/99-resume.conf > /dev/null
(Note the spaces before and after the doublequote characters.)
Now repeat step 6 from above to rebuild the initrd.
Don't forget to add the line resume=UUID=.... (using the UUID of the encrypted partition containing swap) to the bootloader kernel-paramter using Yast.
sudo lsblk -o +UUID. Find in the tree an entry listed as type crypt [SWAP]. The UUID looks something like abc4eef4-f9ac-7788-abc0-cda56baabf08 and is on the right side at the same line.E.g.:
# lsblk -o +UUID
NAME MAJ:MIN RM  SIZE RO TYPE  MOUNTPOINTS  UUID
...
└─vda4
     253:4    0    2G  0 part               9eed6cd3-2ba0-4269-9abf-79d92193587a
  └─cr_swap
     254:1    0    2G  0 crypt [SWAP]       1feea2b9-ae28-4ca5-8d3b-d71f389e30ee
In this example, the value of the resume kernel command line option should be resume=UUID=1feea2b9-ae28-4ca5-8d3b-d71f389e30ee or resume=/dev/mapper/cr_swap.
Passphrase locale
The current openSUSE setup does not support to set the locale for the grub2 early stage.
Make sure to use a passphrase that doesn't need special characters if you don't use the US layout, as they could be in a different position than your usual layout.
Unattended boot with TPM 2.0
- This was an experimental feature and it is deprecated. It was only available in openSUSE Tumbleweed and MicroOS.
- The documentation for the new implementation can be found here: [1]
- fde-tools expects an encrypted root file system including /boot.
- Updated Guide
With the help of TPM 2.0 chip, it's possible to automatically decrypt the root partition without typing any passphrase. The key concept is to seal the LUKS key against a proper set of TPM Platform Configuration Registers(PCRs). When the system reaches a certain state, then the boot loader, i.e. grub2, can unseal the LUKS key with the expected PCRs and decrypt the root partition.
By default, the measured PCRs are 0,2,4,7, and 9, and the list is a configurable variable, FDE_SEAL_PCR_LIST,in /etc/sysconfig/fde-tools. For the details of TPM PCRs, please check Linux TPM PCR Registry.
After grub2 decrypts the root partition, it further forwards the unsealed key to systemd by synthesizing an additional initrd, so that systemd can reuse the unsealed key. For security reason, grub2 will discard the key immediately when entering the interactive mode, e.g. the menu editor or shell.
The potential use cases:
- a remote server or cloud VM to boot without intervention
- a local server to boot automatically after the power outage
Prerequisite
First of all, the key sealing and unsealing are based on TPM 2.0. Make sure your system supports TPM 2.0 and TPM 2.0 is enabled in BIOS/Firmware menu.
Currently, the required packages, pcr-oracle >= 0.4.5, fde-tools >= 0.6.5, and grub2 with the latest TPM 2.0 support, are only available in openSUSE Tumbleweed and MicroOS. Those packages may be merged into openSUSE Leap in the future.
After installing fde-tools, you can use the following command to check if the system supports TPM 2.0 sealing/unsealing:
user $ sudo fdectl tpm-present
Setup LUKS2 partitions
fde-tools relies on the LUKS2 token to track the keyslot for the sealed key, so a root partition in LUKS2 format is required. Setting up a LUKS2 partition can be done during installation or by converting the existing LUKS1 partition.
Choose LUKS2 format during installation
The Guided Setup with enabled disk encryption will automatically create a LUKS2 formatted partition using the PBKDF algorithm. No other changes are necessary.
Create default partitioning
Enable Disk Encryption for default partitioning


Alternatively, the partitions can be set up in the Expert partitioner.
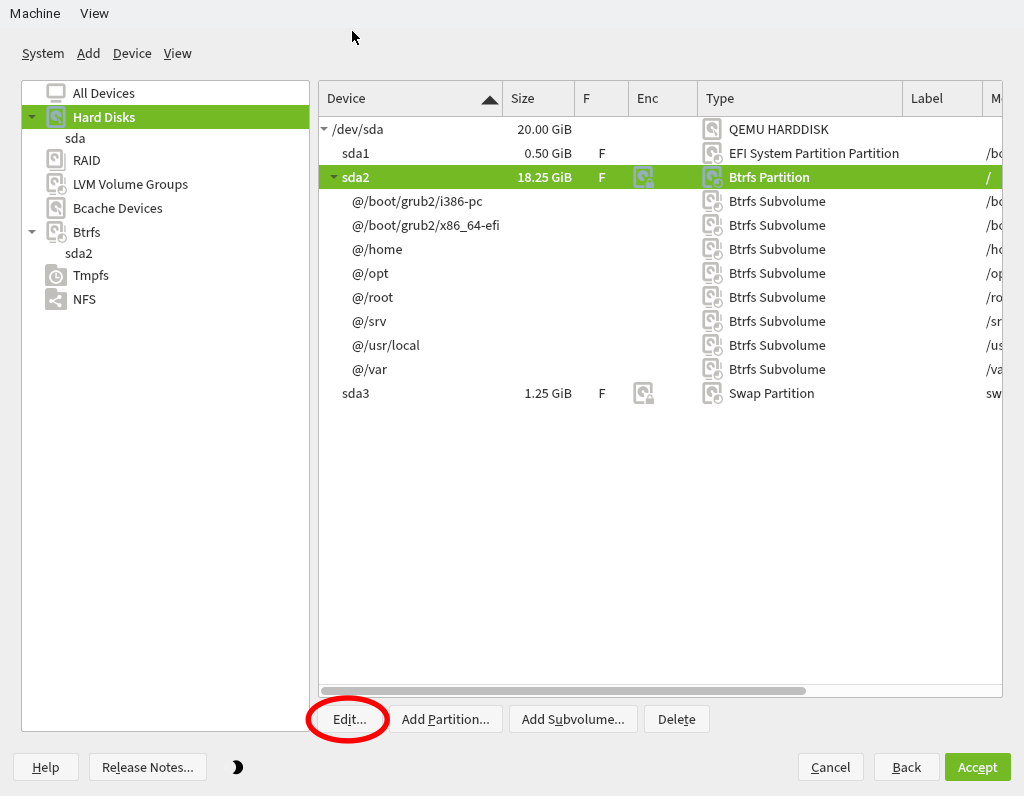
Edit a partition to change the encryption format
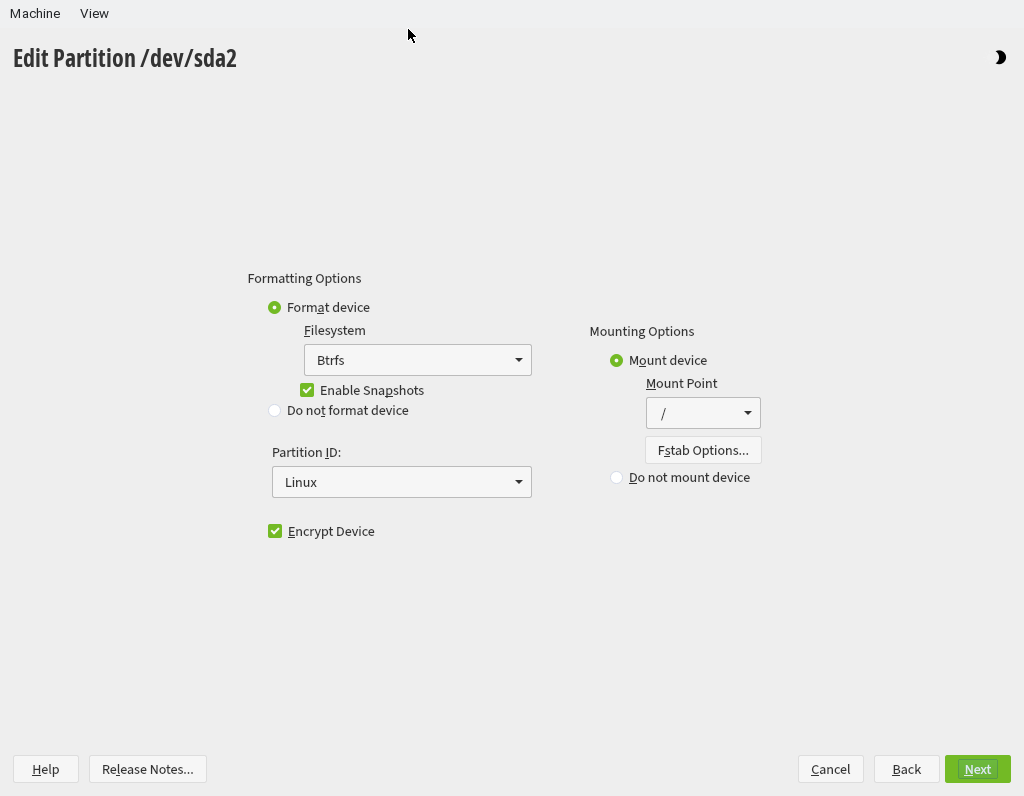
Make sure "Encrypt Device" is checked
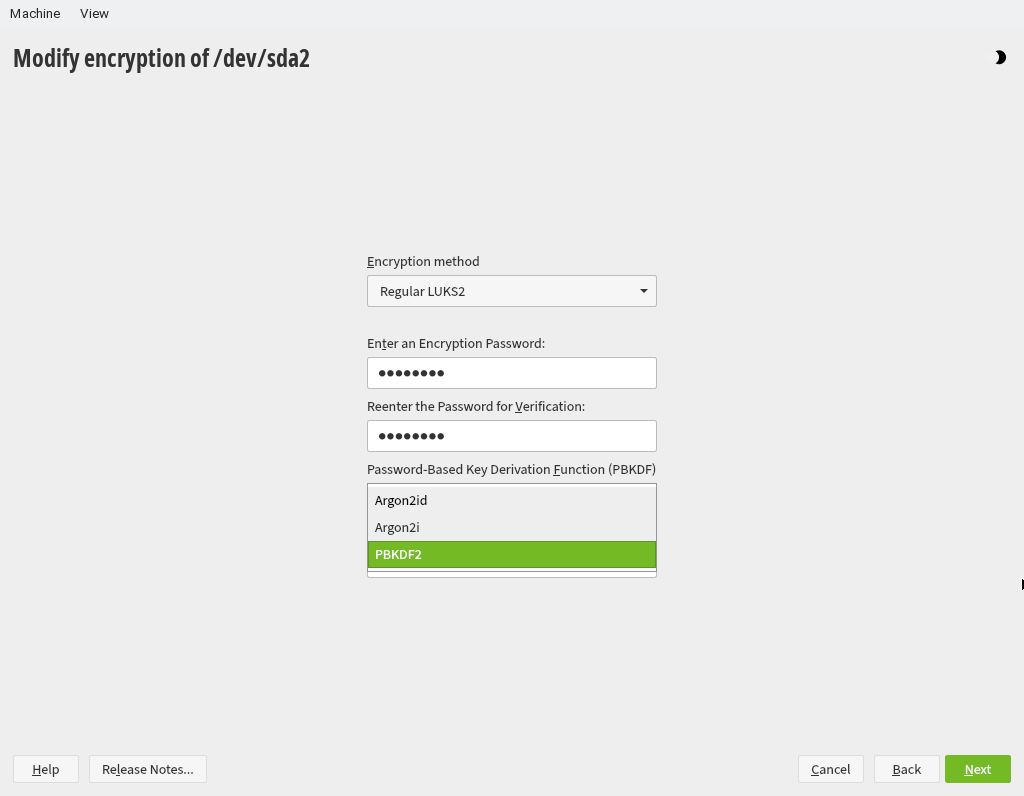
Choose LUKS2 as the encrytion method


When modifying the encryption options, please choose PBKDF2 for PBKDF which is the only algorithm supported by grub2 now.
Once you change the encryption method for all the encrypted partitions, continue the installation and then you will have a system with LUKS2 partitions.
Convert the existing LUKS1 partition to LUKS2
Since online conversion is not supported, you need to boot into a Live OS or the Rescue mode of the installation media to proceed the further commands.
After booting to the Live OS, inspect the partition layout with lsblk. For example:
# lsblk /dev/sda
NAME        MAJ:MIN RM  SIZE RO TYPE  MOUNTPOINTS
sda           8:0    0   20G  0 disk
├─sda1        8:1    0  512M  0 part  /boot/efi
├─sda2        8:2    0 18.3G  0 part
│ └─cr_root 254:1    0 18.2G  0 crypt /var
│                                     /usr/local
│                                     /srv
│                                     /root
│                                     /opt
│                                     /home
│                                     /boot/grub2/x86_64-efi
│                                     /boot/grub2/i386-pc
│                                     /.snapshots
│                                     /
└─sda3        8:3    0  1.2G  0 part
  └─cr_swap 254:0    0  1.2G  0 crypt [SWAP]
According to the output, /dev/sda2 and /dev/sda3 are encrypted partitions, and we can go further to check the LUKS version with cryptsetup luksDump like this:
# cryptsetup luksDump /dev/sda2
LUKS header information for /dev/sda2

Version:        1
Cipher name:    aes
Cipher mode:    xts-plain64
...
It's clear that the LUKS version of /dev/sda2 is 1, and we will convert it to LUKS2 with the following command:
# cryptsetup convert --type luks2 /dev/sda2
Repeat the procedure on other LUKS1 partitions if necessary.
Use existing LUKS2 partition
If you already had your `/` directory in a LUKS2 partition, you will need some further steps to make the system fully compatible with GRUB 2.
As of GRUB 2.12rc1 (Tumbleweed and Leap 15.5 versions), the only supported algorithm to generate a key from a passphrase is pbkdf2. However, the default cryptsetup algorithm is argon2id.
To check the algorithm used by your key, use the command
$ sudo cryptsetup luksDump /dev/nvme0n1p7 | grep PBKDF
where /dev/nvme0n1p7 is your encrypted device. The command will show the algorithm used by each key that can unlock the device. For instance:
PBKDF:      argon2id
PBKDF:      argon2id
In this case, the first keyslot uses pbkdf2 and the second keyslot uses argon2id. In this specific case, the second slot uses a key-file generated as explained above, while the first keyslot is the password used to access the device at boot time.
In order to change the PBKDF algorithm of the first keyslot, use the following command:
$ sudo cryptsetup luksConvertKey --hash sha512 --pbkdf pbkdf2 /dev/nvme0n1p7
Replace /dev/nvme0n1p7 with your device.
At this point we can check the algorithm again:
 $ sudo cryptsetup luksDump /dev/nvme0n1p7 | grep PBKDF
   PBKDF:      pbkdf2
   PBKDF:      argon2id
Now, re-generate the EFI GRUB and its configuration:
$ sudo update-bootloader --reinit
Seal the LUKS key with TPM 2.0
With fde-tools, it only takes one command to create the sealed LUKS key and update the grub2 configuration:
user $ sudo fdectl regenerate-key
fdectl regenerate-key will request the passphrase of the root partition since it's going to enroll a randomly generated key into the root partition. The command will then seal the new random key with pcr-oracle which predicts the PCR values and seals the key with TPM 2.0. If everything goes well, the sealed key will be /boot/efi/EFI/opensuse/sealed.tpm, and /boot/efi/EFI/opensuse/grub.cfg will look like this:
set btrfs_relative_path="yes"
tpm_record_pcrs 0-9
tpm2_key_protector_init -T $prefix/sealed.tpm
if ! cryptomount -u 597e2ffc6d6a4f32a6c2b7359542f90f --protector tpm2; then
    cryptomount -u 597e2ffc6d6a4f32a6c2b7359542f90f
fi
search --fs-uuid --set=root 1e71ec27-4de0-4bff-9436-8da3951508fa
set prefix=(${root})/boot/grub2
source "${prefix}/grub.cfg"
Since the TPM PCRs are sensitive to changes, the key unsealing may fail after a boot component update, e.g. shim, grub2, or UEFI firmware. In such case, you can update the signature of the sealed key with
user $ sudo fdectl tpm-authorize
This command calculates the new PCRs and update the signature in the sealed key.
More fdectl commands
If you want to disable TPM key unsealing temporarily:
user $ sudo fdectl tpm-disable
This command removes the TPM key unsealing commands from the grub2 configuration while keeping the LUKS keyslot untouched, so that the user can restore TPM key unsealing with the following command:
user $ sudo fdectl tpm-enable
In case you want to remove TPM key unsealing along with the LUKS keyslot completely:
user $ sudo fdectl tpm-wipe
Revocation of the authorized policies
When a serious vulnerability is found in the boot component such as grub2 or the shim loader, it is suggested to remove the authorized policies associated with the affected component. However, there is no easy way to revoke the already signed and authorized polices. The most effective method is to replace the sealed LUKS key by fdectl regenerate-key:
user $ sudo fdectl regenerate-key
Since the old LUKS key is replaced, all those authorized policies against the old key are invalidated consequentially.
Additional steps for encrypted swap partition
Assume that you are using the same passphrase for both root and swap partitions (the default setting of openSUSE Tumbleweed), fde-tools can handle both partitions at the same time.
First, add both the root and swap partitions, e.g. /dev/sda2 for root and /dev/sda3 for swap, to FDE_DEVS in /etc/sysconfig/fde-tools like this:
FDE_DEVS="/dev/sda2 /dev/sda3"
Then, invoke fdectl regenerate-key to enroll the sealed key into the root and swap partitions.
user $ sudo fdectl regenerate-key
Edit /etc/crypttab to add /.fde-virtual.key to the third column of root and swap and x-initrd.attach to the fourth column:
cr_root  UUID=597e2ffc-6d6a-4f32-a6c2-b7359542f90f  /.fde-virtual.key  x-initrd.attach
cr_swap  UUID=dbf1fd8a-d2ab-4e8d-a7bc-4e3493fadee7  /.fde-virtual.key  x-initrd.attach,force
x-initrd.attach to explicitly decrypt both partitions in initrd.The last steps are to update initrd and grub2 configuration to reflect the change in /etc/crypttab.
user $ sudo dracut --force
user $ sudo update-bootloader --refresh
If everything is configured correctly, grub2 will unlock the root partition automatically and pass the key safely to systemd for the further booting.
Known Issues
TPM2_Load failure
Some users may encounter a similar error message during booting:
error: ../../grub-core/tpm2/module.c:796: Failed to load sealed key (TPM2_Load: 0x1df).
It's likely caused by the primary key stored in the TPM persistent handle 0x81000001. To check if this handle exists, type the following command:
user $ tpm2_getcap handles-persistent |grep 0x81000001
Then, evict it with this command:
user $ sudo tpm2_evictcontrol -C o -c 0x81000001
GRUB level decryption at boot is too slow
By default, when booting the system and after typing your passphrase at GRUB's prompt to decrypt the root partition, the passphrase verification may take a very long time (about 30 seconds on my system). According to this Arch Linux wiki page, this decryption process is slow due to how openSUSE defined some encryption-related parameters during the installation setup. Since the Arch Linux explanation is already quite good, let's jump to the point in order to fix this behavior.
1. Find your root partition OR your LVM partition, depending on how you setup your system. Ex: /dev/nvme0n1p2
2. Type this command (and the corresponding passphrase) and look for the "Iterations" value for the key(s) you want to affect:
# cryptsetup luksDump /dev/nvme0n1p2
[...]
Key Slot 0: ENABLED
        Iterations:             1920000
        Salt:                   [...]
        Key material offset:    [...]
        AF stripes:             [...]
[...]
3. We want to change the value "1920000" to a lower value. But not too low since it lowers security in the process. A recommendation of a minimum of 1000 (one thousand) is done in the RFC-2898 and its upgrade RFC-8018. I would personally recommend to start at 100k (one hundred thousand) and increase with an 100k increment until you feel the unlocking time to be noticeable and right below an unbearable level. This is the command to change the value to 100k:
# cryptsetup luksChangeKey --pbkdf-force-iterations 100000 --pbkdf pbkdf2 /dev/nvme0n1p2
Please note that cryptsetup's default algorithm has been switched from PBKDF2 to Argon2 but it does not necessarily work well with GRUB yet, therefore make sure it has been specified in the command lined out above!