Portal:VPN/YaST VPN Module
Introduction
The YaST VPN module creates VPN gateways and clients based on IPSec. Currently the modules supports setting up the following gateway scenarios:
- Provide network access to Linux clients authenticated via pre-shared key or certificate.
- Provide network access to Windows 7, 8, 10, and Blackberry clients authenticated via a combination of certificate and username/password.
- Provide network access to Android, iOS, and MacOS clients authenticated via a combination of pre-shared key and username/password.
For a VPN client, the module supports the following scenarios:
- Prove client identity with a pre-shared key to connect to a VPN gateway.
- Prove client identity with a certificate to connect to a VPN gateway.
Setup of the scenarios will be described in detail below.
Scenarios
Common setup for gateways
If your VPN scenario involves setting up a VPN gateway that offers access to outside the VPN subnet (such as a gateway that provides Internet access), please remember to visit YaST Network Settings module, and set "Enable IPv4 Forwarding" and/or "Enable IPv6 Forwarding" for the involved network adapters.
Secure site-to-site communication
Site-to-site VPNs are suitable for connecting two or more Linux computers in one virtual private network. You may choose between using a pre-shared-key (aka. password) or a PEM-encoded certificate to secure the connection. Please note that a certificate provides way stronger encryption than a pre-shared-key.
The screenshots illustrate the setup procedure:
|
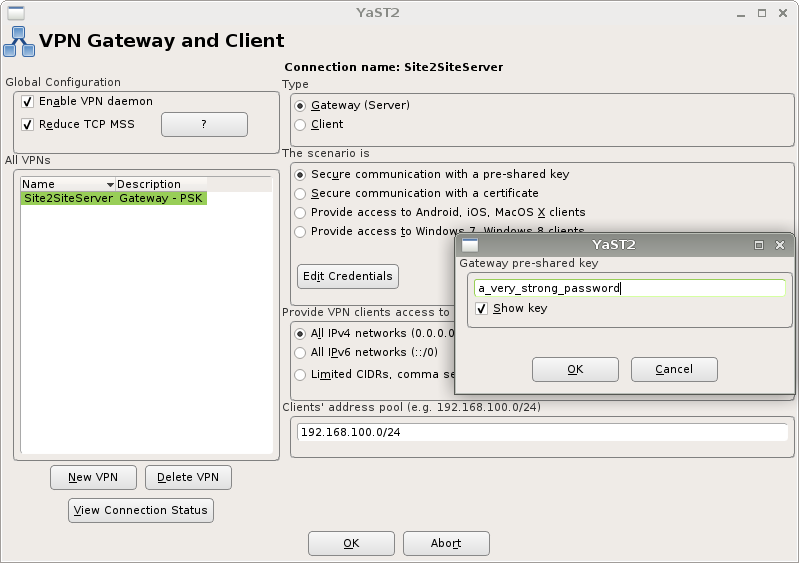
Create gateway (server)Click "New VPN" and enter a name for the server. Choose "Gateway (Server)" in Type, and choose scenario "Secure communication with a pre-shared key" or "Secure communication with a certificate". Click "Edit Credentials" to enter pre-shared key (password) or certificate. If you decide to use a certificate, please make sure that the certificate and key are separated, and encoded in PEM format. Next, choose the network access allowed to the VPN clients. If you wish to offer Internet access and access to all server's private networks to the VPN clients, choose "All IPv4 networks". Or you may provide limited private networks access to VPN clients by manually entering CIDR. Please note that one gateway connection cannot serve both IPv4 and IPv6 at the same time. Finally, enter an address pool for VPN clients in CIDR form. Once connected, your VPN clients will automatically fetch a vacant address from this pool. Click "OK" when done.
|
|
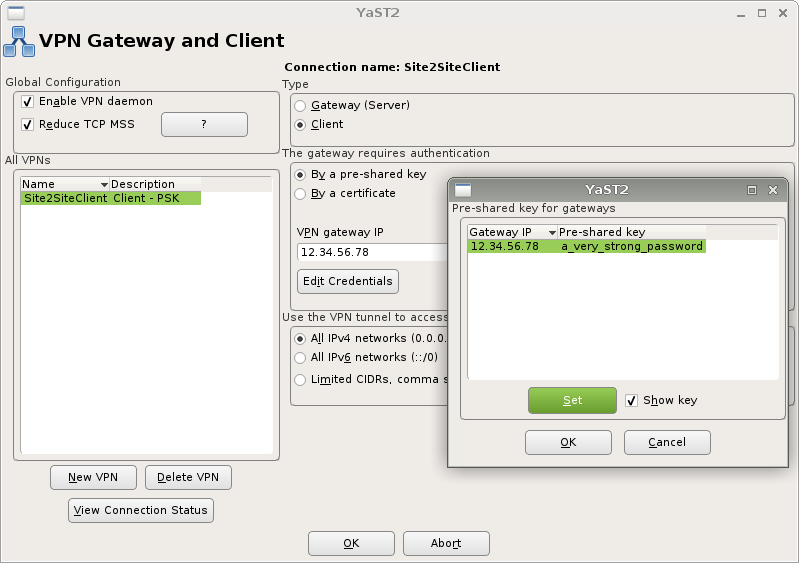
Connect a clientClick "New VPN" and enter a name for the client connection. Choose "Client" in Type, and choose scenario (the client will authenticate) "By a pre-shared key" or "By a certificate". Click "Edit Credentials" to enter pre-shared key (password) or certificate that the VPN gateway expects. If you decide to use a certificate, please make sure that the certificate and key are separated, and encoded in PEM format, and their contents are identical to that on the VPN gateway. Next, choose the network access for the VPN connection - only traffic on the selected network will go through the VPN client connection. If the gateway offers too much network access (e.g. All IPv4 networks) but you only wish traffic to a private network to go through VPN, then enter the private network's CIDR in the text box. Click "OK" when done.
|
Provide network access to Windows and Blackberry clients
IPSec VPN supports a wide variety of configurations, but there is one common scenario supported by the built-in VPN client on both Blackberry and Windows (7,8,10):
- The client expects a certificate from VPN gateway
- The VPN gateway responds with a certificate that identifies the gateway
- The client (Blackberry or Windows) validates the certificate against local trusted certificate store
- The client presents VPN gateway a username/password combination
- The VPN gateway validates the username/password combination
Gateway setup
|
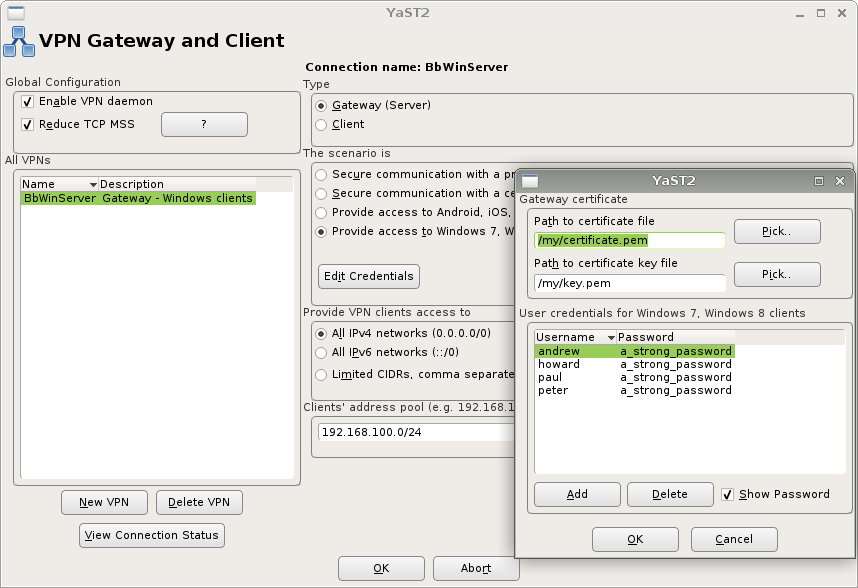
Create gateway (server)Click "New VPN" and enter a name for the server. Choose "Gateway (Server)" in Type, and choose scenario "Provide access to Windows 7, Windows 8 clients". Click "Edit Credentials" to enter certificate, certificate key, and username/password combinations. Please make sure that the certificate and key are separated and PEM-encoded. If the connection will server Windows clients, please make sure that Certificate file is smaller than 1KB, otherwise a bug in Windows VPN implementation will prevent a connection from working. Next, choose the network access allowed to the VPN clients. If you wish to offer Internet access and access to all server's private networks to the VPN clients, choose "All IPv4 networks". Or you may provide limited private networks access to VPN clients by manually entering CIDR. Please note that one gateway connection cannot serve both IPv4 and IPv6 at the same time. Finally, enter an address pool for VPN clients in CIDR form. Once connected, your VPN clients will automatically fetch a vacant address from this pool. Click "OK" when done.
|
Client setup
On Windows, the system must trust the certificate presented by VPN gateway by having the certificated in Trusted Root certificate store. The procedure is: - Launch Microsoft Management Console (mmc) as Administrator - Add "Certificates" snap-in for "Computer Account" (choosing other account types will not work) - Import the VPN gateway certificate (PEM file) to "Trusted Root Certification Authorities".
More detailed procedures are available here (external link to wiki.strongswan.org): Storing a Windows 7 Machine Certificate
Please note that if your VPN gateway or Windows client is behind a NAT device (such as wireless/wired router), you must alter Windows Registry settings, or Windows will refuse to connect to the VPN gateway. The procedure is: - Launch Registry Editor (regedit) as Administrator - Locate to sub-key HKEY_LOCAL_MACHINE\SYSTEM\CurrentControlSet\Services\PolicyAgent - Create a 32-bit DWORD value named "AssumeUDPEncapsulationContextOnSendRule" and set the value to 2
More detailed procedures are available here (external link to support.microsoft.com): How to configure an L2TP/IPsec server behind a NAT-T device in Windows Vista and in Windows Server 2008
Despite that the article talks about L2TP+IPSec combined, it still applies for our VPN gateway.
Please note that if your VPN gateway certificate does not contain Extended Key Usage information, you must also alter Windows Registry settings, or Windows will refuse to connect to the VPN gateway. The procedure is: - Launch Registry Editor (regedit) as Administrator - Locate to sub-key HKEY_LOCAL_MACHINE\SYSTEM\CurrentControlSet\Services\RasMan\Parameters - Create a 32-bit DWORD value named "DisableIKENameEkuCheck" and set the value to 1
More detailed procedures are available here (external link to support.microsoft.com): How to configure verification of additional fields in peer certificates during IKE negotiation for L2TP/IPsec tunnel connections in Windows Vista
Windows users should now be able to create VPN connection pointing to the VPN gateway, using any of the defined username/password combinations.
Blackberry users should add VPN gateway certificate to the device's certificate store. Unlike Windows, Blackberry does not require additional workaround in the situation where a NAT sits in between the Blackberry and VPN gateway. However, I do not have information on whether Blackberry enforces Extended Key Usage information validation.
Provide network access to Android and Apple clients
The common scenario supported by the built-in VPN client on Android, iOS, and MacOS clients is:
- The VPN gateway expects a pre-shared-key from client
- The client presents the correct pre-shared-key to the VPN gateway
- The client presents VPN gateway a username/password combination
- The VPN gateway validates the username/password combination
Gateway setup
|
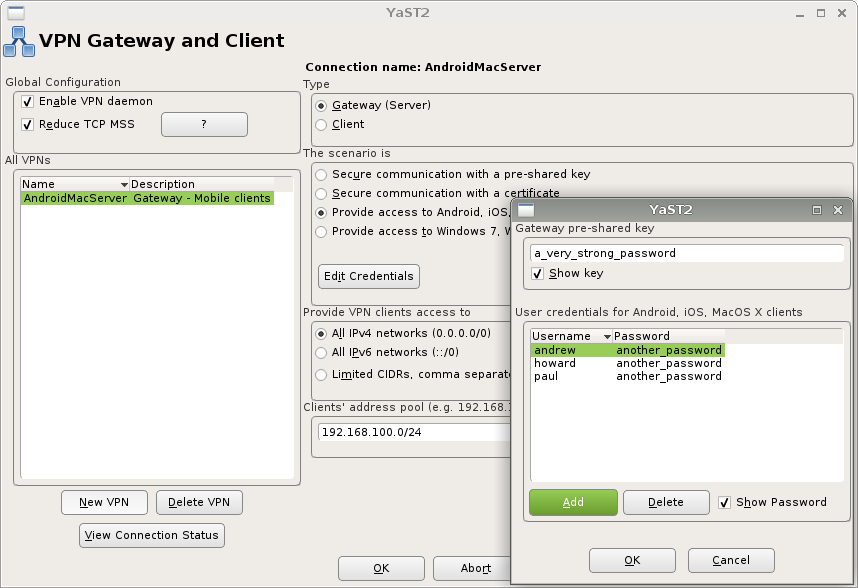
Create gateway (server)Click "New VPN" and enter a name for the server. Choose "Gateway (Server)" in Type, and choose scenario "Provide access to Android, iOS, MacOSX clients". Click "Edit Credentials" to enter gateway pre-shared-key, and username/password combinations. Next, choose the network access allowed to the VPN clients. If you wish to offer Internet access and access to all server's private networks to the VPN clients, choose "All IPv4 networks". Or you may provide limited private networks access to VPN clients by manually entering CIDR. Please note that one gateway connection cannot serve both IPv4 and IPv6 at the same time. Finally, enter an address pool for VPN clients in CIDR form. Once connected, your VPN clients will automatically fetch a vacant address from this pool. Click "OK" when done.
|
Client setup
Android, iOS, and MacOS all support the VPN gateway natively, without the help from any third-party software.
On Android, the type of connection is called "IPSec Xauth PSK". When you create the connection, please make sure to leave "IPSec identifier" field empty, or your connection will not work.
On iOS and MacOS, the type of connection is simply called "IPSec".
Manually customise /etc/ipsec.conf and /etc/ipsec.secrets
The YaST module will take care of both /etc/ipsec.conf and /etc/ipsec.secrets with all gateway and client scenarios. But there are enormous number of possibilities with IPSec and the YaST VPN module does not understand all of them, therefore, please refrain from manually altering /etc/ipsec.conf and /etc/ipsec.secrets, or your customisations may be removed the next time you use YaST VPN module.
YaST VPN module will show a warning when it detects unrecognised, manually altered configuration.