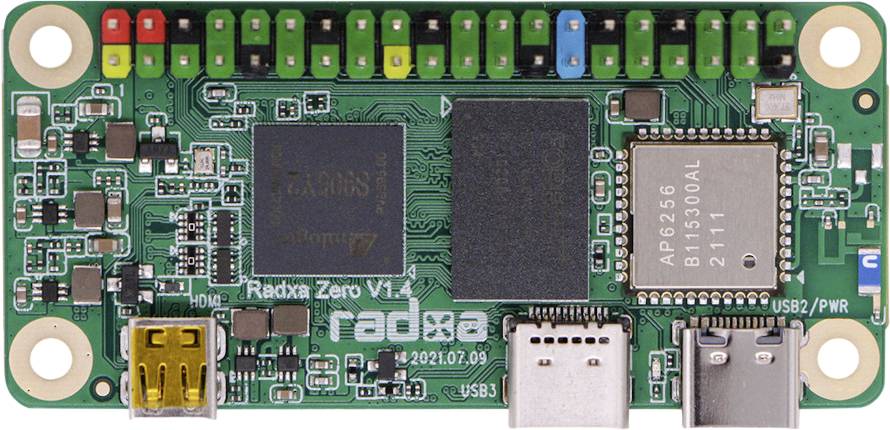
HCL:Radxa Zero
Radxa Zero is an ultra-thin SBC in small form factor with powerful performance based on Amlogic S905Y2.
Technical Data
- Amlogic S905Y2 (Quad Cortex-A53 @ 1.8GHz)
- ARM G31 MP2 GPU
- Supporting OpenGL ES 3.2, Vulkan 1.0, and OpenCL 2.0.
- 2GB/4GB LPDDR4 @ 3200Mb/s
- On board eMMC (up to 128 GB)
- microSD card (up to 128 GB)
- HDMI 2.0 up to 4K@60
- 802.11 ac (WiFi 5) and Bluetooth 5.0
- 1 x USB 2.0 Type-C OTG & Power combo port
- 1 x USB 3.0 Type-C HOST
- 40-pin expansion header
openSUSE on Radxa Zero
The following images are available:
 |
Tumbleweed
|
JeOS image |
If the direct links above do not work for you, please check the general download directory for the images.
Writing a disk image to an SD card
The SD card is written in two steps, the first being the openSUSE image, and the second being the U-Boot from Radxa.
Remember to erase the eMMC if any image was written previously, otherwise, the Radxa Zero will boot from eMMC instead of SD card.
Write openSUSE Image
As root extract the openSUSE image onto your SD card. WARNING: This will erase all data on the SD card.
xzcat [image]..raw.xz | dd bs=4M of=/dev/[mmcblkX] oflag=sync status=progress; sync
Replace [mmcblkX] with the actual disk you intend to write to.
Write U-Boot Image
As root install U-Boot onto your SD card. The u-boot.bin.sd.bin file can be found on Radxa website.
dd if=u-boot.bin.sd.bin of=/dev/[mmcblkX] bs=1 count=444; sync
dd if=u-boot.bin.sd.bin of=/dev/[mmcblkX] bs=512 skip=1 seek=1; sync
Replace [mmcblkX] with the actual disk you intend to write to.
Writing a disk image to the eMMC
The eMMC is written in three steps, the first being eMMC erase, the second openSUSE image, and the third the U-Boot from Radxa.
Follow Erasing the eMMC steps first, and once the eMMC is mounted as a USB Storage device, follow the steps below.
Write openSUSE Image
As root extract the openSUSE image onto the eMMC.
xzcat [image]..raw.xz | dd bs=4M of=/dev/[sdX] oflag=sync status=progress; sync
Replace [sdX] with the actual disk you intend to write to.
Write U-Boot Image
As root install U-Boot onto the eMMC. The u-boot.bin.sd.bin file can be found on Radxa website.
dd if=u-boot.bin.sd.bin of=/dev/[sdX] bs=1 count=444; sync
dd if=u-boot.bin.sd.bin of=/dev/[sdX] bs=512 skip=1 seek=1; sync
Replace [sdX] with the actual disk you intend to write to.
Erasing the eMMC
If the eMMC has an image/bootloader, it must be erased to boot from the SD card. The eMMC must also be erased if you want to flash a new image into it. If the board is new, you probably want to erase it. If you have an older image, you probably want to make a backup or you are going to lose all the data in it.
The board must be in maskrom mode to allow erasing the eMMC. To boot in maskrom mode, connect a USB-C cable to the USB-C port marked with USB2/PWR while holding the "USB BOOT" button.
After connecting the board to the computer, run the following command (WARNING: This will erase all data on the eMMC):
sudo boot-g12.py radxa-zero-erase-emmc.bin
If everything success, you should see something like:
Firmware Version :
ROM: 3.2 Stage: 0.0
Need Password: 0 Password OK: 1
Writing radxa-zero-erase-emmc.bin at 0xfffa0000...
[DONE]
Running at 0xfffa0000...
[DONE]
AMLC dataSize=16384, offset=65536, seq=0...
[DONE]
AMLC dataSize=49152, offset=393216, seq=1...
[DONE]
AMLC dataSize=16384, offset=229376, seq=2...
[DONE]
AMLC dataSize=49152, offset=245760, seq=3...
[DONE]
AMLC dataSize=49152, offset=294912, seq=4...
[DONE]
AMLC dataSize=16384, offset=65536, seq=5...
[DONE]
AMLC dataSize=1362288, offset=81920, seq=6...
[DONE]
[BL2 END]
Once the eMMC is erased, it mounts as a USB Mass Storage device, it will show as /dev/sdX (X can be any letter) in your system.
For more detailed information and where to get the binaries and tools check the official Radxa documentation.
Troubleshooting
boot-g12.py errors with "Device not found"
If the eMMC tool fails with Device not found the board is not in maskrom mode.
Disconnect the USB-C cable and try again.
In maskrom mode, lsusb should show the board as:
ID 1b8e:c003 Amlogic, Inc. GX-CHIP
Erasing eMMC does not mount as a USB Mass Storage device
When erasing the eMMC, if the eMMC is not mounted after completion, the eMMC is probably not erased entirely. Multiple tries often fix the issue.
Image does not boot
Check Radxa Zero Boot Troubleshooting documentation.
Most probably, U-Boot was not flashed properly.
Partitions disappeared from SD/eMMC
If partitions disappear after writing U-Boot to the SD card or eMMC, it means you are writing to the wrong location, or you are using the wrong image.
The openSUSE Radxa Zero image uses an MBR partition table, while the openSUSE EFI images (and many other boards) use GPT.
GPT partition table cannot be used with Radxa Zero, because the bootloader is written in an address that would override some of the bits in the GPT scheme, resulting in an unreadable disk.
