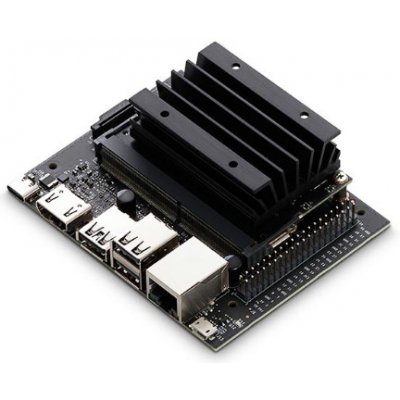
HCL:Jetson Nano
The Jetson Nano is a jetson module which can be found on the Jetson Nano Developer Kit
Technical Data
- Quad-Core ARM® Cortex A57 processor at 1GHz
- 4GByte of LPDDR4 (also 2GB version available)
- 128-core NVIDIA Maxwell™ GPU
- 16 GB of eMMC
- PCIe port 1 x4 (PCIe Gen2)
- HDMI output
- Camera input: 12 lanes (3x4 or 4x2) MIPI CSI-2 D-PHY 1.1 (1.5 Gb/s per pair)
- 10/100/1000 Gb Ethernet
- USB: 4x USB 3.0, USB 2.0 Micro-B
- GPIO
- I2C
- I2S
- SPI
- UART
- 2MB Serial NOR Flash
Writing a disk image to the SD card
Please update the firmware on the SPI flash by following instructions from HCL:Jetson_Nano#Update_Firmware section below. Then, you can just follow the instructions available for an EFI image: HCL:AArch64_EFI
dtb-nvidia package from Tumbleweed if you want to try it. (Tested successfully with dtb-nvidia 5.11.12)Update Firmware
To flash the latest firmware with u-boot built from openSUSE, please follow those instructions, based on instructions from the NVidia Jetson Nano Quick Start Guide.
- Put the Jetson Nano into Force Recovery Mode (FRC) to prepare for flashing the firmware:
- Ensure that your Jetson Nano Developer Kit is powered off.
- Enable Force Recovery mode by placing a jumper across the FRC pins of the Button Header on the carrier board.
- For carrier board revision A02, these are pins 3 and 4 of Button Header (J40) which is located near the camera header.
- For carrier board revision B01, these are pins 9 (GND) and 10 (FC REC) of Button Header (J12), which is located on the edge of the carrier board under the Jetson module.
- Connect the Micro-USB OTG cable to the Micro USB port on the Nano and to the host computer. The developer kit powers on automatically and enters Force Recovery mode.
- Remove the jumper from the FRC pins of the Button Header.
- You can check that the Jetson Nano is in recovery mode by running:
lsusb
which should show something like:
Bus 001 Device 002: ID 0955:7f21 NVIDIA Corp. APX
- Now we can actually flash the firmware.
- Download and extract latest
u-boot-p3450-0000*.rpmfrom Tumbleweed repository as it includes the required BTRFS support - Download and extract L4T Release R32.4.4 or later:
- Download and extract latest
wget https://developer.nvidia.com/embedded/L4T/r32_Release_v4.4/r32_Release_v4.4-GMC3/T210/Tegra210_Linux_R32.4.4_aarch64.tbz2
tar xvf Tegra210_Linux_R32.4.4_aarch64.tbz2
cd Linux_for_Tegra
- Copy the
u-boot.binfile at the place expected by Nvidia tools
- Copy the
cp ../u-boot-p3450-0000*/boot/u-boot.bin bootloader/t210ref/p3450-porg/
For Jetson Nano 2GB you have to copy the file to this path:
cp ../u-boot-p3450-0000*/boot/u-boot.bin bootloader/t210ref/p3541-0000/u-boot.bin
- From the Linux_for_Tegra directory, execute:
sudo ./flash.sh p3448-0000-max-spi external
Which should output something similar to:
###############################################################################
# L4T BSP Information:
# R32 , REVISION: 4.4
###############################################################################
# Target Board Information:
# Name: p3448-0000-max-spi, Board Family: t210ref, SoC: Tegra 210,
# OpMode: production, Boot Authentication: ,
###############################################################################
./tegraflash.py --chip 0x21 --applet "/home/guillaume/jetson_nano/Linux_for_Tegra/bootloader/nvtboot_recovery.bin" --skipuid --cmd "dump eeprom boardinfo cvm.bin"
Welcome to Tegra Flash
version 1.0.0
Type ? or help for help and q or quit to exit
Use ! to execute system commands

[   0.0032 ] tegrasign --key None --getmode mode.txt
[   0.0050 ] Assuming zero filled SBK key
[   0.0052 ]
[   0.0052 ] Generating RCM messages
[   0.0070 ] tegrarcm --listrcm rcm_list.xml --chip 0x21 0 --download rcm nvtboot_recovery.bin 0 0
[   0.0088 ] RCM 0 is saved as rcm_0.rcm
[   0.0097 ] RCM 1 is saved as rcm_1.rcm
[   0.0098 ] List of rcm files are saved in rcm_list.xml
[   0.0098 ]

<snip>

[ 159.8891 ] Flashing completed

[ 159.8893 ] Coldbooting the device
[ 159.8932 ] tegradevflash --reboot coldboot
[ 159.8970 ] Cboot version 00.01.0000
[ 160.2068 ]
*** The target t210ref has been flashed successfully. ***
Make the target filesystem available to the device and reset the board to boot from external external.
You are now ready to use a regular EFI image (which includes the Device Tree, since flashed u-boot need to load it).
Linux_for_Tegra/bootloader/t210ref/cfg/flash_l4t_t210_max-spi_p3448.xml to increase the LNX partition size. You will likely need to gain some space elsewhere, so you can drop the optional BMP partition (but you will loose the NVIDIA splash screen on boot).Serial console
Serial console can be get throught the Button Header (J12) connecting UART2_*XD to a serial-to-USB adapter. See Jetson Nano Documentation for mor information on the pin layout.
Known Issues
- BTRFS support: If the firmware is flashed with an old u-boot which is not able to load the DTB automatically from BTRFS (see: https://bugzilla.opensuse.org/show_bug.cgi?id=1185656), you will need to add the following line on grub as a workaround:
devicetree /boot/dtb/nvidia/tegra210-p3450-0000.dtb
- Ethernet MAC address change at each boot
- GPU support:
- tegra support is not enabled in Mesa. https://bugzilla.opensuse.org/show_bug.cgi?id=1184845
- GNOME-Shell shows a black screen with a cursor when Tegra is enabled - https://gitlab.freedesktop.org/mesa/mesa/-/issues/1172
