SDB:Linux Apache MySQL PHP
Please refer to this article's discussion page for more information.
You are welcome to edit this article, but please refer to the discussion page to complete the merge as soon as possible.
Tested on openSUSE
Recommended articles
Related articles
Introduction
First off this article goes beyond simply installing Apache/MySQL/PHP if that's all your after (and configuring them) you can stop reading after section 6.
Now I will not claim I posses the knowledge or experience to guarantee this is the best or even a safe way of setting up your openSUSE box as a LAMP (Linux, [Apache], [MySQL], [PHP]) server, however it is one that works!
Proceed at your own risk.
In this article I tried to keep things simple and used the following markup:
- bold text indicates you should be seeing the same on your screen if you are following that step. (Use it to confirm to yourself that you are taking the right steps)
- Italic text is used for additional information about something that will only interest some, it's safe to ignore it.
Code blocks are used for commands which you can copy and paste into the console.
Below it is often listed what it does if you do not trust the command or are wondering why you should use it.Blockqoute blocks are used for textual output you should be getting on your screen. (Be it in a console or just a window with a textfield)
Requirements
As you may have anticipated you will need to install the following software.
The mentioned versions behind the program itself in the table are the ones used while writing this tutorial, it most likely also applies to newer versions.
| Application | Tested version |
|---|---|
| Apache2 | 2.2.10.2-5 |
| MySQL | 5.0.67-12.15 |
| PHP5 | 5.2.8 |
The easiest way to install these (and the only one I'll mention) is by doing the following:
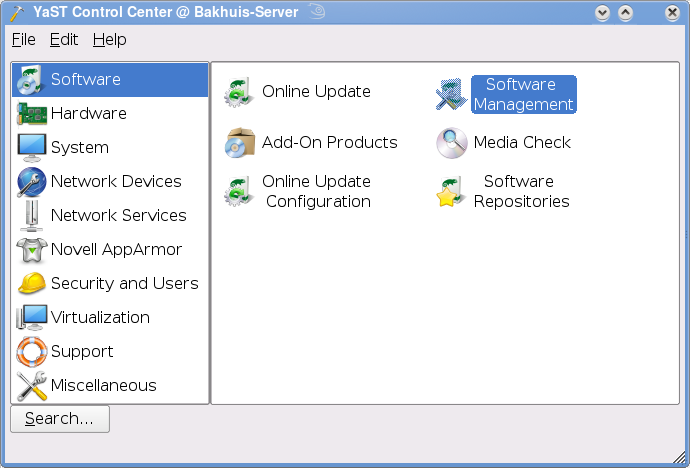
Go to the Yast Control Center and select Software Management
Which should give you a window as in the picture below
The latest and greatest, or not?
Now before we continue, I'll ask you the question do you want the run the very latest versions?
If you do you'll be prompted to update the software far more often but might gain benefits from improvements in a newer version sooner
- No - Make use of this link: Installation or just scroll down to the installation part.
- Yes - Just continue with "Repositories to select" below.
Repositories to select
As you have decided to go for the latest and greatest we will need to add some additional software resources to your openSUSE configuration.
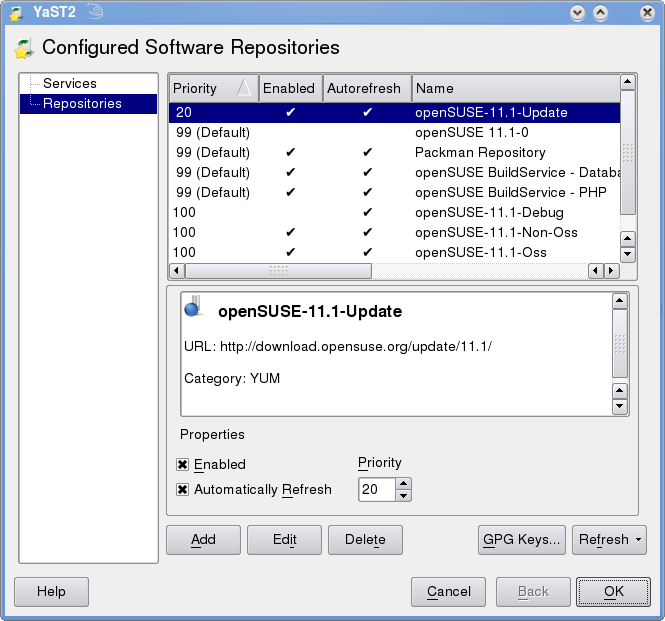
- Go to the menu option Configuration
- Click the Repositories option
- Click the add button in the new window
- Select Community Repositories from the list with options and click next
If you followed the steps above you should be presented with a new window that has a list in which you'll need to select openSUSE BuildService - PHP and openSUSE BuildService - Database by checking the checkboxes next to them.
Just hit the ok button afterwards and you're done!
If you are asked to "Import a trusted GnuPG Key" click the import button. (might pop up more than once, keep hitting the import button) If everything went well you should end up back at the window as in the screenshot below which should now have the PHP and Database repositories added to the list.
Congratulations, you have successfully added some new repositories to get the latest version of MySQL and PHP from! Hit the Ok button and proceed with the next step.
Installation
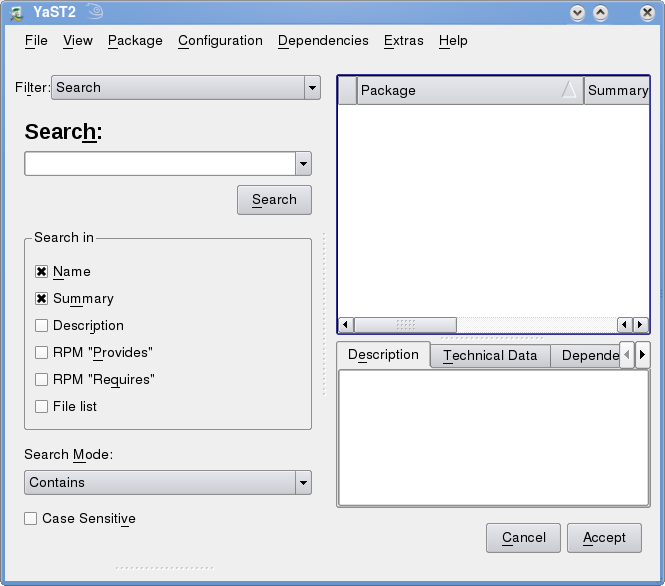
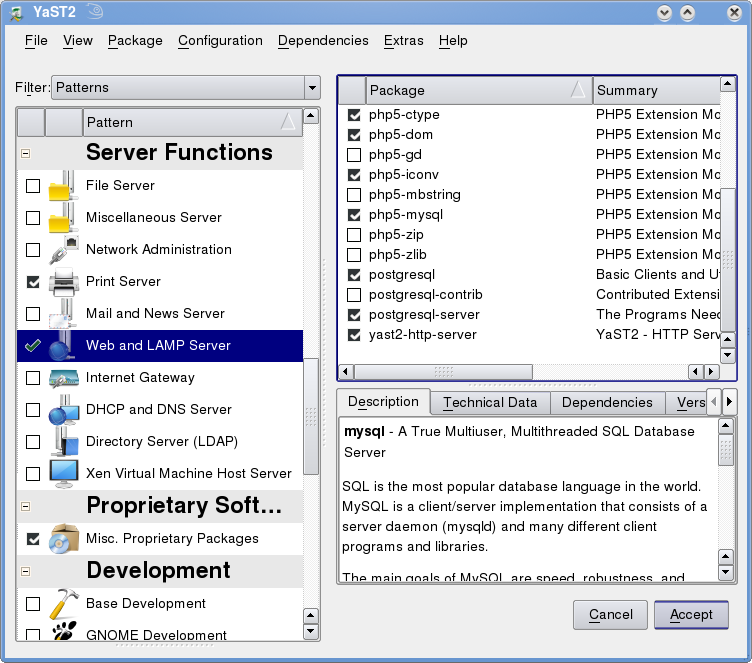
OpenSUSE provides you with an easy way to install all the needed packages. All you need to do is select Patterns instead of Search in the dropdown list behind Filter: this will change the window contents and present you with a long list. In this list find the option Web and LAMP Server and mark the checkbox before hitting accept.
Now just sit back and grab a coffee while Yast Software Management is downloading and installing the software needed to continue with the next step. (Choose no if you're asked to install additional packages)
Starting the server
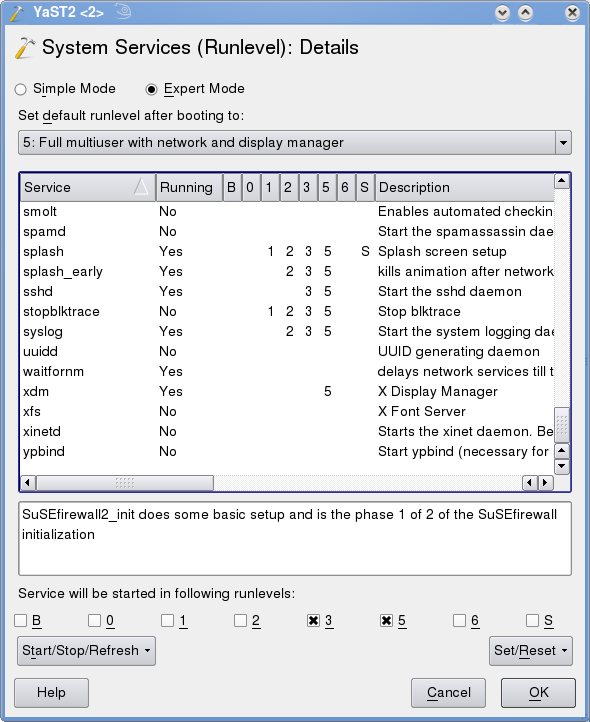
You should still have the YaST Control Center window open. If not, open it up again. In the YaST Control Center go to System and click the System Services (Runlevel) option. In the new window that should pop up select the Expert Mode radio button and search for the option apache2 in the list.
Start
After selecting Apache2 click the Start/Stop/Refresh button (as show in the image to the right) and go for the option Start now which hopefully will give you a popup with the text below.
/etc/init.d/apache2 start returned 0 (success):
Autostart
Assuming you want your server to boot up automatically along with openSUSE itself do the following:
- Click the Set/Reset button
- Click the Enable the service option
Confirming Apache2 works
Now if everything went well should be able to browse to 127.0.0.1 with the web browser of your choice (Firefox/Konqueror/Opera etc) and it should come up with a page with the text
It works!
If it did not.. it's time to make a post on the openSUSE forums to inquire about help.
Confirming PHP works
The easiest way to confirm PHP works is by starting up your favorite text-editor (for example kwrite or gedit) and copy/paste the code below into it.
<?php
    phpinfo();
?>
Notice: use <?php only. <? will not work.
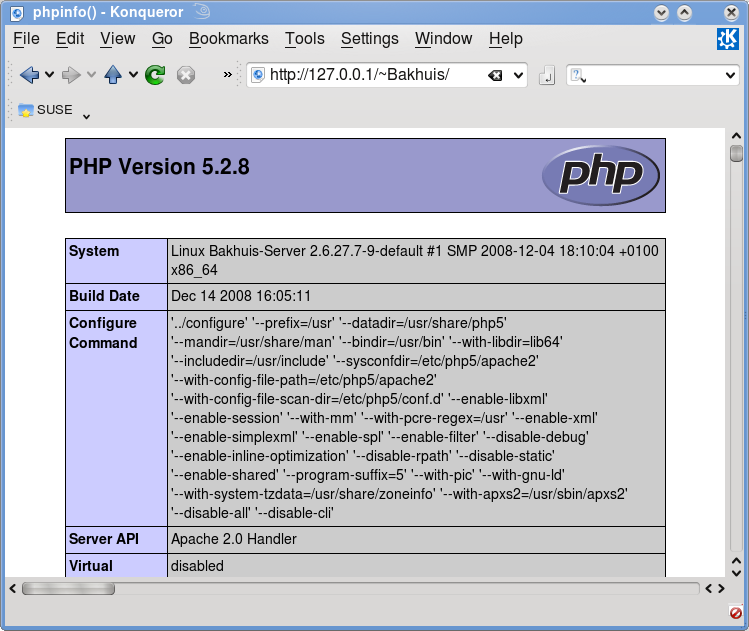
Now save this file to your /home/USERNAME/public_html directory as index.php and pay a visit to http://127.0.0.1/~username
As you may have noticed from looking at the screenshot, my username is Bakhuis so the path becomes 127.0.0.1/~Bakhuis. If your page doesn't look anything like the screenshot please make sure you wrote the username correctly (including the use of UPPER and lowercase letters) and prefixed it with the '~' character.
In case the browser wants to save your php files instead of displaying the content, you should enable php support in the /etc/apache2/mod_userdir.conf file. Add the following line to it, just after the <Directory /home/*/public_html> line and restart the server.
Include /etc/apache2/conf.d/php5.conf
If you're still unable to get to the page or are getting error pages instead please inquire about help on the openSUSE forums
Start and Configure MySQL
Starting MySQL
As with [Starting the server] go to Yast Control Center > System Services (runlevel) and enable expert mode again. After selecting mysql from the list click the Start/Stop/Refresh button and click the option Start now
which hopefully will give you a popup with the text:
/etc/init.d/mysql start returned 0 (success):
Autostarting MySQL
Assuming you want your database to boot up automatically along with openSUSE (and the webserver if you you configured it earlier to do) do the following:
- Click the Set/Reset button and click the Enable the service option
Whether you enabled the service or not, click the Ok button and if prompted to save the changes answer it with yes.
Configuring mySQL
Now that we got both PHP and Apache running it's time to configure MySQL. I'll take you trough this stepwise. (You can simply copy and paste the bits with a grey background into the console and hit enter afterwards)
- Start up your favorite terminal application (for example, Konsole or Xterm)
- Execute the command below to obtain root rights
su
(follow the instructions on screen) cd /bin
mysql_install_db --user=mysql
this should result into something likeInstalling MySQL system tables...
OK Filling help tables... OK PLEASE REMEMBER TO SET A PASSWORD FOR THE MySQL root USER ! To do so, start the server, then issue the following commands: /usr/bin/mysqladmin -u root password 'new-password' /usr/bin/mysqladmin -u root -h Bakhuis-Server.site password 'new-password'
Alternatively you can run: /usr/bin/mysql_secure_installation
which will also give you the option of removing the test databases and anonymous user created by default. This is strongly recommended for production servers.
See the manual for more instructions.
You can start the MySQL daemon with: cd /usr ; /usr/bin/mysqld_safe &
You can test the MySQL daemon with mysql-test-run.pl cd mysql-test ; perl mysql-test-run.pl
Please report any problems with the /usr/bin/mysqlbug script!
The latest information about MySQL is available on the web at http://www.mysql.com
Support MySQL by buying support/licenses at http://shop.mysql.com
- Do as it (alternatively) suggests and run
/usr/bin/mysql_secure_installation
- First you'll be prompted for a password, leave it blank and hit enter.
- It will now prompt you if you want to set a password, type in y and hit enter again
- Now you'll be prompted to enter a password and confirm it, do so.
- Finally this 'wizard' will ask you a couple of questions how mysql should be configured, it's safe to answer them all with y
phpMyAdmin
This step is optional and only for those who want to install phpMyAdmin with the use of the repositories instead of doing a more 'manual' install.
It's perfectly imaginable you don't want to do this but for example would rather use [phpMiniAdmin], [MySQLQuickAdmin] or one of many others. If that's the case please move onto the firewall configuration part.
The installation
Manual installation
You may install phpMyAdmin manually to the path /srv/www/htdocs. Just download latest version from http://downloads.sourceforge.net/project/phpmyadmin/, extract to /srv/www/htdocs. You'll get a directory with phpMyAdmin looking like /srv/www/htdocs/phpMyAdmin-3.2.1-all-languages. Just rename it to something more conviniet, for example /srv/www/htdocs/phpMyAdmin.
Next you can view phpMyAdmin working http://127.0.0.1/phpMyAdmin
One-click installation
Install phpMyAdmin by making use of the one click installer below.
The link behind the one click installer is the repository with the phpMyAdmin package in case you're using a different version of openSUSE or prefer not to use one click installers.
| One-Click installer | Repository for manual installation | |
|---|---|---|
| phpMyAdmin |  | http://download.opensuse.org/repositories/server:/php:/applications/openSUSE_11.1 |
Confirming it works
To check if phpMyAdmin works pay a visit to http://127.0.0.1/phpMyAdmin/ which should come up with a page asking you for a password/username combination. For the username enter 'root' and the password is the one you entered earlier while configuring MySQL.
The configuration
As you arrived here it must mean your phpMyAdmin worked, great! Now let's configure it so we don't see the following message everywhere.
The configuration file now needs a secret passphrase (blowfish_secret).
Instead of using the "su" command, use the sudo command. This can be achieved by issuing "visudo" as root and adding the user to the wheel group.
- Start up your favorite console application (Xterm, Konsole, etc)
su
- Obtain super user/root rights
password:
- Enter root password when prompted. Alternatively, use sudo.
cp /srv/www/htdocs/phpMyAdmin/config.sample.inc.php /srv/www/htdocs/phpMyAdmin/config.inc.php
- Renames the phpMyAdmin configuration file from config.sample.inc.php to config.inc.php
chmod 777 /srv/www/htdocs/phpMyAdmin/config.inc.php
- Give full access rights to anyone
- (No need to change permissions to 777 and back to 644 if the user has already edited the sudo file as well as in the wheel group)
- Open the /srv/www/htdocs/phpMyAdmin/config.inc.php file in the text editor of your choice (Gedit, Kwrite, etc) and change the lines as listed in table below.
Line# From To 17 $cfg['blowfish_secret'] = ; /* YOU MUST FILL IN THIS FOR COOKIE AUTH! */$cfg['blowfish_secret'] = 'ROOT PASSWORD HERE'; /* YOU MUST FILL IN THIS FOR COOKIE AUTH! */
The root password you used to log into phpMyAdmin earlier instead of ROOT PASSWORD HERE35 $cfg['Servers'][$i]['extension'] = 'mysql';$cfg['Servers'][$i]['extension'] = 'mysqli';
append an i - Save and close the document
chmod 664 /srv/www/htdocs/phpMyAdmin/config.inc.php
- Resets the old file permissions
Confirm error #3 has dissapeared
Visit http://127.0.0.1/phpMyAdmin once again and log in with root/your password and check if the warning below this has dissapeared
The configuration file now needs a secret passphrase (blowfish_secret).
Error #1 and #2
So two errors left... we'll take care of both of them in one go, just take the following steps.
- Start up your favorite console application (Xterm, Konsole, etc)
su
- Obtain super user/root rights
chmod 777 /etc/php5/apache2/php.ini
- Sets full access rights to everyone
- Open /etc/php5/apache2/php.ini in your favourite text editor (Kwrite, Gedit, etc)
- Find the following line:
;mbstring.strict_encoding = Off
(line #1019?)and remove the first character on the line (the ;) so it looks like this:mbstring.strict_encoding = Off
- Save and close the file
chmod 644 /etc/php5/apache2/php.ini
- Resets the old read/write/execute rights
/etc/init.d/apache2 restart
- Restarts the server so the changes take effect
Confirming error #1 and #2 have disapeared
Pay a visit to http://127.0.0.1/phpMyAdmin again and it should be error free.
Firewall configuration
If you want computers other than the one you have installed this on to be able to access your webpages you need to configure the openSUSE firewall to allow traffic over port 80.
Again YaST will make your life easier as all you have to do is follow these steps:
- Go to Yast Control Center
- Click on Security and Users (on the left)
- Click on Firewall (on the right)
- In the new window that pops up click the Allowed services option in the list at the left
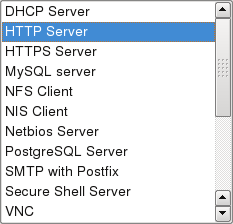
- Now on the right find the dropdownbox that is under Service to Allow and in that dropdownbox select HTTP Server (as illustrated in the image to your right)
- Click add
- Click next
- Click finish
Testing the firewall configuration
Now you should be able to visit your site from other computers in the same Local Area Network. If you do not have a second computer you can not test this, so move on the next step.
To test this you'll need to know your IP address, follow the steps below to display it if you don't know it.
- Start your favorite terminal program (xterm, konsole, etc)
/sbin/ip addr
- Outputs network connection information
- Find the line marked as bold, which is your IP address.
3: eth0: <BROADCAST,MULTICAST,UP,LOWER_UP> mtu 1500 qdisc pfifo_fast state UNKNOWN qlen 1000
    link/ether 00:1c:25:e3:00:af brd ff:ff:ff:ff:ff:ff
    inet '''192.168.1.100'''/24 brd 192.168.1.255 scope global eth0
From a computer other than the one you've been doing this on but that's in the same LAN, visit the bold number you found in the previous step , for this example that would be http://192.168.1.100.
Testing external accessibility
In order to test if your website can be accessed from the outside world you will need to visit http://Your-External-IP.
Sites like whatsmyip.org can tell you your external IP.
If the "It works!" page isn't coming up you most likely need to configure your router to forward/allow access to port 80 to the IP address of your server.
Speed Tweak
Now what this 'Tweak' will do is compressing the content your webserver is serving in real time. Excluding a few formats that will have no or nearly no benefit from it (images and/or already compressed files like a zip) or files that may even become corrupted when compressed further (e.g. the .pdf format). Basically at the cost of a little bit of cpu time and I really do mean a little.. pages will become smaller with the following benefits:
- Faster loading pages
- Lower bandwidth costs
Now if you want more information just search for "http compression" with the web search engine of your choice.
mod_deflate
- Open your favorite console application (Xterm, Konsole, etc)
su
- Obtain super user/root rights
a2enmod deflate
- Enables the deflate mod, however it's not used until the steps below are followed as well.
chmod 777 /etc/sysconfig/apache2
- Sets full access rights on the file to anyone
- Now open /etc/sysconfig/apache2 in your favorite text editor (Kwrite, Gedit, etc) and find the line (probably line #14)
APACHE_CONF_INCLUDE_FILES=""
- Replace the found line with
Save the file and close itAPACHE_CONF_INCLUDE_FILES="/etc/apache2/httpd.conf.local"
chmod 644 /etc/sysconfig/apache2
- Reset permissions to their old values
- Now we'll need to create the file we just referenced to, so execute the following commands
cp /etc/apache2/httpd.conf /etc/apache2/httpd.conf.local
- This creates a copy of http.conf with the name http.conf.local
chmod 777 /etc/apache2/httpd.conf.local
- Set full access rights on the file to anyone
- Now open /etc/apache2/httpd.conf.local in your favorite text editor and overwrite ALL of its contents with the text below
SetOutputFilter DEFLATE
SetEnvIfNoCase Request_URI \.(?:gif|jpe?g|png)$ \
    no-gzip dont-vary
SetEnvIfNoCase Request_URI \
    \.(?:exe|t?gz|zip|bz2|sit|rar|7z)$ \
    no-gzip dont-vary
SetEnvIfNoCase Request_URI \.pdf$ no-gzip dont-vary

BrowserMatch ^Mozilla/4 gzip-only-text/html
BrowserMatch ^Mozilla/4\.0[678] no-gzip
BrowserMatch \bMSIE !no-gzip !gzip-only-text/html
Save the file and close it.
chmod 644 /etc/apache2/httpd.conf.local
- Resets old access rights
/etc/init.d/apache2 restart
- Restarts the server in order for the changes to take effect
Confirming it works
Now how do you find out if it actually worked? It's actually quite simple, you pay a visit to websiteoptimization.com and use their analyze tool.
If your site is using mod_deflate the test will show you
# Congratulations. This site is using HTTP compression, otherwise called content encoding using gzip. The sizes reported here are for compressed content sent from the server to the client.
If you want examples of sites that are using it and thus will test positive try our beloved openSUSE.org or google.com
See also
- Installing_and_setting_up_PhpDocumentor_HOWTO Easily and automatically create documentation for your PHP files.
External Links
Credits
I would most likely never figured all of this out without [this] extremely useful page. It's rather dated and was written with openSUSE 9.1 in mind.
This article was written by Axeia.
