openSUSE:UEFI
About UEFI
Introduction to the standard
UEFI (Unified Extensible Firmware Interface) is an industry standard that specifies the different interfaces that a system must provide in a pre-boot environment. UEFI will control the system from powering it on until the operating system is fully loaded. Also, UEFI is responsible for providing an interface between the resources that the system provides and the operating system.
In other words, UEFI is meant to replace and extend the old BIOS firmware.
UEFI is not a new thing. Intel has been working in EFI/UEFI since mid 1990s, and there are vendors like HP or Apple that provided EFI machines since a long time ago. But it is when Microsoft announced Windows 8 that UEFI became the required way to boot the new certified machines.
The UEFI specification (http://www.uefi.org/specs/) is a big document that contains all the interfaces, variables and structures that the firmware manufacturer must provide, and which are accessible to the operating system. The good news is that Linux has been able to use EFI at boot time since 2000 using GRUB or elilo. In fact, openSUSE 12.2 had support for UEFI, and since openSUSE 12.3, there was experimental support for the Secure Boot extension.
Secure boot is an extension of UEFI. One of the key points of UEFI is that it can be extended. UEFI has an internal virtual machine that is independent of the architecture that it is using. The standard accepts special binary files compiled for this virtual machine (EFI binaries) that can be executed inside the environment. These binaries can be device drivers, applications or extensions to the UEFI standard. UEFI, in some sense, is like a small operating system that runs when the machine is powered on and whose main task is to find and load another operating system.
How can you determine whether you have a UEFI machine? Normally, check the firmware configuration pressing F1 (or ESC, depending on the machine) during the power on process. Browsing through the menus, it can be discovered that the machine can run in legacy mode (the old BIOS mode), EFI mode and in a hybrid mode, where the actual model will be selected based on the operating system that will be loaded.
If your machine does not have UEFI support and you want to test this new technology with openSUSE, you can use QEMU and the Intel's reference implementation of UEFI: UEFI and Secure Boot with QEMU
GPU support - UEFI GOP
The Graphics Output Protocol (GOP) is enabled by UEFI driver to support graphic console output in the pre-OS phase. Without GOP support you can use UEFI CSM (Compatibility Support Mode), which emulates legacy BIOS behaviour.
The ultimate goal of GOP is to replace legacy VGA BIOS and eliminate VGA HW functionality. One effect of UEFI is replacing legacy BIOS interrupt calls, which depend on 16-bit x86 compatibility, with protocols. The traditional VESA modes used by the BIOS to define a display adapter’s supported modes rely on software interrupts, so they had to be replaced. The result is the UEFI Graphics Output Protocol (GOP), which replaces a complex set of modes with a simple video buffer. GOP just defines a buffer for a particular resolution and color depth. This makes it easier to support a new resolution, or have the display scale to a different resolution. There are also common resolutions in use (example: Microsoft Windows requires 1024x768 and 800x600 for GOP in their bootloader, Intel EPOG supports 800x600 in GOP). This simplicity in implementation makes GUI development easier for the BIOS and pre-boot applications, such as the AMI Provisioning environment.
Hardware support for UEFI GOP
Check hardware support with https://www.techpowerup.com/vgabios/ site. You may need to upgrade video BIOS to get UEFI GOP support.
AMD UEFI GOP
AMD supports UEFI GOP since Evergreen generation, but some vendors delayed it to Radeon 300 series.
Nvidia UEFI GOP
Nvidia supports UEFI GOP since 700 series with Kepler architecture. For Kepler 600 series you need video BIOS upgrade.
Intel UEFI GOP
Intel Arc discrete graphic cards are rather new and support UEFI GOP. However, they don't support legacy BIOS boot.
Manual adding UEFI GOP support
Use this manual to upgrade your video BIOS. Beware: don't interrupt upgrading process. You may brick your device with wrong video BIOS.
GPT
UEFI changes more things than the firmware, the syscalls and the interfaces. It also proposes a new style of partitioning the hard disk. GUID Partitioning Table (GPT) is to replace the old Master Boot Record (MBR) solution.
MBR had some important limits, like the number of primary and logical partitions, and the size of these partitions. GPT resolves these issues and one can now have an arbitrary number of partitions (in sets of 128) and an addressable disk space of 2^64 bytes (i.e. in the order of exabytes). So, if you have have large disks, this is the kind of partition table that you would want. Another key difference is that GPT references every partition using an unique UUID number, avoiding collisions between partition identification.
If YaST detects that the machine is in EFI mode, it will try to create a GPT partition in a fresh install. Once GPT partitions are in place, the old fdisk cannot be used anymore to create, remove or edit partitions. The new tool to do that is gdisk and is in the gptfdisk package. The interface is the same one that we had in the fdisk tool.
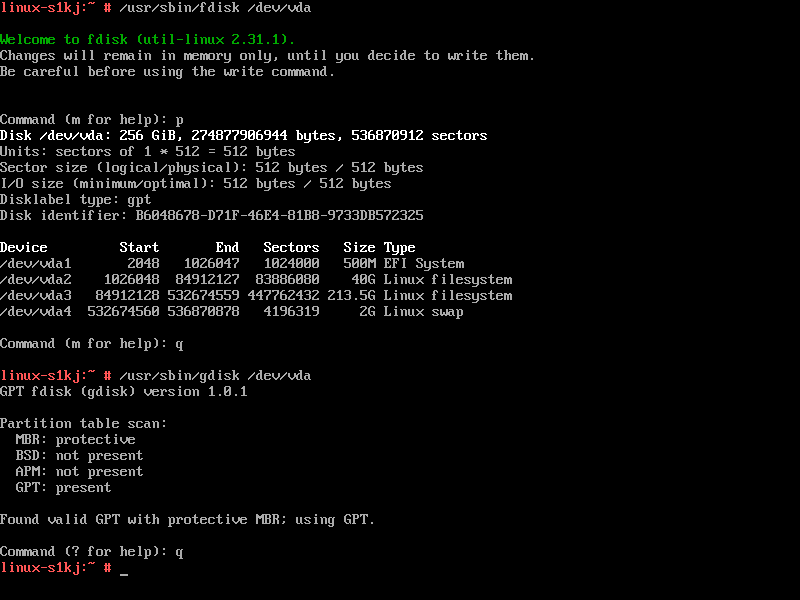
fdisk and gdisk with a GPT partition

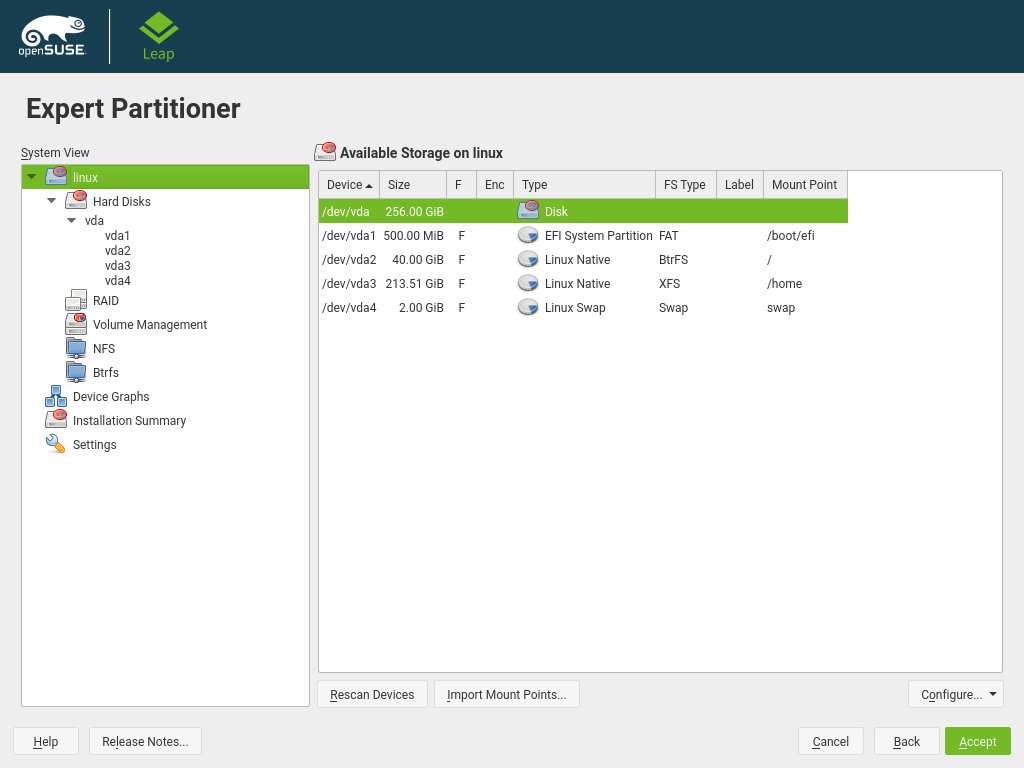
From time to time, if we are planning to make some test and experiment with the different modes, we will want to remove the GPT format from our hard disk. We can do that using YaST2. To do that go to the Expert Partitioner option , select the correct hard disk and in the "Expert..." button select the "Create New Partition Table"
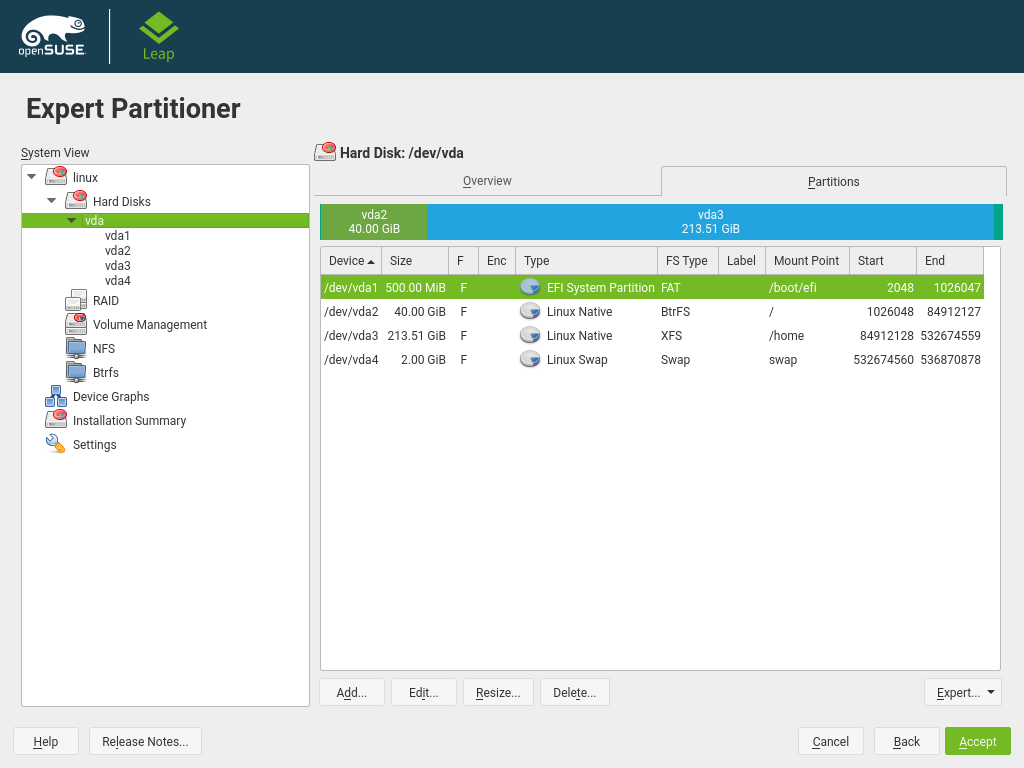
Expert Partitioner mode

This will replace the partition table according to the system that we have running.
EFI System Partition
The EFI System Partition (ESP) is a partition where UEFI expect to find the EFI programs that can be used to boot all the operating systems installed on the device. Also, EFI will find here some device drivers used at boot time, and other tools needed to be run before the operating system is booted.
This partition uses a FAT file system and can be created via YaST2 during a fresh installation, or reused in a dual boot machine. That means that if we have a previous Windows version installed on the system, YaST2 will detect the EFI partition, will put the new EFI bootloader used to load openSUSE, and will mount the partition in the /boot/efi mount point.
Mount point for EFI partition

By default, the firmware will search /EFI/BOOT/bootx64.efi as the extension that will load and execute in order to load the operative system. In Windows machines, the correct extension is in /EFI/Microsoft/Boot/BCD.efi, and for openSUSE is /EFI/opensuse/grubx64.efi (or shim.efi if we have secure boot enabled)
 # find /boot/efi
 /boot/efi
 /boot/efi/EFI
 /boot/efi/EFI/boot
 /boot/efi/EFI/boot/bootx64.efi
 /boot/efi/EFI/boot/fallback.efi
 /boot/efi/EFI/opensuse
 /boot/efi/EFI/opensuse/MokManager.efi
 /boot/efi/EFI/opensuse/grub.efi
 /boot/efi/EFI/opensuse/shim.efi
 /boot/efi/EFI/opensuse/boot.csv
 /boot/efi/EFI/opensuse/grub.cfg
 /boot/efi/EFI/opensuse/grubx64.efi
ESP and old UEFI firmwares
While UEFI standard requires 32-bit FAT for fixed drives, old UEFI firmwares ("first wave") can use only 16-bit FAT. Use OS installer to adjust ESP parameters.
Minimal ESP volume
For FAT32 minimal volume is 32 MiB for 512 byte sectors. Windows requires minimum 100 MiB ESP. For compatibility with 4K drives OS installer uses 260 MiB FAT32 by default. You can adjust ESP parameters according to your needs.
The Boot Manager
In order to select the correct extension that will load the operating system, EFI provides to the user an internal boot manager. The operating system is responsible for creating a new entry for itself. We can launch the boot manager, and list all the boot entries, during the power on process, usually pressing F9 or F12. But we can use the efibootmgr tool to query and edit the entries. For example, to list the current entries we can run efibootmgr -v.
 # efibootmgr -v
 BootCurrent: 0006
 Timeout: 0 seconds
 BootOrder: 0006,0005,0000,0001,0002,0003,0004
 Boot0000* EFI DVD/CDROM ACPI(a0341d0,0)PCI(1,1)ATAPI(1,0,0)
 Boot0001* EFI Floppy    ACPI(a0341d0,0)PCI(1,0)ACPI(60441d0,0)
 Boot0002* EFI Floppy 1  ACPI(a0341d0,0)PCI(1,0)ACPI(60441d0,0)
 Boot0003* EFI Hard Drive        ACPI(a0341d0,0)PCI(1,1)ATAPI(0,0,0)
 Boot0004* EFI Internal Shell    MM(b,3fa9e00,3ffbdfff)
 Boot0005* opensuse      HD(1,800,4e000,f43c4206-073e-4e81-8940-fec01a69e79b)File(\EFI\opensuse\grubx64.efi)
 Boot0006* opensuse-secureboot   HD(1,800,4e000,f43c4206-073e-4e81-8940-fec01a69e79b)File(\EFI\opensuse\shim.efi)
We can see that openSUSE created two different entries to boot. One is used when we are in secure mode, and the other when we are not.
If for some reason we lost one of the entries, we can recreate it using efibootmgr. For example, to recreate the entry 'opensuse' we can do:
# efibootmgr -c -L "openSUSE-alt" -l '\EFI\opensuse\grubx64.efi'
EFI Variables
The UEFI standard specify a set of variables that are stored in a non-volatile part in the firmware. Those variables are used to store information and to control the behavior of the UEFI system. When we create a new entry in the boot manager, or when we enable or disable the secure boot option, for example, we are accessing and changing the value of one of those variables.
We can query and access to these variables directly from openSUSE via Sysfs. Sysfs is a virtual file system that the kernel provide to export some internal information to user space. We can find the variables in '/sys/firmware/efi/vars/'. So, for example, the last boot loader entry can be queried with
Secure Boot
Background
UEFI Secure Boot is a method to restrict which binaries can be executed to boot the system. The firmware only executes boot loaders that carry the cryptographic signature of well known entities. In the context of Secure boot X.509 certificates are used to identify entities.
Today most consumer PC hardware that has secure boot enabled by default is shipped with Microsoft Windows 10. Therefore the firmware only knows about Microsoft as well known entity for signing boot loaders. To be able to boot openSUSE without having to reconfigure the list of known signature issuers and without having to turn off Secure Boot, the bootloader of openSUSE has to have a signature by Microsoft.
Implementation in openSUSE
The default boot loader used by openSUSE on UEFI systems is grub2. When in secure boot mode, an additional boot loader called 'shim' is used too. Instead of directly calling grub2 in that mode the firmware first loads 'shim'. 'shim' carries a signature by Microsoft in order to be recognized by the firmware. 'shim' in turn knows about the openSUSE certificate that was used to sign grub2. grub2 then is able to load linux kernels that are also signed by the openSUSE certificates. After loading the Linux kernel the scope of secure boot ends. The linux kernel used in openSUSE does not impose additional restrictions.
In order to allow having custom boot loaders as well as custom kernels shim offers a way to import custom signatures. The program 'MokManager' is used for that purpose. When 'shim' is instructed to load a binary that is not signed by a well known entity it calls into MokManager which allows to import certificates into the database of well known signature issuers.
Agreement of trusting the built-in openSUSE certificate
For the very first time of loading openSUSE 'shim', it asks the user if the openSUSE certificate built in 'shim' is trusted to verify grub2 and linux kernels.
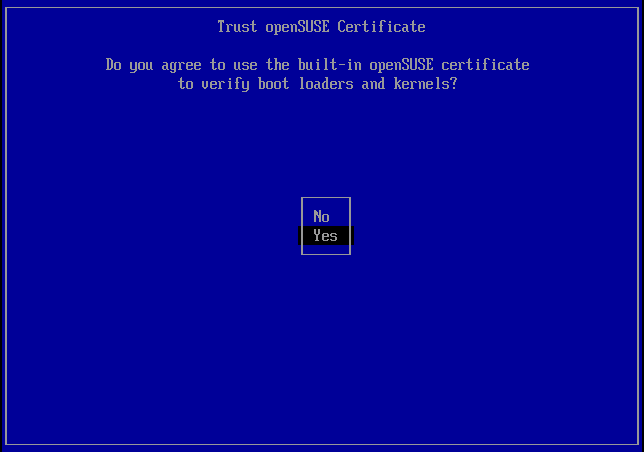
Trust openSUSE certificate
If the user chooses 'Yes', 'shim' stores the answer in a non-volatile UEFI variable in the firmware and won't bother the user afterward. The user can determine whether the openSUSE certificate is trusted with the following command:
For the normal openSUSE system, the command outputs `1`.
In case the user wants to revoke the openSUSE certificate, the following command will initiate the revoking process:
The user will be asked for a password as the authentication for the revoking process. During the next booting process, 'MokManager' will be launched to finish the revoking process.
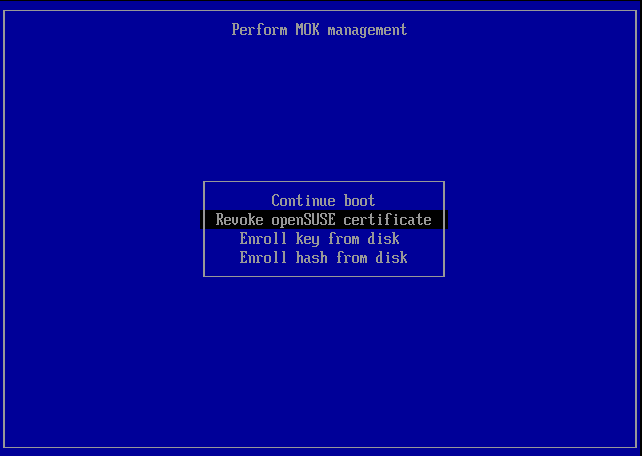
Option to revoke openSUSE certificate
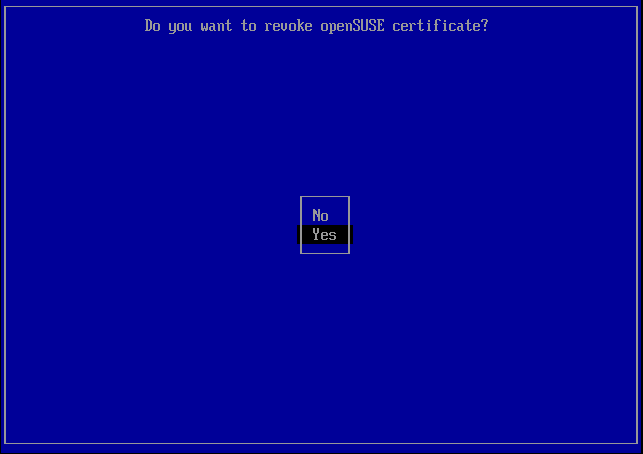
Prompt of the revoking
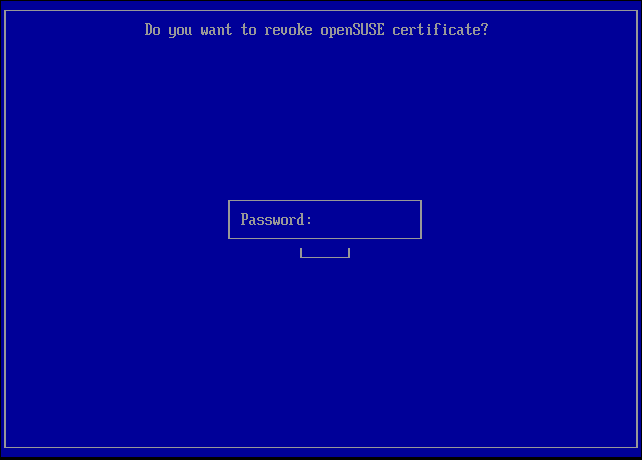
Authentication of the revoking process


At the end of the revoking process, 'MokManager' requests the user to type the password set by 'mokutil' to complete the revoking of the openSUSE certificate.
How to enable or disable Secure Boot support
x86_64
The installation program YaST can automatically detect whether secure boot is enabled. During the installation it offers an option to manually enable/disable Secure Boot support. Turning that option on is required for shim to be installed. To enable or disable support for Secure Boot in an installed system the YaST bootloader module can be used.


AArch64
On AArch64, there is no shim, so you need to install the openSUSE key in your UEFI database (DB) manually. See openSUSE:UEFI#Other_options to know how to do it.
As for x86_64, the installation program YaST can automatically detect whether secure boot is enabled. During the installation it offers an option to manually enable/disable Secure Boot support. To enable or disable support for Secure Boot in an installed system the YaST bootloader module can be used.
How to determine whether a system has secure boot turned on
To determine whether a machine has secure boot enabled in the firmware enter the following command as root in a Linux shell:
Secure Boot is enabled if the command outputs '1'. Some firmware versions are known to be broken and display '0' there even if secure boot is enabled though.
Booting a custom kernel
Secure boot does not prevent you from using your own self compiled kernel. You just have to sign it with your own certificate and make that certificate known to the firmware or MOK.
- Create a custom X.509 key and certificate used for signing:$ openssl req -new -x509 -newkey rsa:2048 -sha256 -keyout key.asc -out cert.pem -nodes -days 666 -addext extendedKeyUsage=1.3.6.1.5.5.7.3.3 -subj "/CN=$USER/"
- Package key and cert as PKCS#12 structure:$ openssl pkcs12 -export -inkey key.asc -in cert.pem -name kernel_cert -out cert.p12
- Generate NSS database for use by pesign:$ certutil -d . -N
- Import key and certificate contained in PKCS#12 into NSS database:$ pk12util -d . -i cert.p12
- Bless the kernel with the new signature:$ pesign -n . -c kernel_cert -i arch/x86/boot/bzImage -o vmlinuz.signed -s
- List the signatures on the kernel image:$ pesign -S -i vmlinuz.signed
At that point you may install the kernel in /boot as usual. Since the kernel now has a custom signature the certificate used for signing needs to be imported into the firmware or MOK.
Before we enroll the certificate into UEFI firmware or MOK, you should convert certificate to DER format:
$ openssl x509 -in cert.pem -outform der -out cert.der
There are two ways to enroll MOK certificate - with mokutil or import manually. The former one is suggested because it makes MOK certificate management easier.
Enroll MOK certificate with mokutil (x86* only)
- Import the DER format key generated and converted from above steps:# mokutil --import cert.der
- Check and confirm the new imported key which to be enrolled:# mokutil --list-new
- Reboot system, it will come into MokManager at bootloader automatically.
- There are four options: "Continue boot", "Enroll MOK", "Enroll key from disk", and "Enroll hash from disk". Chose "Enroll MOK, select certificate and confirm.
- Reboot.
- Confirm the enrolled certificate:# mokutil --list-enrolled
Enroll MOK certificate manually from MOKManager (x86* only)
- copy the certificate to the ESP for easier access:$ sudo cp cert.der /boot/efi/
- reboot
- In the grub menu press the 'c' key
- Type (assuming the ESP is 'gpt1' on 'hd0'):grub> chainloader (hd0,gpt1)/EFI/opensuse/MokManager.efi
grub> boot - Select "Enroll key from disk"
- Navigate to the cert.der file and press enter
- Follow the instructions to enroll the key. Normally this should be pressing '0' and then 'y' to confirm
Other options
Alternatively the firmware menu may provide ways to add new key to 'db'.
For this operation, you need to add the /usr/share/efi/aarch64/grub.der file to a FAT partition accessible from your UEFI (USB stick or EFI partition of an installation of openSUSE).
Then, for an EDK2 based UEFI, you need to go to Device Manager > Secure Boot Configuration > Secure Boot Mode. Enable Secure Boot if not already enabled and select Custom Mode. Go to Custom Secure Boot Option > DB Options > Enroll Signature > Enroll Signature using File, select the right device (USB stick, or HDD) and go to your file within the File Explorer and validate it by pressing enter key. You can enter a Signature GUID (optional).
Finally, Commit Changes And Exit. Go back to main menu by pressing escape multiple times and select Continue to continue the boot process with the new key.
Booting a kernel from Kernel:stable repository
Booting a kernel from repository Kernel:stable is similar to booting a custom kernel. The difference is that instead of creating your own key and certificate, a certificate from the repository is used.
- Download .crt certificate from the repository by clicking "GPG Key / SSL Certificate GPG Key / SSL Certificate" and "SSL Cert.".
- Convert certificate to DER format for import into UEFI firmware or MOK: openssl x509 -in Kernel\ builds\ for\ branch\ stable_ssl.cert -outform der -out cert.der
- Copy the certificate to the ESP for easier access: sudo cp cert.der /boot/efi/
- Boot to MokManager or firmware interface, and enroll the key as instructed in custom kernel instruction above.
Booting the Machine without vendor provided Keys
If the firmware menu offers options to reset the keys used for secure boot you may install new PK, KEK and db without Microsoft keys. Import /usr/lib64/efi/shim-opensuse.der into db to make openSUSE kernels boot in that case. The default shim is signed by both Microsoft and openSUSE. Some firmware versions don't support double signing though. In that case install /usr/lib64/efi/shim-opensuse.efi which only has the openSUSE signature as /boot/efi/EFI/opensuse/shim.efi
Booting the Machine that supports only one signature with vendor provided Keys
Some firmwares could not parse more than one signature in the EFI images, and the default shim would fail in this case. If the firmware menu doesn't provide options to install new keys, you have to strip the openSUSE signature manually to work around the issue.
- install mozilla-nss-tools and pesign zypper install mozilla-nss-tools pesign
- create a temporary nss database mkdir certdb
certutil -N -d certdb
(press "Enter" to ignore the password request) - strip the openSUSE signature pesign -n certdb/ -r -i /usr/lib64/efi/shim.efi -o shim.efi -u 1
- replace the default shim.efi with the newly-generated shim.efi mv shim.efi /boot/efi/EFI/opensuse/shim.efi
- remove the temporary nss database rm -rf certdb
Those steps have to be done every time after shim is updated. This kind of firmwares should be less and less since the multi-signature support is already included in the edk2 upstream for more than a year, but it could still happen in the old machines.
Create RPM scriplet to strip signature automatically on package update
RPM scriplet is a series of directives that can be used to inflict necessary or desired change on a system during install time or after the installation of the RPM. The following instructions suggest to build your own RPM with a simple scriplet, which will perform the same operations above to strip the openSUSE signature.
- install rpm-build package: zypper install rpm-build
- create the directory hierarchy of our new RPM: mkdir name_of_rpm
cd name_of_rpm
mkdir -p BUILD RPMS SOURCES SPECS SRPMS - create file SPECS/name_of_rpm.spec with the following content (vim will generate it from template for your convenience): Name: name_of_rpm
Version: 1.0
Release: 0
Summary: shim secure boot signing script
License: GPL
BuildRequires: pesign
%description
%post
%postun
%triggerin -- shim,grub2-x86_64-efi
# password prompt is optional, so we avoid it
# this directory is suggested to avoid certutil "bad database" error
certutil -N -d /root/.pki/nssdb/ --empty-password
pesign -n /root/.pki/nssdb/ -r -i /usr/lib64/efi/shim.efi -o /root/shim.efi -u 1
mv /root/shim.efi /boot/efi/EFI/opensuse/shim.efi
rm /root/.pki/nssdb/*
%files - build the rpm (-bb means to build binary only, without sources): rpmbuild -v -bb SPECS/name_of_rpm.spec
- install the new rpm (requires root privileges): rpm -i ~/rpmbuild/RPMS/x86_64/name_of_rpm-1.0-0.x86_64.rpm
The script will be applied right after installing the RPM. Next time when either shim or grub2-x86_64-efi packages are getting upgraded, the scriptlet will be triggered to strip the signature. If you know any more packages that update shim upon upgrade, you can specify them at the end of %triggerin line, separating them by comma. You can now delete rpmbuild directory, it is the default location for new RPM builds.
This scriplet has two minor problems:
- If several packages at %triggerin line are specified, the signature will be striped repeatedly during an openSUSE upgrade, which is redundant.
- grub2-x86_64-efi seems to have the post-transaction script that updates shim after it's being installed. However, the %triggerin directive doesn't consider such scripts and is only invoked when the target package is being installed, in other words, shim will be updated afterwards.
Enable the validation process in shim
You might get the "Booting in insecure mode" warning while loading shim. You can remove it with the following command:
This will enable secure boot validation for the OS. Do keep in mind this will prevent unsigned kernel modules from loading. If you want to disable it, run:
Signing kernel module for verification
The kernel module verification be auto-enabled when openSUSE kernel boots with UEFI secure boot. So your self-built kernel module must be signed, otherwise it can not pass the kernel module verification.
Create a key pair
To create a signing key and certificate using the openssl req command, type the following:
 export USER="your name"
 export privkey="signing_key.pem"
 export pubkey="signing_key.x509"

 openssl req -new -x509 -newkey rsa:2048 \
             -keyout $privkey \
             -outform DER -out $pubkey -days 36500 \
             -subj "/CN=$USER/" \
             -addext "extendedKeyUsage=codeSigning" \
             -nodes
The EKU codeSigning setting is required for latest kernel releases of openSUSE Leap/Tumbleweed to accept the certificate for signature verification of kernel modules. The -addext option requires OpenSSL version 1.1.1 or later. For earlier versions of OpenSSL, consult the documentation for setting the EKU.
Please follow the Enroll MOK certificate with mokutil section to enroll signing_key.x509 to MOK. After rebooting, kernel will load MOK to kernel keyring and use it to verify kernel module.
Signing kernel module
There are two tools that can be used to sign kernel module.
The first tool is kernel-sign-file in pesign-obs-integration package. The following is a example command for signing your .ko file by kernel-sign-file tool:
/usr/lib/rpm/pesign/kernel-sign-file -i pkcs7 sha256 ./signing_key.pem ./signing_key.x509 your_module.ko
Another tool is scripts/sign-file.c in Linux kernel source. You will need to compiler it before using it.
./scripts/sign-file sha256 ./signing_key.pem ./signing_key.x509 ./your_module.ko
You can simply use hexdump command to check that the signature be attached to the end of your_module.ko file. For example:
hexdump -C your_module.ko
 [..snip]
 00015250  2d f6 15 a8 8d 60 00 fb  38 5a 3c 45 e3 52 9d db  |-....`..8Z<E.R..|
 00015260  80 88 af a8 c5 82 42 82  18 c9 c9 a5 aa e6 87 a9  |......B.........|
 00015270  cf b9 18 96 c5 36 e9 8c  78 5b 86 84 e8 8b 99 95  |.....6..x[......|
 00015280  24 8a 57 b9 1b e8 c8 0f  9a ae f6 dc 16 e2 60 56  |$.W...........`V|
 00015290  4c 6a df a4 ef 72 d7 41  6e b4 63 6c 79 fe 9a ce  |Lj...r.An.cly...|
 000152a0  ca 08 90 ba 94 41 4b 36  7f d5 79 fd 27 74 59 5d  |.....AK6..y.'tY]|
 000152b0  40 64 7a 70 96 b8 09 c0  16 a2 63 df 14 66 66 00  |@dzp......c..ff.|
 000152c0  00 02 00 00 00 00 00 00  00 01 8f 7e 4d 6f 64 75  |...........~Modu|
 000152d0  6c 65 20 73 69 67 6e 61  74 75 72 65 20 61 70 70  |le signature app|
 000152e0  65 6e 64 65 64 7e 0a                              |ended~.|
 000152e7
You should found the a magic "~Module signature appended~" shows in the end of your .ko file. Which means that a signature blob be attached.
Then you can just use modprobe or insmod command to probe your kernel module. Kernel will use MOK in kernel keyring to verify kernel module.
Local build and sign NVIDIA driver
Due to license situation, NVIDIA can only be built on your local machine. Which means that NVIDIA .ko file must be signed on local. The NVIDIA kmp for openSUSE does the job in RPM scripts. When secure boot is enabled, NVIDIA kmp can auto-build ko files and auto-sign them by a one time key-pair. It will also calls mokutil to enroll the one time public key to MOK. Please check the SDB:NVIDIA_drivers#Secureboot for more detail.
Reset SBAT string for booting to old shim in old Leap image
We introduced new 15.7 shim since Leap 15.5. The 15.7 shim is the first version for fully supporting SBAT mechanism. SBAT mechanism be used to block old shim which has security concern normally. For the detail of SBAT, you can check this document.
Situation
You have installed Leap 15.5 which means the shim 15.7 is your default first-stage bootloader now. Then you want to boot the old shim 15.4 in Leap 15.4 iso image. But the shim 15.4 be blocked by SBAT self-block mechanism. You saw the following messages be shown on screen:
 Verifying shim SBAT data failed: Security Policy Violation
 Something has gone serously wrong: SBAT self-check failed: Security Policy Violation
Note:
The above violation messages are exposed by shim 15.4's SBAT self-block mechanism. This mechanism is the only SBAT function be supported by old shim 15.4 in Leap 15.4 iso image.
Step by step for re-setting SBAT
This section is a step by step for resetting SBAT efi variable (aka. SbatLevelRT). Before resetting SBAT to original mode, please aware that you need to take the security risk because old shim has security issues. That's why we use SBAT mechanism to block old shim.
1. Reboot to firmware UI to disable secure boot
2. Boot to Leap 15.5, run mokutil command in terminal:
Check secure boot state:
 localhost:~ # mokutil --sb
 SecureBoot disabled
Check current SBAT string in SbatLevelRT variable. Default is "latest" mode as following:
 localhost:~ #  mokutil --list-sbat-revocations
 sbat,1,2022111500
 shim,2
 grub,3
Run mokutil to set SBAT policy to "delete"
localhost:~ # mokutil --set-sbat-policy delete
You can hexdump SbatPolicy efi variable to confirm, the command 3 be written to SbatPolicy variable
 localhost:~ # hexdump /sys/firmware/efi/efivars/SbatPolicy-605dab50-e046-4300-abb6-3dd810dd8b23
 0000000 0007 0000 0003
 0000005
3. Reboot to Leap 15.5
Which means booting to shim 15.7. The shim 15.7 will take the delete mission and reset SbatLevelRT variable to "original" mode.
Note:
Please do NOT reboot to Leap 15.4 (which means you boot to shim 15.4). The old shim 15.4 does NOT support "--set-sbat-policy" command for resetting SbatLevelRT. The mokuil delete command will be ignored by shim 15.4.
4. Confirmed that the SBAT be set to "original" mode
Now you still boot to Leap 15.5, run mokutil command in terminal to confirm that the SBAT string be changed to "original" mode (aka. delete):
 localhost:~ # mokutil --list-sbat-revocations
 sbat,1,2021030218
AS the above result, the original string only has a SBAT version, without shim or grub2 SBAT entries. It means that shim SBAT will NOT block anything.
5. Now you can reboot to firmware UI to enable secure boot.
6. Then boot to old shim 15.4 in Leap 15.4 image. The SBAT self-block mechanism will not stop shim 15.4 itself now.
Glossary
- PK
- The "Platform Key" typically refers to a certificate installed by the hardware vendor on the machine. To be able to modify the KEK a valid signature of the PK is required.
- KEK
- A valid signature of the "Key Exchange Key" is required to update the signature database.
- db
- The Signature Database contains well known certificates, signatures or hashes of binaries. Only binaries that can be verified using that database are executed by the firmware. A valid signature of the KEK is required to update the Signature Database.
- dbx
- The Forbidden Signatures Database is the opposite of 'db', basically blacklist of certificates, signatures and hashes. If a binary matches any of the entries there it cannot be executed. A valid signature of the KEK is required to update the Forbidden Signature Database.
- MOK
- Machine Owner Keys. An extra database of certificates or hashes used by MokManager. MokManager can be used interactively by the user during boot to update MOKs.