SDB:Kolab
What is Kolab?
Kolab is a secure, scalable and reliable groupware server. It is formed by a number of well-known and proven components or the standards tasks such as E-Mail, Directory and Web Service.[1]
Components:
- 389 Directory Server as the default LDAP server component
- Postfix for delivering mails
- Cyrus IMAP as for storage and IMAP connectivity
- amavisd-new, SpamAssasin and ClamAV for spam detection and virus scanning
- Roundcube Webmail as a web mailer
- SASL
- Kolab services, content filter, definitions and bindings
See Kolab for more information.
Installation Process
In general, the installation process consists of the following:
- Add the repositories
- Install the wanted components
- Modify the config file
- Run the kolab setup routine
This section will describe these steps in detail.
Repositories
To install Kolab, you need to add the server:Kolab:UNSTABLE and the server:Kolab:Extras repository. There is also a server:Kolab:STABLE repository, containing stable and tested packages. Currently no stable packages are available, so don't use it.
The following will add the required repositories (STABLE,UNSTABLE and Extras) on openSUSE Leap 15.6 and refresh the repository cache:
Here you can find other examples on how to add a repository.
Version: 15.5
Version: Tumbleweed
Packages
Once the repositories have been configured, Kolab and all its dependent packages can be installed:
or - if you only want to install the ldap components for Kolab 3,
| Package | Summary |
|---|---|
| kolab | Kolab Groupware Server meta package for single server installations |
| kolab-conf | Kolab Groupware Configuration Utility packages meta package |
| kolab-imap | Kolab Groupware IMAP component meta package |
| kolab-ldap | Kolab Groupware LDAP components meta package |
| kolab-mta | Kolab Groupware Mail Transfer Agent meta package |
| kolab-webadmin | Web based admin- and user interface for the Kolab Groupware Server |
| kolab-webclient | Web based mail client for the Kolab Groupware Server |
For single server installations, an additional package kolab-scripts is recommended to simplify installation:
Pre-Installation
Kolab requires a few system adjustments (best before installation) to run; running
will trigger a script, that is
- checking for a fully qualified host name and falling back to "kolab.ajaissle.de", if there is no fqdn present,
- updating your system to ensure you are using the latest packages and bug fixes,
- checking for a present ca and server certificate or creating a certificate authority and a self signed server certificate, if none is present,
- giving users cyrus and postfix access to the certificates,
- creating a user_deny.db for cyrus-imapd and
- updating the ClamAV virus definition database.
You can
to see in detail what commands are used for this task.
Installation
After preparing the system, you can start the setup using:
Because of the many services involved (and for higher security), the setup script will ask for a lot of password values:
- LDAP administrator - used to login to the graphical console of 389 Directory Server
- LDAP Directory Manager (cn=Directory Manager) - the administrator user you will be using to at least initially log in to the Web Administration Panel, and that Kolab uses to perform administrative tasks
- Cyrus Administrator - used by Kolab to execute administrative tasks in Cyrus IMAP
- Kolab Service account - used by services such as Postfix and Roundcube to create a bind to the LDAP server
- MySQL root user - administrative user for the MySQL server. Kolab will only require this for installation and forget about it afterwards. You still need to know this for administrative tasks like backups and such.
- MySQL 'kolab' user - used by Kolab services, such as Web Administration Panel.
- MySQL 'roundcube' user - used by the Roundcube Webmail interface.
Post-Installation
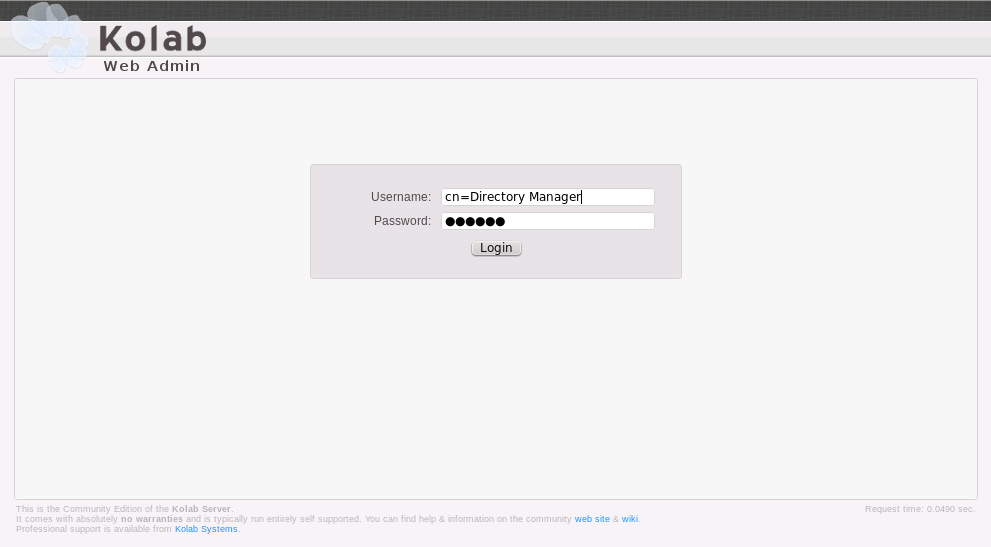
After the setup, you should be able to log into the Kolab Web Administration Panel. The Kolab Web Admin is located at http://''serveraddress''/kolab-webadmin, where serveraddress is your respective server address or host name. For your first login, you have to use "cn=Directory Manager" as the user name, and the password you provided during setup.
Hints and Tweaks
Add an alias to one of your users, that will accept email from root@domain.tld. In case e.g. cron sends an email notification, the email will arrive at the user that has the alias set for the root.
An even nicer solution is, to have the emails sent to a distribution list e.g. cron@domain.tld. In your cron scripts you should have your emails sent to cron@domain.tld in that case.
Groupware testing
- Open a browser and point it to:
- https://@servername@/freebusy/user@domain.tld.ifb
- https://@servername@/freebusy/user@domain.tld.xfb
- https://@servername@/freebusy/trigger/user@domain.tld/FOLDER.pfb (replace FOLDER with your Kalendar folder for instance)
All of these urls should show you ical formatted data.
In the urls above user@domain.tld is a user you have created with the kolab web admin interface before.
- Curl could be used for testing the freebusy components as well (it's ten times faster than doing everything with the preferred browser):
curl -u user@domain.tld:password -k -X GET \
https://@servername@/freebusy/trigger/user@domain.tld/FOLDER.pfb
Use this freebusy test script to test the freebusy functionality.
#!/bin/bash
# See: http://kolab.org/cgi-bin/viewcvs-kolab.cgi/doc/architecture/freebusy.txt

# The server that runs the kolab server
SERVER=yourserver
# The user and password that logins to the kolab server (user@domain.tld)
LOGIN_USER=youruser
PASSWORD=youruser_password

# The user for whom the Free Busy information is requested
FB_USER=

if [[ -z "$PASSWORD" ]]; then
  echo "error: password is required" >&2
  exit 1
else
 _PASSWORD=:$PASSWORD
fi

_LOGIN_USER=$(echo $LOGIN_USER | sed 's/@/%40/')
[[ -z "$FB_USER" ]] && FB_USER=$_LOGIN_USER

HTTP=yes
if [[ "$HTTP" == "yes" ]]; then
  PROTOCOLS="http https"
else
  PROTOCOLS="https"
fi

for PROT in $PROTOCOLS; do

  echo === $PROT ifb ===
  curl -k $PROT://${_LOGIN_USER}${_PASSWORD}@$SERVER/freebusy/$FB_USER.ifb
  echo

  echo === $PROT xfb ===
  curl -k $PROT://${_LOGIN_USER}${_PASSWORD}@$SERVER/freebusy/$FB_USER.xfb
  echo

  echo === $PROT pfb with trigger ===
  curl -k $PROT://${_LOGIN_USER}${_PASSWORD}@$SERVER/freebusy/trigger/$FB_USER/Calendar.pfb
  echo

  echo === $PROT pfb ===
  curl -k $PROT://${_LOGIN_USER}${_PASSWORD}@$SERVER/freebusy/$FB_USER/Calendar.pfb
  echo

  echo === $PROT pxfb ===
  curl -k $PROT://${_LOGIN_USER}${_PASSWORD}@$SERVER/freebusy/$FB_USER/Calendar.pxfb
  echo
done
Clients
KDE client configuration
The client configuration, based on KDE's Kontact is described in kolab server 2 and kde client configuration
If the groupware functionality works and Kontact is configured correctly, you should see should be able to see the following picture:
Web client
Kolab 3.x has it's own modified Roundcube Webmail (more precise: uses Roundcube Webmail plus various plugins). To use it, install the kolab-webclient package:
After installation you can access it from http://@servername@/roundcubemail. Note that @servername@ should be the same as given while running kolab-bootstrap.
If you have problems getting the login from webclient, check the error_log of apache.
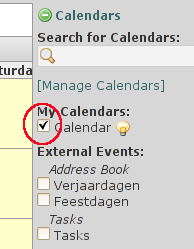
Don't forget to check your calendar, as shown in the screenshot on the right.
If the calendar is not checked it is not displayed. Although you can schedule events successfully....
Personal Information synchronization
If you want to synchronize e.g. your mobile phone with your information stored in the Kolab server, you can do so by installing the kolab-syncroton package:
On single server installations, this package is installed by default. After installation, you can check http://servername/Microsoft-Server-ActiveSync and log in with your Kolab user credentials. If everything is working, you should see your User ID and IP address displayed.
It works!
Your userid is: 14 and your IP address is: 192.168.154.52.
Backups
During kolab_bootstrap many config files are written to disk. Some of these will overwrite your config files. The config files to be created during kolab_bootstrap, can be determined with:
/etc/kolab/templates # sed -n 's/^.*TARGET=//p' *

For example:
/etc/amavisd.conf
/etc/clamd.conf
/etc/cyrus.conf
/etc/freshclam.conf
/etc/imapd.conf
/etc/kolab/kolab_smtpdpolicy.conf
/etc/openldap/ldap.conf
/etc/postfix/ldapdistlist.cf
/etc/postfix/ldaptransport.cf
The original config files are saved (backed up) to /var/adm/backup/kolab/kolab_backup-orig.tar.bz2 during the first execution of kolab_bootstrap.
Please, let us know if things can be improved. This can be done on the talk page of the wiki page, and on the kolab-devel (at) kolab (dot) org emaillist. In case you use the talk page, inform the packagers with an email to the before mentioned emaillist. Include in the email that it concerns kolab on suse.
Troubleshooting
Useful commands for debugging
Get a list of installed Kolab packages:
LDAP Troubleshooting
Check the following for errors (replace HOSTNAME with your 389-ds instance name):
If the setup script did its job and created a 389-ds instance, you can try to start this instance manually:
And if this instance is created but not starting when
if performed, have a look at /etc/systemd/system/dirsrv.target.wants/ and check if it's empty. A link named dirsrv@HOSTNAME.service should exist inside.
Reset a broken Installation to do a re-install
If you canceled an installation or the setup hung, or if you just want to reinstall a working Kolab server from scratch, you first need to get rid of any created MySQL databases and 389-ds LDAP server instances.
To remove the LDAP instances:
To remove the MySQL databases:
See Also
- Kolab documentation
- Kolab wiki
- Kolab article in the Ubuntu wiki
- http://bmts.us/wiki/doku.php?id=article:kolab:tweaks
- User:Aeneas jaissle/SDB:Kolab 3
- User:Aeneas jaissle/SDB:Kolab 3/Development


