SDB:Basics of partitions, filesystems, mount points
When it comes to installing openSUSE or to adding/removing disks to an existing system, people start talking about mounting and umounting, and about filesystems and partitions. Some people have little real idea of what all these words mean in a Unix/Linux environment which means that discussing problems in this area is full of potential misunderstandings. Many people do have some knowledge based on familiarity with other Operating Systems. That increases the possibility of confusion. This page aims at clarifying this vocabulary considered in a Unix/Linux environment.
Notion of Disk
In this document, the word disk will be used as a generic term for anything that is seen by operating systems as a disk drive i.e. a place where they can store and retrieve data perennially — perennially implying the idea of nonvolatility when powering the computer off. No matter whether it is a flash device that looks like a disk, an optical drive or a 'real' hard disk, or even a combination of several devices.
Because newer types of mass storage devices present themselves to the system as disks, they fall into this category. The operating systems can not see if a disk is inside the system enclosure, beside it, on a table, or on another shelf, so there is no difference between what some people call internal and external disks.
Disks are normally supplied formatted by the manufacturer. That means that damaged tracks are marked and replacements used, sector numbers are written. This is done to interface with the controller's hardware and firmware. This type of formatting is also known as low-level formatting.
Partitions
Notion of partition
It is often necessary — especially when one wants to install several operating systems on the same computer — to divide the hard disk into several regions and to attribute every one of them to such or such operating system. This dividing is done by an operation called partitioning and the created regions are called partitions. Each system can store and retrieve data on these partitions independently from other operating systems.
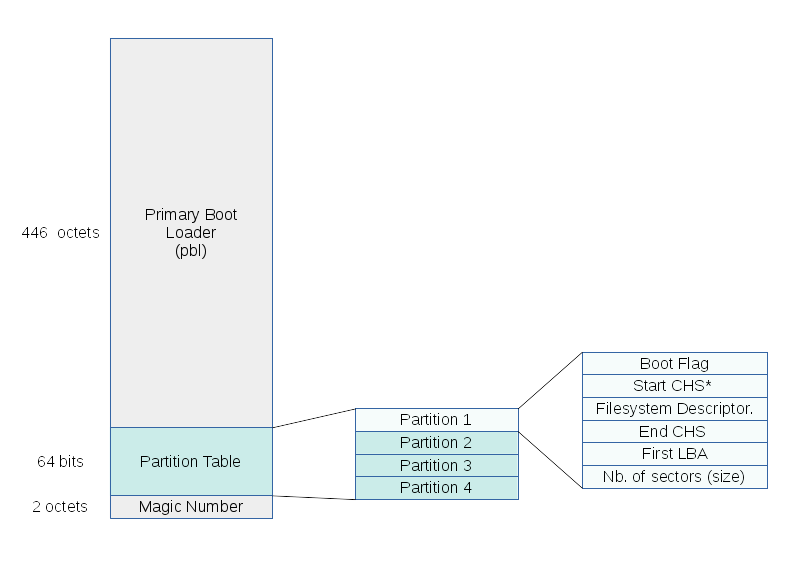
To access the partitions, the operating systems have to read a very particular area of the disk, called the Partition Table. The partition table contains information about the size and the location of the partitions.
System administrators can, from the OS that is currently running, use a specialized program to create, delete and manipulate partitions. This program is called a partition editor.
To be usable by an OS, a disk must include at least one partition but generally there are more. An OS can use several partitions even if they belong to different disks.
Partition Naming
- In Windows, partitions are named after a letter followed by a colon e.g. C:, D:, etc. The Windows system itself is always located in C:.
- In Linux, partitions are named after the path from the unique root of the tree — into which all directories and files (including device files) are placed to constitute the entire filesystem — to their location in this tree. Generally they are named /dev/hd<a letter>/<a number> or /dev/sd<a letter>/<a number> e.g. /dev/sda1 or /dev/hda2. We will bring more light upon this at the time of speaking of the filesystem in Linux.
Disk Partitioning in a PC
Legacy Partitioning and Booting
The Basic Principles
At the beginning, when disks had little space, there was the idea that four partitions would be enough for all possible usage (but this proved false). With this kind of partitioning, data about partitions — number, location, size, type, etc. — is written in the partition table which is located in a particular sector at the very beginning of the disk and in which the firmware — called Basic Input Output System (BIOS) — fetches the instructions in order to boot the machine. This boot sector is known as the Master Boot Record (MBR) and includes the code necessary to the continuation of the loading of the OS. The boot program included in the MBR alongside the partition table is sometime called the boot loader. It works often as the first stage of a loading mechanism handing the control to a second stage located in a particular sector of an other partition: the Volume Boot Record (VBR).
The following image shows the structure of the MBR. There is the first stage boot loader to be loaded into memory in order to be executed by the computer's BIOS. This loader — Primary Boot Loader (PBL) — will look in the partition table for the partition whose boot flag indicates that it is the boot partition, i.e. the one that contains the second stage of the boot loader. It is therefore in the VBR of this partition that the first stage boot loader will look for the code that will allow the loading of the operating system. This can be done directly if the operating system is alone on the computer, or through a program that presents the user a boot menu. Such a program is called a Boot Manager.
The boot manager may be placed, depending on the case, either directly into the MBR of the boot disk or into the VBR of a partition — the one which boot flag is set to indicate that it is the boot partition. Among the most well known boot manager, are GRUB and Lilo.
Primary, Extended and Logical Partitions
When it became very obvious that four partitions were not going to be sufficient, a backwards-compatible solution was found: make one of the four partitions — which were then called primary partitions — a special partition called the extended partition that can hold more partitions — the logical partitions. Newer BIOSes (nowadays all BIOSes) know about it. Thus we have 3 types of partitions:
- primary partitions, these are the partitions of old, there can be four of them (numbered 1, 2, 3, 4);
- extended partition (in fact also a primary partition) — there can only be one, it has normally the number after the highest created primary partition (3 or 4) and should contain all of the remaining space of the disk (otherwise space is wasted);
- logical partitions — they are created inside the extended partition, their numbers are always 5 and higher (the maximum is debatable, but enough for most people).
Some people are bewildered by the extended partition, it seems to be of no use and takes a lot of disk space and that space seems also to belong to other useful partitions; of course, the extended partition is acting as a container for the secondary partitions, and so space shows up in both the extended partition and the secondary partitions that it contains. Reading the above might reassure them.
An example of a disk with partitions of all three types goes here:
fdisk -lDisk /dev/sda: 200.0 GB, 200049647616 bytes 255 heads, 63 sectors/track, 24321 cylinders Units = cylinders of 16065 * 512 = 8225280 bytes Disklabel type: dos Disk identifier: 0x1c841c84 Device Boot Start End Blocks Id System /dev/sda1 1 574 4604008+ c W95 FAT32 (LBA) Partition 1 does not end on cylinder boundary. /dev/sda2 * 575 8967 67416772+ 7 HPFS/NTFS /dev/sda3 8968 24321 123331005 f W95 Ext'd (LBA) /dev/sda5 8968 9229 2104483+ 82 Linux swap / Solaris /dev/sda6 9230 11840 20972826 83 Linux /dev/sda7 11841 24321 100253601 83 Linux
- Partition 1 is a restore partition put there by the PC's manufacturer.
- Partition 2 contains a Windows XP system (Windows calls it the C: drive).
- Partition 3 is the extended partition, which runs until the end of the disk and holds the following three:
- Partition 5 is the openSUSE swap partition.
- Partition 6 is the openSUSE / partition.
- Partition 7 is the openSUSE /home partition.
- The Disklabel type line indicates that it is a dos partition table.
- The star in front of /dev/sda2 indicates location of the boot flag, identifying the partition where Windows-compatible MBR code jumps to continue the boot process. There must be a boot flag on one primary partition, unless other than Windows-compatible MBR code is used, such as that used by LILO and Grub.
GPT Partitioning
One of the major limitations of the legacy partitioning — a.k.a. dos partitioning — is the fact that it uses only 32 bits to keep the block addresses, thus, with 512 byte sectors, the address range is 2^32 bytes (2TB). To overcome this limitation, Intel, in the late 1990s, imagined a new partition table: the GPT, that has since become part of the UEFI standard. The address range thus passed to some Zettabytes (10^21), a size that provides us with some quietness for a while. Reaching this point some explanations about the various acronyms seems necessary:
- GPT stands for GUID Partition Table.
- GUID stands for Globally Unique Identifier.
- UEFI stands for Unified Extensible Firmware Interface. UEFI is the standard that defines the software which constitutes the interface between the firmware — itself in direct connection with the hardware — and the operating system. UEFI has supplanted the good old BIOS. To discover more about UEFI please read the page dedicated to UEFI.
GPT Partitioning and Booting with a UEFI Firmware
If your computer does not have a BIOS but a firmware corresponding to the UEFI standard, booting will be done in a way quite different from what is described above. It is beyond the scope of this page to describe this booting in detail. For more information on this topic please refer to the UEFI.
The Linux Filesystem and its Setting Up
Description of the Linux Filesystem
Files in Linux
It is customary to say that in Linux "almost everything is a file; if something is not a file, it is a process." However, Linux distinguishes between different categories of files:
- Regular files that contain data such as e.g. text, program instructions, pictures, video recording, etc.
- Directories that are really just files containing a list of files.
- Special files that represent the mechanism used for input and outputs and that are placed in the /dev directory.
- Sockets, special files for inter-process communication through the network.
- Links a mechanism to make a visible file in multiple locations of the file system.
- Pipes which allows inter-process communication with a lean semantics relatively to the sockets.
We will come back to some of these concepts later in this page.
Structure of the Filesystem
In Linux, all files and folders are placed in a single root tree. This root is called root and is spotted by the / sign in Linux commands. The volumes used to contain these files (or folders) do not obviously appear in the tree that makes them completely abstracted. Each of the used volumes includes part of the tree but is not very visible.
In this tree, a particular file - or directory - is located in an absolute way by mean of its path. This path begins with / - the root of the file system - and is followed by the name of the directories that constitute the genealogy of the file concerned, each ancestor being separated by a / character. Thus /home/Fred/Documents/example.txt represents the example.txt file located in the Documents directory itself located in the Fred folder, itself located in the home directory itself directly under the root (/).
- the files are placed in one of the many trees whose roots are each of the volumes such as C:, D:, etc.
- the separator of tree levels is \ instead of /.
Devices Files and Special Files - Naming of disks and Partitions
At boot time, the Linux system scans the hardware and associates to each of the discovered devices a special file a.k.a. device file. This special file - name given because it has no content on the disc, but it is used as a file - is a kind of interface between the device driver and hardware. The driver just writes to this device-file for output and reads in it to make an entry. These device-files are usually placed in the /dev directory. Disks are generally associated with the special-files (device files) hd<letter> for PATA units sd<letter> for SATA drives. The partition of these disks are indicated by hd<letter>/<number> or sd<letter>/<number> and placed in the /dev directory e.g. /dev/hda, /dev/hda1, /dev/hda2, /dev/sda, /dev/sda1, /dev/sda2, /dev/sdb, etc.
Preparing the Partition Before Installation
Beyond the low level formatting and the making of the partitions, there is still left one operation without which operating systems are unable to make use of the partitions: the high level partitioning. In fact, this operation aims at putting a branch of the filesystem. This branch is completely void but ready to receive directories and files and to prepare the VBR — the famous VBR we spoke of previously. In Linux, as if it wanted to insist on what this formatting does, calls it mkfs.<type> — mkfs being a contraction of make filesystem. It is the reason why, in the literature, we will find the wording make a filesystem instead of format.
During the installation process you will be prompted to specify which type you want to assign to the file system that you'd set up on each of these partitions. We will not go into the technical details on the advantages and disadvantages of each type but know that the most commonly used by Linux are ext2, ext3, ext4, Reiser, Btrfs, Xfs, etc. If you want later to the installation, create a file system on a partition, you must specify the mkfs.<type> this type of file system. For example, to create an ext4 file system in the /dev/sdc1 open a terminal, and having get superuser privileges, launch the command:
mkfs.ext4 /dev/sdc1Setting Up the Filesystem - Mounting and Unmounting of Partitions
Initialization in RAM
When starting the system, after the kernel has been loaded into memory by the boot loader , a minimum file system is created in memory from an image stored using various techniques, the explanation of which goes far beyond the limits fixed to this page. This filesystem is virtual, in the sense that it resides in volatile memory . It will become little by little real in the sense of living on non-volatile media , by means of mounting operations to be described now . This is because , this virtual initial system contains all the necessary drivers to mount different partitions - with their filesystem - that the thing is made possible.
Notion of Mounting and Unmounting
Mounting Point
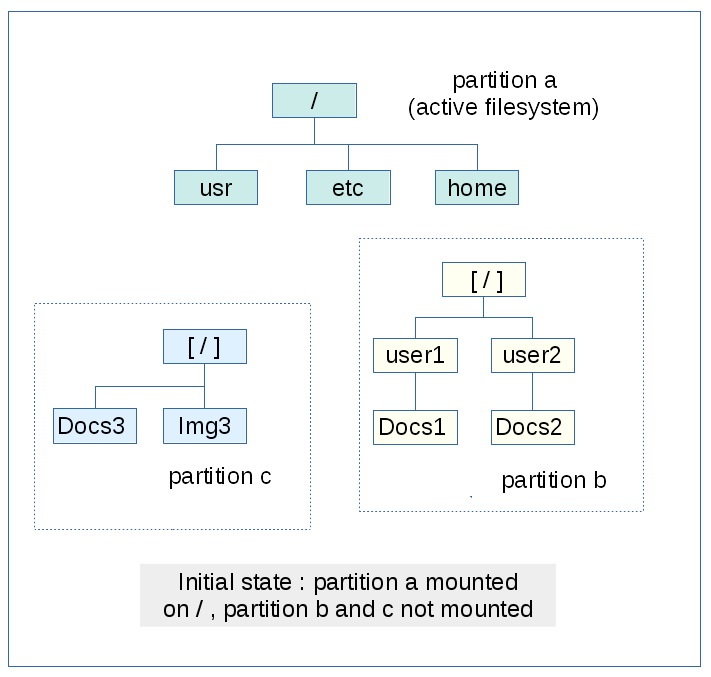
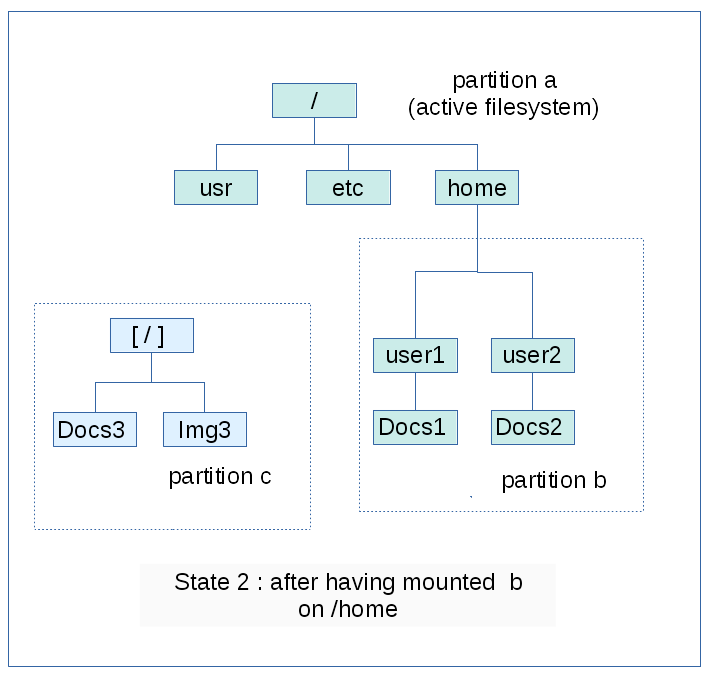
A mount point is nothing more than any directory in the filesystem tree on which we are going to graft a branch that resides on a still inactive partition. As visible in the following illustrations, the graft will make the branch of the tree that was downstream of this mount point invisible to the operating system and replace it with the branch residing on the grafted partition.
Mounting and Unmounting Illustration
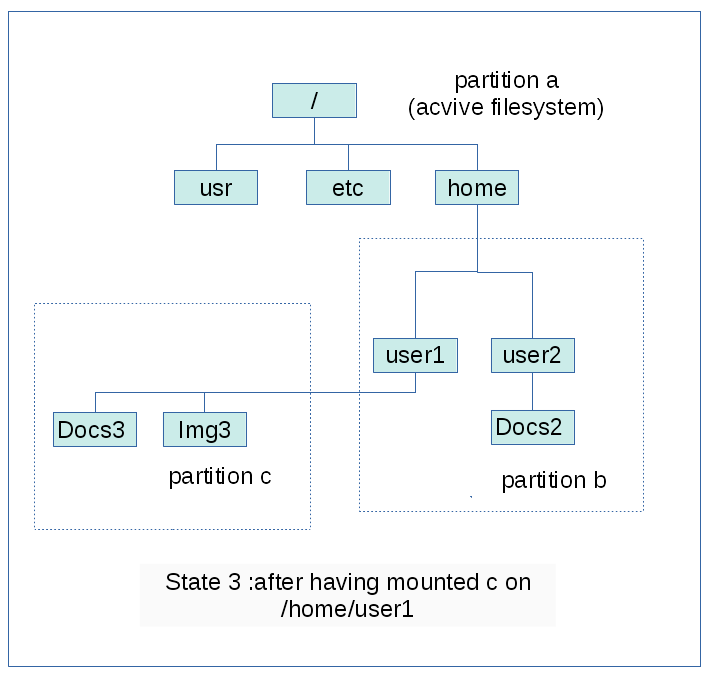
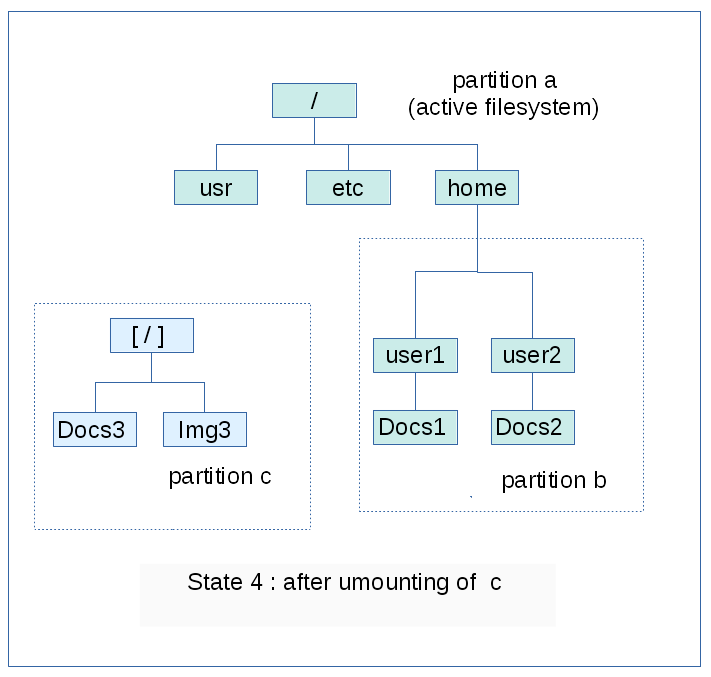
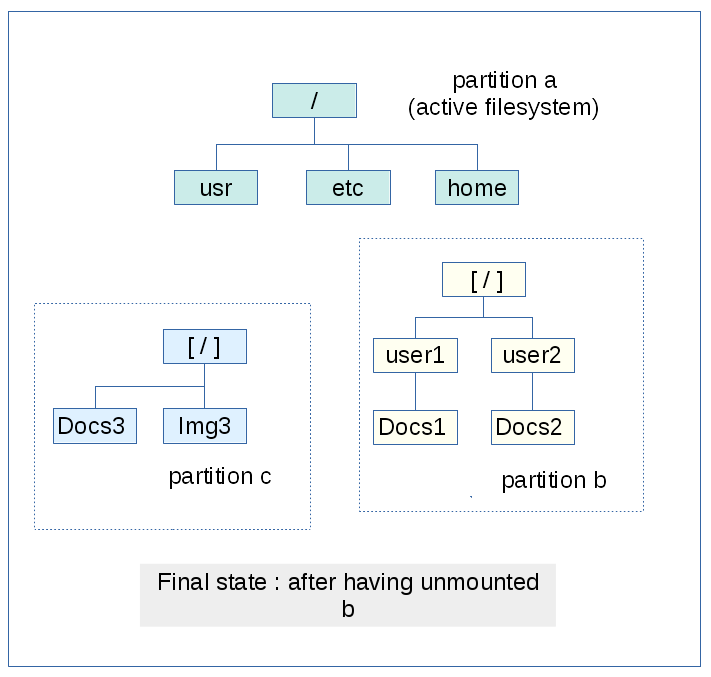
The previous images show how a partition — here the b partition — is mounted on a mount point — here /home. Everything happens as if the root of the mounted partition was replacing the directory the mount point represents like a graft. The whole tree inside the partition become instantly accessible to the operating system's processes. The b partition, from this moment on, belongs to the Linux filesystem. Conversely, if before the mounting, the tree extended itself beyond the mounting point with a more or less complicated branch, this branch doesn't disappear from the medium that was containing it, it simply becomes disconnected from the OS and invisible to it. This mechanism is figured on the following picture, with the disappearance of the /home/User1/Docs1 directory from the filesystem after the c partition has been mounted on the /home/user1 mounting point.
Of course, if the c partition is then unmounted, the hidden directory is discovered anew while the directories of the c partition are made unreachable anew.
To finish, the unmounting of b partition restore the initial state.
Determination of Partition to Be Mounted
During the installation of openSUSE, or any other distribution of Linux, the administrator, after having completed the partitioning of the disks that are present on the system, is asked what use he wants to do with the partitions. Generally, openSUSE suggests a basic organization providing the following uses:
- a swap partition that will be used as an extension of the computer's RAM;
- a partition to be mounted on the filesystem's root;
- a partition to be mounted on the /home mount point, the use of which will be for users directories and files in order to keep them clearly segregated from the Linux system.
The choices made by the administrator during the installation process are stored into the /etc/fstab file in the real filesystem — real has to be understood here in the sense of residing on the non-volatile disk. This file contains, in addition to the affectation of the partitions, some mounting options that are beyond the scope of this page, but the reader is invited to read the fstab man pages on this subject using the command:
man fstab
Mounting Partitions after Installation
During the installation, the administrator has defined which partition the system had to use and where in the filesystem tree they should be mounted. As for the mounting itself, it has been done transparently by YaST. But what to do if after the installation we want to access another partition? The are various answers to this question that we are going to review hereafter.
Case of Removable Media
We are speaking here of CDs/DVDs or USB sticks that can be plugged and unplugged at will by the user. What happens when a removable device is plugged into the system? The first thing that is required is to attribute it a device file. It is the udev daemon that does the job as he does for any other device at boot time, following the same rules. The kernel notifies the udev daemon the availability of a new device and udev creates the device file. For example, if it is a USB stick, and if that stick is labelled, this device file will be found in the /dev/disk/by-label/ directory. As for the mounting, here is how things happen. The HAL daemon gets an signal from udev telling him that the a new device file has been created. HAL uses the /media directory to accomplish the mounting.
He mounts everything there. He has its administration there. This is not configurable. When a the partition to be mounted has a label (e.g. Backup), he will use that label to create the /media/Backup/ mount point and will mount the partition there. When there is no label he will mount using the device type as a name and thus mount at /media/cdrom/ or /media/disk/. He will add numbers to avoid double names (/media/disk-1). Thus you can not get your wandering home directory mounted inside /home/ with HAL! The user can dismount the partition at any moment — this is even a recommendation prior to the disconnection of such a medium in order to avoid interruption of pending read or write operations.
To do so, he can use the graphical file explorer of the desktop environment or use the umount command:
umount <path to partition's mount point>
Case of Irremovable Media
One can discover after the installation of openSUSE in dual boot with Windows that he needs to access numerous files inside the Windows partition and that unfortunately this partition has not been declared to be mounted by the system.
- If the need is temporary, it is possible to use a tool such as Gnome-disk-utility to make a temporary mounting on /run/media/<user name>/<partition label>.
The mounted partition then appears in the file explorer. It is also accessible from the command line — please refer to the basic commands of Linux.
- If the need is permanent, one can add a line to the /etc/fstab file. At the next booting, the new line will be taken into account and the partition mounted as required by the options defined in /etc/fstab
Standard Organization of the Filesystem
The organization of the Linux Filesystem is defined by the Filesystem Hierarchy Standard. This standard enables Software and users to predict the location of installed files and directories. In it last version, it distinguishes two major criteria that preside to the localization of the files. Their variability — static or variable — and their ability to be shared between hosts — shareable and non-shareable. We are not going to enter the details of this text now but we will just indicates to what use are the first level directories are intended for:
- / is the root. It is the highest level of the filesystem. At the very beginning of the filesystem setting up, this directory — as some other sub directories — is purely virtual (residing in RAM), then the partition that contains the final root of the filesystem is mounted there read-only. Thus the kernel is able to find the tools necessary to the initialization of disks and the mounting of the other partitions. After this job is done, the partition is remounted read write.
- /home is the place where the files of the users will be placed. Generally, but it is not mandatory, a separate partition is mounted there.
- /etc is the place for installed application configuration files e.g. /etc/fstab, /etc/hosts, etc.
- /lib is the place for shared libraries and the kernel modules.
- /media is a mounting point for removable devices such as CDs, DVDs, USB stick or drives, etc.
- /bin is a place for essential command binaries such as cat, ls, mount, etc.
- /boot is a place for static files of the boot loader.
- /dev is for the device files.
- /mnt is a place where to mount filesystems temporarily.
- /opt is for additional programs.
- /run is for data related to running processes.
- /sbin is for essential commands.
- /srv is for the data of services supported by the system e.g. the files of a web server.
- /tmp is for temporary files.
- /usr is a secondary hierarchy.
- /var is for variable data.
- /root is for the files belonging to the super user (root).
Of course, for each of this first level directories, the standard goes deeper in the tree description but this detailed knowledge is not absolutely necessary to a standard user, a fortiori to a beginner.
Tools
This being a primer we do not talk much about tools, but some are mentioned (e.g. fdisk, mkfs.<type>, mount). As always, they and configuration files like /etc/fstab have their man-pages on your system (and on the Internet). They are there to be read by you. While Yast > System > Partitioner is a useful GUI, you may have to revert to CLI commands in runlevel 3 or single user mode because you need filesystems being unmounted while working on them. For the same reason you might even have to boot from a rescue CD/DVD running fdisk, and friends, from there (else you would not have an unmounted /). Bootable GUI tools like Gparted are a step further. They know a lot about the internals of filesystems and can thus change their size, but this is far beyond the scope of this document.
Links
- http://en.wikipedia.org/wiki/Disk_formatting
- http://en.wikipedia.org/wiki/Disk_partitioning
- http://en.wikipedia.org/wiki/Inode
- http://en.wikipedia.org/wiki/Filesystem_Hierarchy_Standard
- http://en.wikipedia.org/wiki/Udev
- http://en.wikipedia.org/wiki/HAL_(software)
Keywords: partition,filesystem,mountpoint,udev,HAL
