Archive:YaST Printer redesign
YaST2 Printer UI enhancement
This is page with some suggestions how to improve usability of yast2-printer module
Benchmarks of other printer modules and their workflows can be viewed at http://old-en.opensuse.org/UX/Printer
The experimental YaST printer module
Not just nice looking design ideas but something which is really implemented so that one can test how its usability is "out there in the real world" ;-)
Basic Design Ideas:
"Exchange Dungeons with Trees!"
What does this mean?
The usual wizard style with a sequence of dialogs looks like a dungeon from the user's point of view - in particular if the issue is not ridiculous simple.
Like a hero in a dungeon equipped only with a faint torch, the user moves from dialog to dialog, only knowing the past where he comes from but never knowing what there will happen after the [Next] button, never having an overview of the environment, always in terrible fear what there might lurk when opening the [Next] door.
In contrast a tree widget keeps the user continuously informed where he comes from, where he currently is, and what the alternatives are.
Obscure widely ramified dialog sequences were condensed into visible tree structures (for example the "Connection Wizard") to keep the user continuously informed where he is and what the alternatives are.
But here "tree" does not only mean the explicite tree widget. With "tree" I mean anything which provides this kind of information to the user (e.g. also a "map").
In particular when sequences of dialogs were condensed into one single dialog, there is no need to provide an additional information how the parts are connected/related to each other because all is visible at a glance so that a derivative design idea is:
"All-in-one Dialogs"
For example the "Overview": It shows all available queues - both local and remote queues - at a glance and it shows also all possible configuration tasks so that there is nothing which is hidden somewhere.
Or the "Add" sequence (first select the connection, then the driver, then specify a queue name): This three mandatory steps happen now in one single dialog from the top down to the bottom.
If the desired connection is not shown in the "Add" dialog, a "Connection Wizard" is available but even this is no longer a widely ramified dialog sequence but just one single dialog which returns to the one single "Add" dialog when the connection is specified.
Another design idea how to get rid of the dungeon feeling where the hero with his faint torch cannot know what is happening behind the walls (i.e. what the tool actually does behind the surface) is:
"Visible Automatisms"
The driver is visible auto-selected. There is no longer a hidden automatism which results whatever driver it thinks is best. The new design makes it much more obvious to the user if there is more than one driver available and which one is actually auto-selected.
The driver is automatically visible auto-selected so that there is no single click more needed by the user. The crucial point is that there is visible feeback from the automatism to keep the user informed what is happening.
Basic Implementation Principles:
Transaction Semantics For Each "One Setup"
This means: Either the YaST module does "one setup" completely or not at all (i.e. "transaction semantics") and it writes each "one setup" as soon as possible to the system (i.e. "for each").
"One setup" means the smallest amount of setup actions which lead from one consistent state to another consistent state.
"Consistent state" is meant from the user's point of view regarding the particular kind of setup (e.g. set up one print queue or set up one service) and not from a low-level (e.g. filesystem or kernel) point of view.
If the user does malicious stuff (e.g. killing YaST) or if the user ignores warning messages, it is possible and accepted that the user can force YaST to set up even an inconsistent state (e.g. activate one service but do not activate another required service).
The current scanner module implements already this semantics.
Reasoning:
As of this writing (May 2008) the current usual YaST module behavior is that all settings while the module runs are kept internally and all of them are written to the system only when finishing the module.
An argument for the current behavior is that this way the user would be able to experiment with the settings and having them actually applied only at the end.
For me this seems to be a contradiction in itself.
I think it is not possible to "experiment with the settings" without actually set up something. I think "experiment with the settings" requires to test them and to test something it must be set up (i.e. the settings must be applied). Without a possibility to do a real test it does not make sense to "experiment with the settings".
One may think that for a test it can be set up temporarily but "set up temporarily" does not make sense too because what exactly should it mean to "set up temporarily"?
Either it is actually set up for a real test in the real system or something else is done to fake a test to make it look as if a real test happens but in fact nothing is changed in the system.
If it is actually set up for a real test in the real system, the test can have two kind of results from the system's point of view:
- It leads to a destroyed system.
- It leaves the system intact.
For the system and the YaST module it does not matter whether or not the test was "successful" regarding what the user intended with his settings.
All what matters is whether or not the system still works after the test because:
If the test destroyed the system, how should YaST go back to the state before the test? I think we would not like to make a complete system shapshot before starting any YaST config module.
If the system still works after the test, the user can decide as he likes:
- Either to edit or delete what was set up
- or to keep what was set up.
If the user wants to keep what was set up, it does not make sense to delete it after the test and set it up again when finishing.
If the user does not want to keep what was set up, he can edit or delete it.
I think "changes get written only when finishing YaST" is wrong because the "only" forbids any real test without gaining any other benefit.
Furthermore it may happen that one setup conflicts with another setup but if each setup was deleted after the test, both setups could be tested "successfully" but when setting up both when finishing it does not work. The result are unfriendly error messages while a YaST module finishes but the user cannot do anything at this stage. Additionally it makes the implementation more complicated and therefore results more bugs. For example when a print queue is deleted and a new queue with the same name is set up, the implementation could not just delete it, but must somehow fake in the user interface as if it was already deleted and as if the new one was already set up until the actual deletion and set up happens during "finish" but what should it do when the deletion or set up fails for whatever reason?
Note that it depends entirely on the particular case what exactly "one setup" is according to the above definition.
For example:
- Add, modify, or delete one print queue is each "one setup" even if there can be several print queues for one printer.
- Activate or deactivate one scanner driver is "one setup" even if one scanner driver can be used for serveral scanners.
- Add a new harddisk and and do all what is necessary to move for example data from existing /usr/ and /var/ directories to new partitions on the new harddisk is "one setup" for a harddisk management tool. In this particular case a "test" is usually impossible because a new partitioning scheme cannot be set up only for a test. Once it is set up, there is usually no way back.
"Just In Time" Configuration
A consequence of the transaction semantics for each "one setup" is that "just in time" configuration is possible.
As of this writing (May 2008) the current usual YaST module behavior is that during startup all information is retrieved from the system (which matches to the behavior to write all settings only when finishing).
This can lead to longer delays during startup because it must read all information at this stage regardless what will be actually needed later by the user.
For example:
- Why autodetecting printers if an existing queue should be deleted or if printing in the network should be set up? Only if the connection is to be modified, printer autodetection results are needed.
- Why retrieving always several thousand printer model and driver descriptions (i.e. PPD file descriptions) when no printer driver is to be added or changed but something else should be set up?
In contrast "just in time" configuration means that for each configuration task the particular needed information is retrieved only when it is actually needed, usually when the matching dialog shows up.
Accordingly the settings for each configuration task are written to the system when each configuration task is done (which is the above transaction semantics for each "one setup") so that the new settings are available when another "just in time" configuration dialog retrieves them from the system.
Strict Compliance With CUPS
How to set up a print queue in full compliance with CUPS:
- Retrieve autodetected printers and their correct matching DeviceURIs from the cupsd: Run "lpinfo -l -v" (or get the exact same information via appropriate CUPS library calls).
- Retrieve available printer driver descriptions from the cupsd: Run "lpinfo -l -m" (or get the exact same information via appropriate CUPS library calls).
- Let the user select a printer/DeviceURI from the first list and a printer driver from the second list and let the user supply an arbitrary queue name.
- Set up the queue: Run "lpadmin -p queue_name -v DeviceURI -m printer_driver -E" (or do exactly the same via appropriate CUPS library calls). There is no re-start of the cupsd needed to add, modify, or delete print queues (only a config change of the cupsd itself requires it to be re-started).
A nice positive side-effect of "strict compliance with CUPS" together with "just in time configuration" is that it is usually possible to run more than one YaST printer module simultaneously or the YaST printer module and whatever other printer config tool (e.g. CUPS command line tools, CUPS web frontend, the KDE or Gnome printer config tool) simultaneously without running into real problems. For example it does not cause any problem when several printer config tools add, modify, or delete queues when the actual writing happens via "lpadmin" command line calls (or via appropriate CUPS library calls) because the cupsd keeps the consistency if many "lpadmin" calls happen at the same time. But this does not mean that it is possible to do arbitrary different kind of configuration tasks simultaneously without running into any problem. For example when one user changes the basic cupsd configuration (e.g. switching to "client-only" where there is no local running cupsd) and another user tries to add, modify, or delete queues (where a local running cupsd is required), the "lpadmin" call would fail (but it would not destroy the CUPS printing system).
The YaST printer module up to openSUSE 11.0 (i.e. the "official" one, not my experimental module which is in full compliance with CUPS) does not work in full compliance with the CUPS printing system.
- It uses additional stuff to autodetect printers (e.g. "hwinfo" or inspecting whatever files directly) which leads to problems when it is a device which the cupsd does not know or knows under a different DeviceURI (the setup may fail or the queue may not work).
- It does not retrieve the printer driver information from the cupsd but inspects the PPD files in the /usr/share/cups/model directory directly. This was sufficient up to CUPS 1.1 but nowadays PPD files can be also generated on the fly via programs in the /usr/lib[64]/cups/driver directory (e.g. /usr/lib/cups/driver/gutenprint.5.0), see "man cups-driverd" so that some driver information is missing.
- It re-starts the cupsd much too often (each time when it finishes) which disrupts all actively printing jobs (really bad on a print server under higher load).
Different Workflow What Actually Happens
The "All-in-one Dialogs" together with the "Just In Time Configuration" results a different workflow what actually happens while the module is running.
As of this writing (May 2008) the current usual YaST module workflow is:
- During startup read all information from the system.
- Show whatever dialogs are needed to let the user do all his configuration tasks and keep all settings only internally.
- When finishing write all settings to the system.
This is the traditional way of data processing:
- Input
- Processing
- Output
The traditional way is no real (i.e. no bidirectional) communication between user and system. The dialogs might look as if there is such a communication but actually it happens only between the user and the GUI but not between the user and the system simply because nothing is done regarding the system until the whole module is finishing and then it is too late for a bidirectional communication (see "unfriendly error messages" above).
The experimental YaST printer module workflow is basically the same as the traditional workflow but it is done for each "all in one dialog":
- During startup of an "all in one dialog" read the information from the system which is needed to show up this particular dialog.
- Show the dialog and let the user do the single configuration task which belongs to the current dialog. Depending on the current individual user settings, keep the settings internally or write them instantly to the system or read more information from the system.
- When finishing the current "all in one dialog" write all settings which belong to the current dialog to the system.
Example:
Assume that the user's "global" configuration task is to replace the printer for the queue "lp" with a different model. This results two single configuration tasks because in this case it is usually more complicated for the user to change all settings for the queue than to simply delete and re-create it:
- Delete the "lp" queue.
- Set up a new "lp" queue for the new model.
The old (traditional) workflow is:
- During module startup read all information from the system (i.e. all queue information, all printer driver descriptions, and autodetect printers).
- Show the old queue in the "Overview" dialog.
- Let the user select the old queue to be deleted.
- Remove the old queue only from the dialog view (but actually don't delete it in the system).
- The user clicks the [Add] button.
- Show the "Add" dialog.
- Let the user do the settings for the new model.
- When finishing the "Add" dialog go back to the "Overview" dialog and show the new queue only in the dialog view (but actually don't set it up in the system).
- After finishing the "Overview" dialog, actually delete the old queue in the system and set up the new queue in the system.
The new workflow is:
- The "Overview" dialog reads queue information from the cupsd.
- The "Overview" dialog shows the old queue.
- Let the user select the old queue to be deleted.
- Let the cupsd remove the old queue from the system.
- The "Overview" dialog reads queue information from the cupsd.
- There is no longer the old queue in the "Overview" dialog.
- The user clicks the [Add] button.
- The "Add" dialog reads printer driver information and autodetected printer information from the cupsd.
- Show the "Add" dialog.
- Let the user do the settings for the new model.
- When finishing the "Add" dialog, let the cupsd set up the new queue in the system and go back to the "Overview" dialog.
- The "Overview" dialog reads queue information from the cupsd.
- There is the new queue in the "Overview" dialog.
Consequently the buttons to finish an "all in one dialog" are no longer labeled "Next" but e.g. "Finish Add" or "Finish Modify" to make it clear that such a button finishes a single configuration task.
Note the difference: The deletion of the old queue happens within the "Overview" dialog while the setup of the new queue happens while finishing the "Add" dialog. The reason is that for deletion only a single value - the queue name - is needed while for a new queue three values - connection, driver, queue name - are needed so that three values must be collected before the queue can be set up.
Imagine what happens in case of the old workflow when the user deletes first the old queue, then replaces the model, and finally tries to set up the queue for the new model: Would the new model be automatically autodetected? Of course not. The user must manually click a [Restart Detection] button. Imagine what happens under the same circumstances when a printer autoconfiguration tool like cups-autoconfig (see http://code.google.com/p/cups-autoconfig/) creates a new queue as soon as the new model is connected: Would the new queue show up automatically in the "Overview" dialog in case of the old workflow? Not at all! Even with the new workflow the new queue shows up only when the "Overview" dialog is re-launched but at least it is not totally ignored.
Screenshots

Overview (local and remote queues and their matching buttons are separated)

Overview (local and remote queues in one list)

Overview (only local queues)

Overview (only remote queues, the modify and delete button line is disabled)

Add a new queue

Modify existing queue

Modify existing queue in 82x28 text mode (horrible)

Modify driver options

Driver options with combo boxes (squashed)

Printing via network

Sharing and publishing local print queues via the network


Overview
Overview with two lists:
Local and remote queues and their matching buttons are well separated shown to the user in two lists.
Overview with one list:
All available queues are shown in one list and all
buttons are shown below this list.
The user can filter out remote or local queues.
In this case the buttons change accordingly (i.e. disabled modify and delete buttons for a remote queue).
Comparison:
Remote queues are shown in the overview in any case by default to make the user aware when there are already queues to print in the network (e.g. via the default CUPS Browsing) so that the user knows when he can just print in the network without the need to set up anything. This default cannot confuse a home-user without a network because when there are no remote queues none are shown so that the home-user has implicitely a "local-only" view.
Having local and remote queues and their matching buttons well separated has the advantage that it is obvious that there are two kind of queues which look the same but which are actually different regarding how they can be configured (remote queues not via [Modify]/[Delete] but via [Printing in the Network]).
Disadvantages:
- For a stand-alone system without network (e.g. a home-user system) the remote queues list is useless (always empty) and might even confuse the user.
- For a personal workstation in the network without a locally attached printer the local queues list is usually useless (usually empty - in particular when there is a CUPS server in the network).
- For a big print server in the network with many local queues the remote queues list is usually useless (usually empty) and wastes space to show more of the local queues.
Because of the disadvantages I think that it is better to have local and remote queues mixed up in one list and accept that then all buttons are also mixed up.
Add a new queue
Adding a queue happens now in three basic and mandatory steps in one single dialog:
- Select the printer device via its connection
- Find and assign a suitable driver
- Name queue
This and only this items are mandatory to set up a new queue. Anything else is optionally and must not appear in this dialog.
Local connections (USB, parallel port, ...) are shown per default.
Users who wish can get a list of more available connections.
Users who wish to make detailed/special/sophisticated settings can use the connection wizard or the driver wizard.
Modify existing queue
The modification dialog is similar to the add dialog regarding the basic settings (the queue name cannot be changed in CUPS):
- Modify the printer device and/or its connection
- Exchange the driver
Plus additional stuff like
- Change the option settings of the currently used driver
- Modify the description string
- Add or modify a location string
Plus special stuff like
- Enable/Disable the queue
- Banner settings
- Access settings
It seems there is currently too much in one dialog here because it looks horrible (and is practically unusable) in a usual small text mode window.
This causes the question what is better:
Split stuff which actually belongs together and spread it over several small dialogs in any case or do the work twice and implement two kind of dialogs: one big dialog for the GUI and several splitted small dialogs only for text mode?
Perhaps it helps to use tabs for
- Basic settings which are
- Modify the printer device and/or its connection
- Exchange the driver
- Driver settings (i.e. change the option settings of the currently used driver) like
- Paper size
- Resolution
- other driver settings...
- Description and Location settings
- Enable/Disable
- Banners
- Access control
Squashed Content
Another issue is that the YaST GUI system does not support scroll bars when there is more content than what fits into the current window of a dialog.
See how "nicely" the combo boxes get squashed if driver options are implemented with combo boxes. Therefore the driver options must be implemented with a widget which supports scroll bars. I think combo boxes are the native way to set the driver options but I cannot use them. I don't want to have driver options artificially split over several dialogs with awkward additional "forward/more" and "backward/less" buttons as a workaround for the missing functionality of a scroll bar in the dialog.
Note the subtle difference: YaST widgets do support scroll bars but the dialog window which contains all the widgets does not. The astounding reason is that this is no bug but intentionally to make sure that dialogs are not overcrowded with too many widgets. It seems to be "better" when the GUI destroys the content than having scroll bars to provide the full content. Personally I think it is in any case a major bug when the GUI destroys the content.
Even if a dialog is overcrowded with widgets and scroll bars result a dizzying feeling as if one uses a magnifying glass to view the dialog, the dialog would be still usable (not nice to use but usable) in contrast to now where the dialog becomes unusable.
By the way 1:
Perhaps the missing scroll bars for dialog windows is the underlying reason why the modify dialog in 82x28 text mode becomes also unusable destroyed?
By the way 2 - regarding "magnifying glass":
I don't know if the YaST GUI supports to increase and/or decrease the size of the elements in a dialog (i.e. something like web browsers support for the font size)?
Release Candidate 2
http://old-en.opensuse.org/User:Mschmidkunz
In contrast to the YaST printer module in 10.3 the redesign shows a tremendous simplification:
- depth of workflow was reduced from 9 levels to 3
- overall number of screens was reduced from over 30 to 10
- technical short wording was replaced by explanatory wording, which is easy to comprehend
- dialog layout which also confused expert users was replaced by simple, meaningful layout
The first feedbacks revealed a great sense of confusion about the amount and design of information presented in the overview. So there is a redesign then :-) The space acquired by help was used for an overview. Help as such will not be dropped it will move to a button within the navigation area. One thought was to hide "print via network", "sharing" and "CUPS autoconfig" under a "Settings" category, but this idea was dropped as the word "Settings" as such is quite meaningless.
The crucial points are:
- By starting the module per default with the "Show All" settings it is avoided that e.g. a desktop user in the network environment doesn't realize that there are already existing queues and starts to add a new queue.
- "Print Via Network" should be very prominent because that is the point users should go to, when they want/are only able to use printers in a network.
Note: The screenshots below have some minor errors (e.g. missing icon, correct navigation button order, correct help display). Additionally, we all know, when you make selection with radio buttons the are below the unselected radio button is usually disabled. I left it enabled on purpose because I want to improve the readability of the mock ups.
Workflow
Workflow of YaST printer module after redesign according to RC 2.
Overview

Printer overview with remote and local queues (Default View: "Show All")
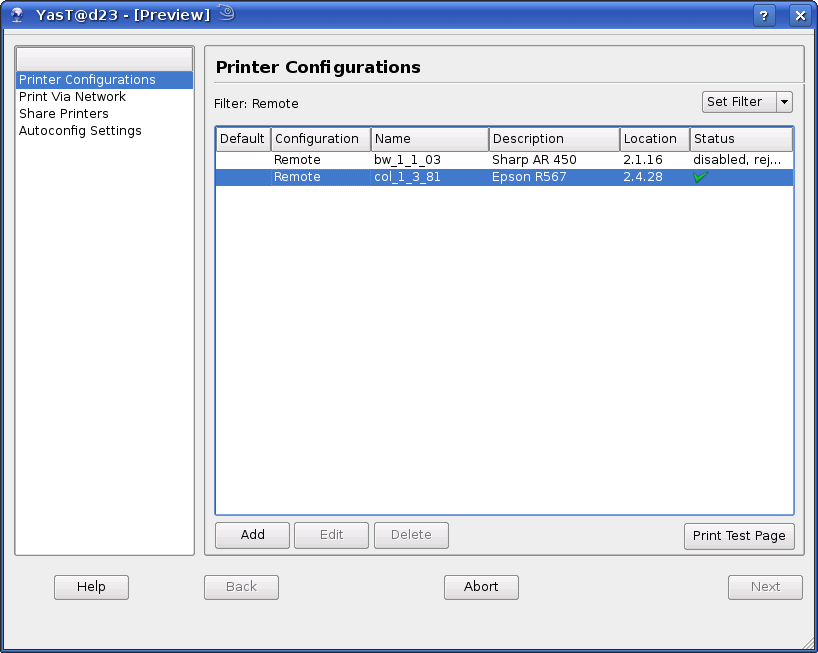
Printer overview with remote Queues filteres
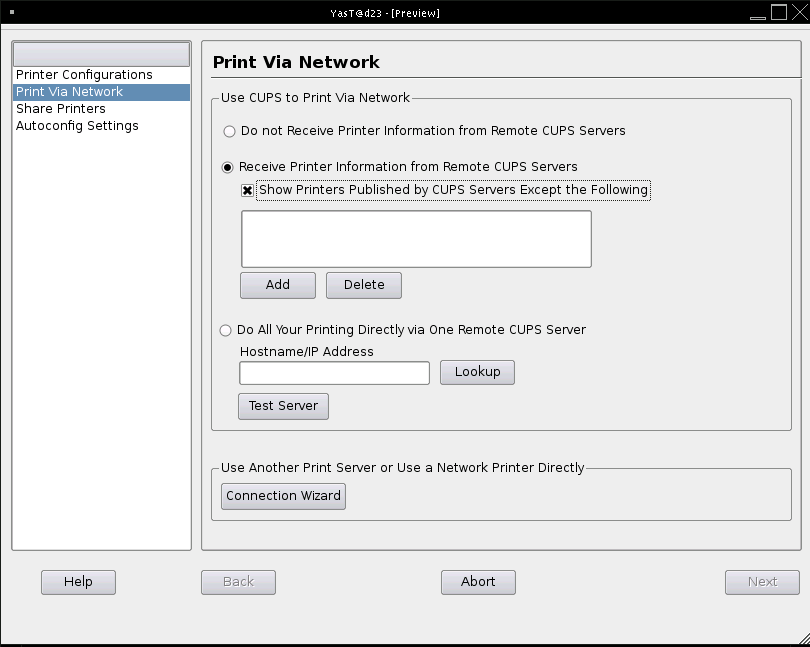
How do I print in the network?
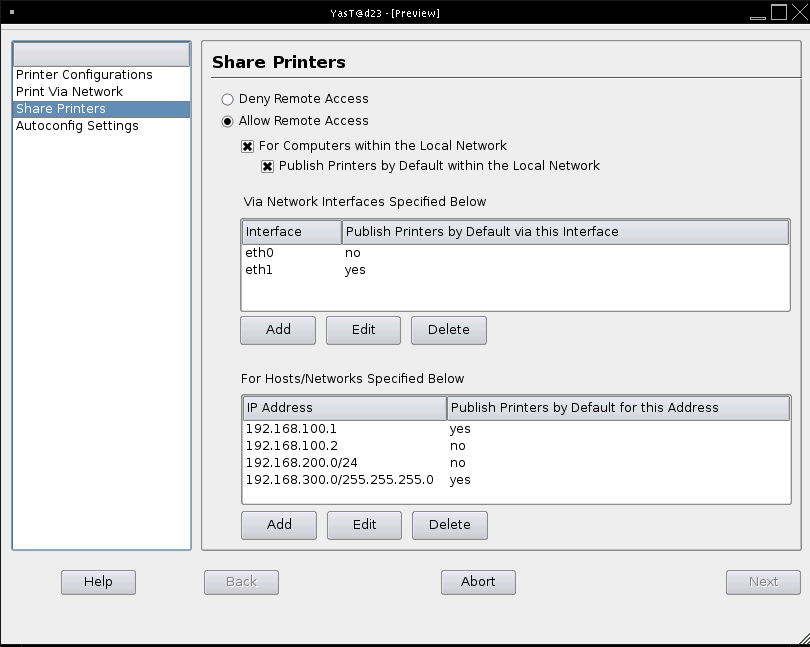
Who is allowed to access my printer configurations and whom do I publish them?
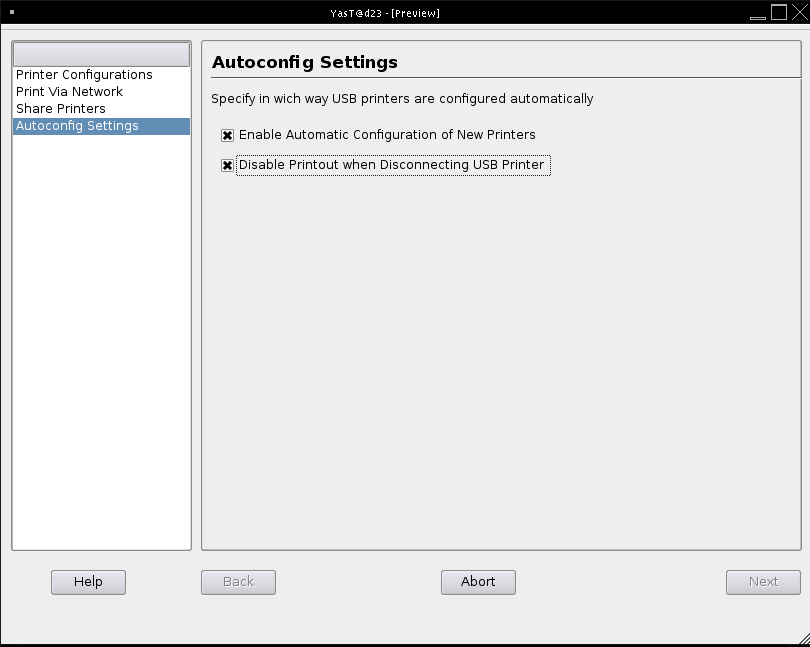
Settings for automatic CUPS configuration
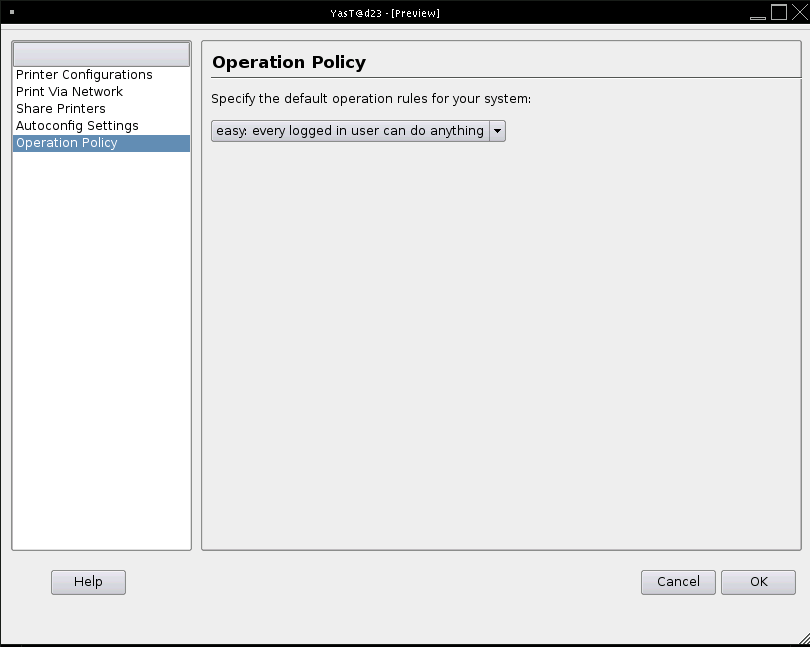
Policy: who is entitled to do which operation?


Add New Queue

Add new queue

Modify Printing Queue

Basic settings

Printer options
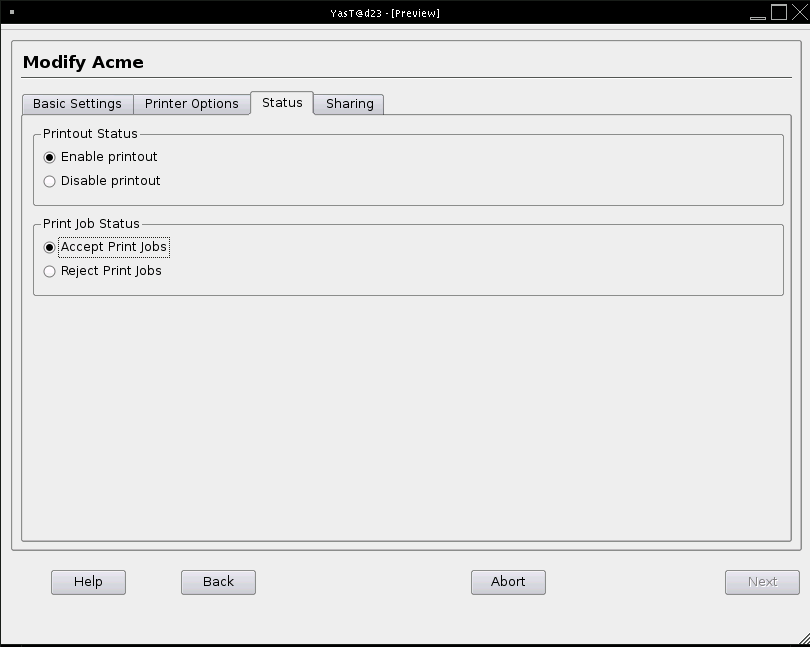
Status

Sharing


Connection Wizard
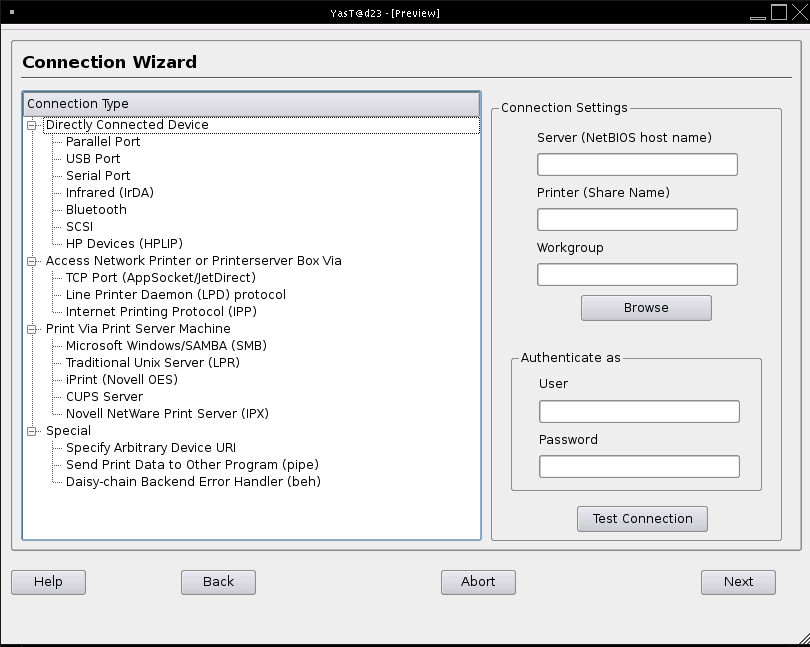
Connection wizard for SMB
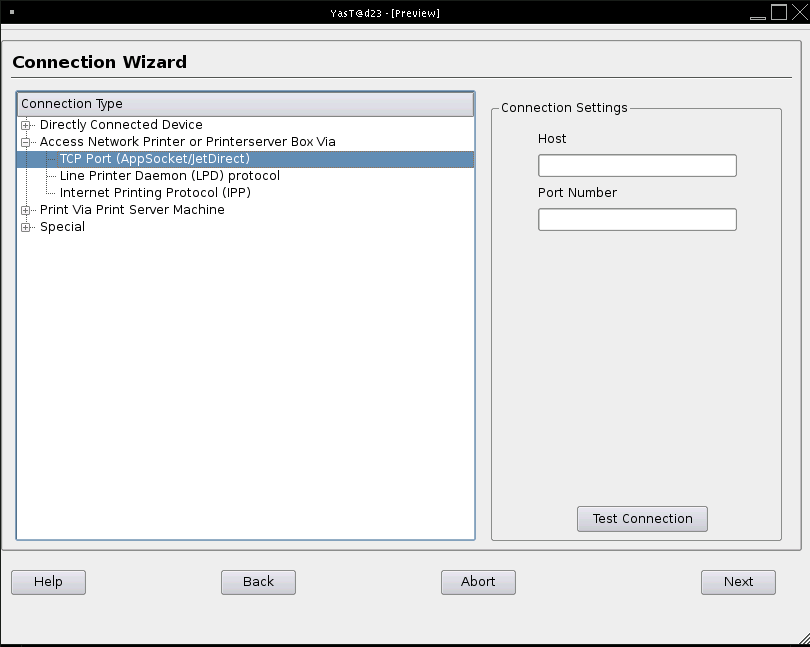
Connection wizard for TCP

"Connection Wizard" dialog after user selects "Use a Network Printer Directly" in the "Print Via Network" dialog


Connection Wizard
If a connection is not detected automatically the user can add it manually with this dialog.
The tree view on the left provides an overview of all available connection types. The corresponding settings for each connection type are displayed in the right window pane.
Add Driver
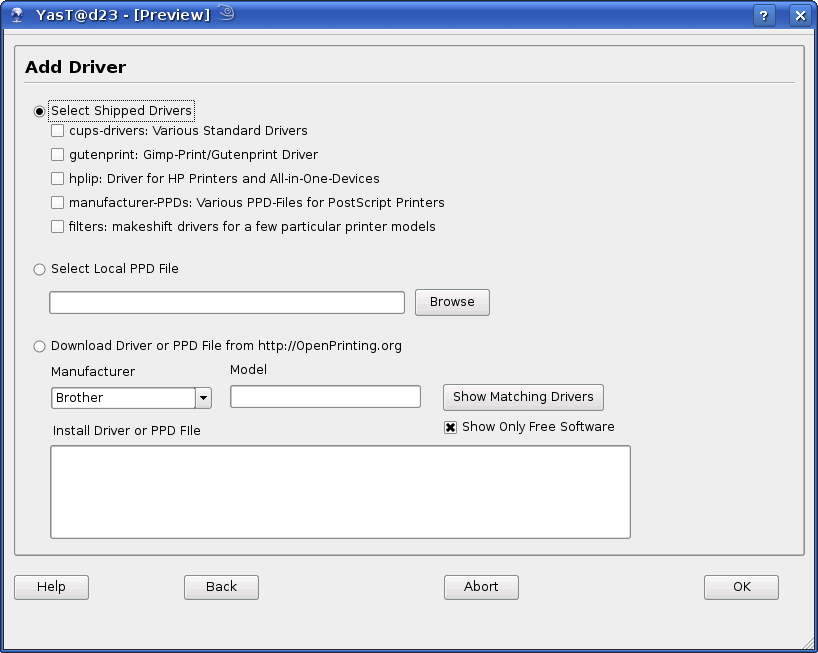
Add a driver

"Add driver" dialog with shipped packages already installed by user

"Add driver" dialog with "Download Driver or PPD" activated


Add Driver
If a driver is not available within the list of the add/modify dialog the user can add an additional driver within this dialog.
He can do it either by browsing his computer (or accessible computers within a network) or by downloading a driver from openprinting.org.
More Driver Options

More driver options

Under construction for openSUSE 11.1
The YaST printer module in openSUSE 11.1 is a complete rewrite from scratch based upon the experimental YaST printer module (see above #The_experimental_YaST_printer_module)
The old YaST printer module had become over many years almost unmaintainable.
This is just what happens over the time when a config tool which started at lprold/apsfilter times was adapted for LPRng/apsfilter and further on for LPRng/lpdfilter then to LPRng/lpdfilter+CUPS up to CUPS-only while at the same time CUPS changed also a lot.
At some point the only reasonable way to get rid of outdated stuff is to actually get completely rid of it.
To implement such a new design, it is easiest to start from scratch because almost all of the old code would have to be changed so that it is easier to simply start from scratch.
Currently (December 2008) there is some minor functionality missing.
In particular the "Connection Wizard" should work basically but some features (e.g. testing this or that connection type or printer autodetection via network) may not work. All connections of autodetected printers are directly available without using the "Connection Wizard". Initially only connections for locally connected autodetected printers are shown. To show also connections for autodetected network printers, click [More Connections]. To verify printer autodetection via network you may run as root the CUPS backend /usr/lib[64]/cups/backend/snmp manually but have in mind that this works only for those network printers which can be detected in the local network environment via some generic SNMP queries (which works usually for HP and Kyocera printers with a built-in network interface).
Of course a new design results new bugs. The most annoying one was https://bugzilla.novell.com/show_bug.cgi?id=468046 which is full of background information what actually happens while a print queue is set up.
Up to date packages
In particular the "Connection Wizard" should now work in a more reasonable way:
- An existing connection can be modified by the "Connection Wizard" which launches with a matching sub-dialog where the values of the existing connection are preset, see https://bugzilla.novell.com/show_bug.cgi?id=553871
- Added percent encoding of URI values in the "Connection Wizard", see https://bugzilla.novell.com/show_bug.cgi?id=561626
Up-to-date yast2-printer-2.20.x packages are available from http://download.opensuse.org/repositories/Printing/ for various openSUSE versions and for SLE11 and SLE11-SP1 (but not for SLE10) for 32-bit Intel compatible (i586) and 64-bit AMD (x86_64).
The openSUSE build service project "Printing" is the printing system development project, see https://build.opensuse.org/project/show?project=Printing
The "Printing" project may contain new, upcoming software.
Therefore the packages in the "Printing" project
might neither be in a stable state nor fit well into
currently installed systems.
Have this in mind if you think about to install
packages from the "Printing" project into your
currently running system.
Do not use "Factory" if your system is something else. Use the matching packages for your particular system. If you do not find exact matching packages, packages for an older system may work (e.g. packages for openSUSE 11.1 may work in a SLE11 or SLE11-SP1 system). In contrast installing packages for a newer system into your system is usually a very efficient way to completely mess up your system.
The packages are
- only for testing
- without any guarantee or warranty
- without any support
As an extreme example, this means that if your complete computer center crashes because of these packages, it is only your problem. On the other hand this does not mean that those packages are known to be terrible broken but they are not thoroughly tested so that any unexpected issue can happen, in particular when the cutting-edge yast2-printer version is used on an older openSUSE or SLE11 system. Usually there was only a "smoke test" (see http://en.wikipedia.org/wiki/Smoke_testing) on the one openSUSE workstation of the particular package developer.
The version number 2.20.x is higher than the version of the original package in your system so that you may have to remove an installed yast2-printer-2.20.x manually using (as root)
rpm -e --nodeps yast2-printer
before you could re-install the original package for your particular system.
Many thanks for testing it!